


Building a FullStack (BE/FE) Agent ↔ UI Application
Building an Agent API using FastAPI, and a React UI Frontend. Opik Agent Observability across the workflow.

Welcome to Neural Bits. Each week, get one deep-dive article covering advanced, production-ready AI/ML development.
Subscribe to join 4,700+ AI/ML Engineers for production-ready insights and tips gained from close to a decade in the AI industry.
The 4’th module on building Kubrick: The Multimodal Agent with eyes and ears.
Kubrick is an open-source, comprehensive course that walks you through building AI Agents that can process Videos, Audio, Images, and Text. You upload a video and can start chatting with it.
This course is structured in 6 modules, where you will learn how to:
Build Multimodal Data Pipelines, MCP Servers, and Video-RAG.
Build Tool Calling Agents from scratch, in Python.
Design a production-ready AI System, with LLMs, VLMs, RAG, and LLMOps.
Best practices in Python, FastAPI, and ML System Design.
📌 Here’s what Kubrick can do:
This course is done in collaboration with Miguel Otero Pedrido! 🙌
Course Modules
✅ Module 1: Cracking the Code of Multimodal AI Pipelines
✅ Module 2: Advanced MCP Servers for Your Agents
✅ Module 3: Tool Calling Agents from Scratch
📌 Module 4: Building a FullStack (BE/FE) Agent ↔ UI Application
⌛ Module 5: Coming Soon…
⌛ Module 6: Coming Soon…
Completing this course, you'll learn how to build an Agentic System that works with multimodal data. You'll gain hands-on experience in designing production-ready APIs (FastAPI) to host your agents, build MCP Servers and Tool Calling Agents, Multimodal agent RAG systems, and more.
This will allow us to build a Multimodal Agentic RAG and chat with Videos.
Find the complete roadmap for this free course: Kubrick Code Repository
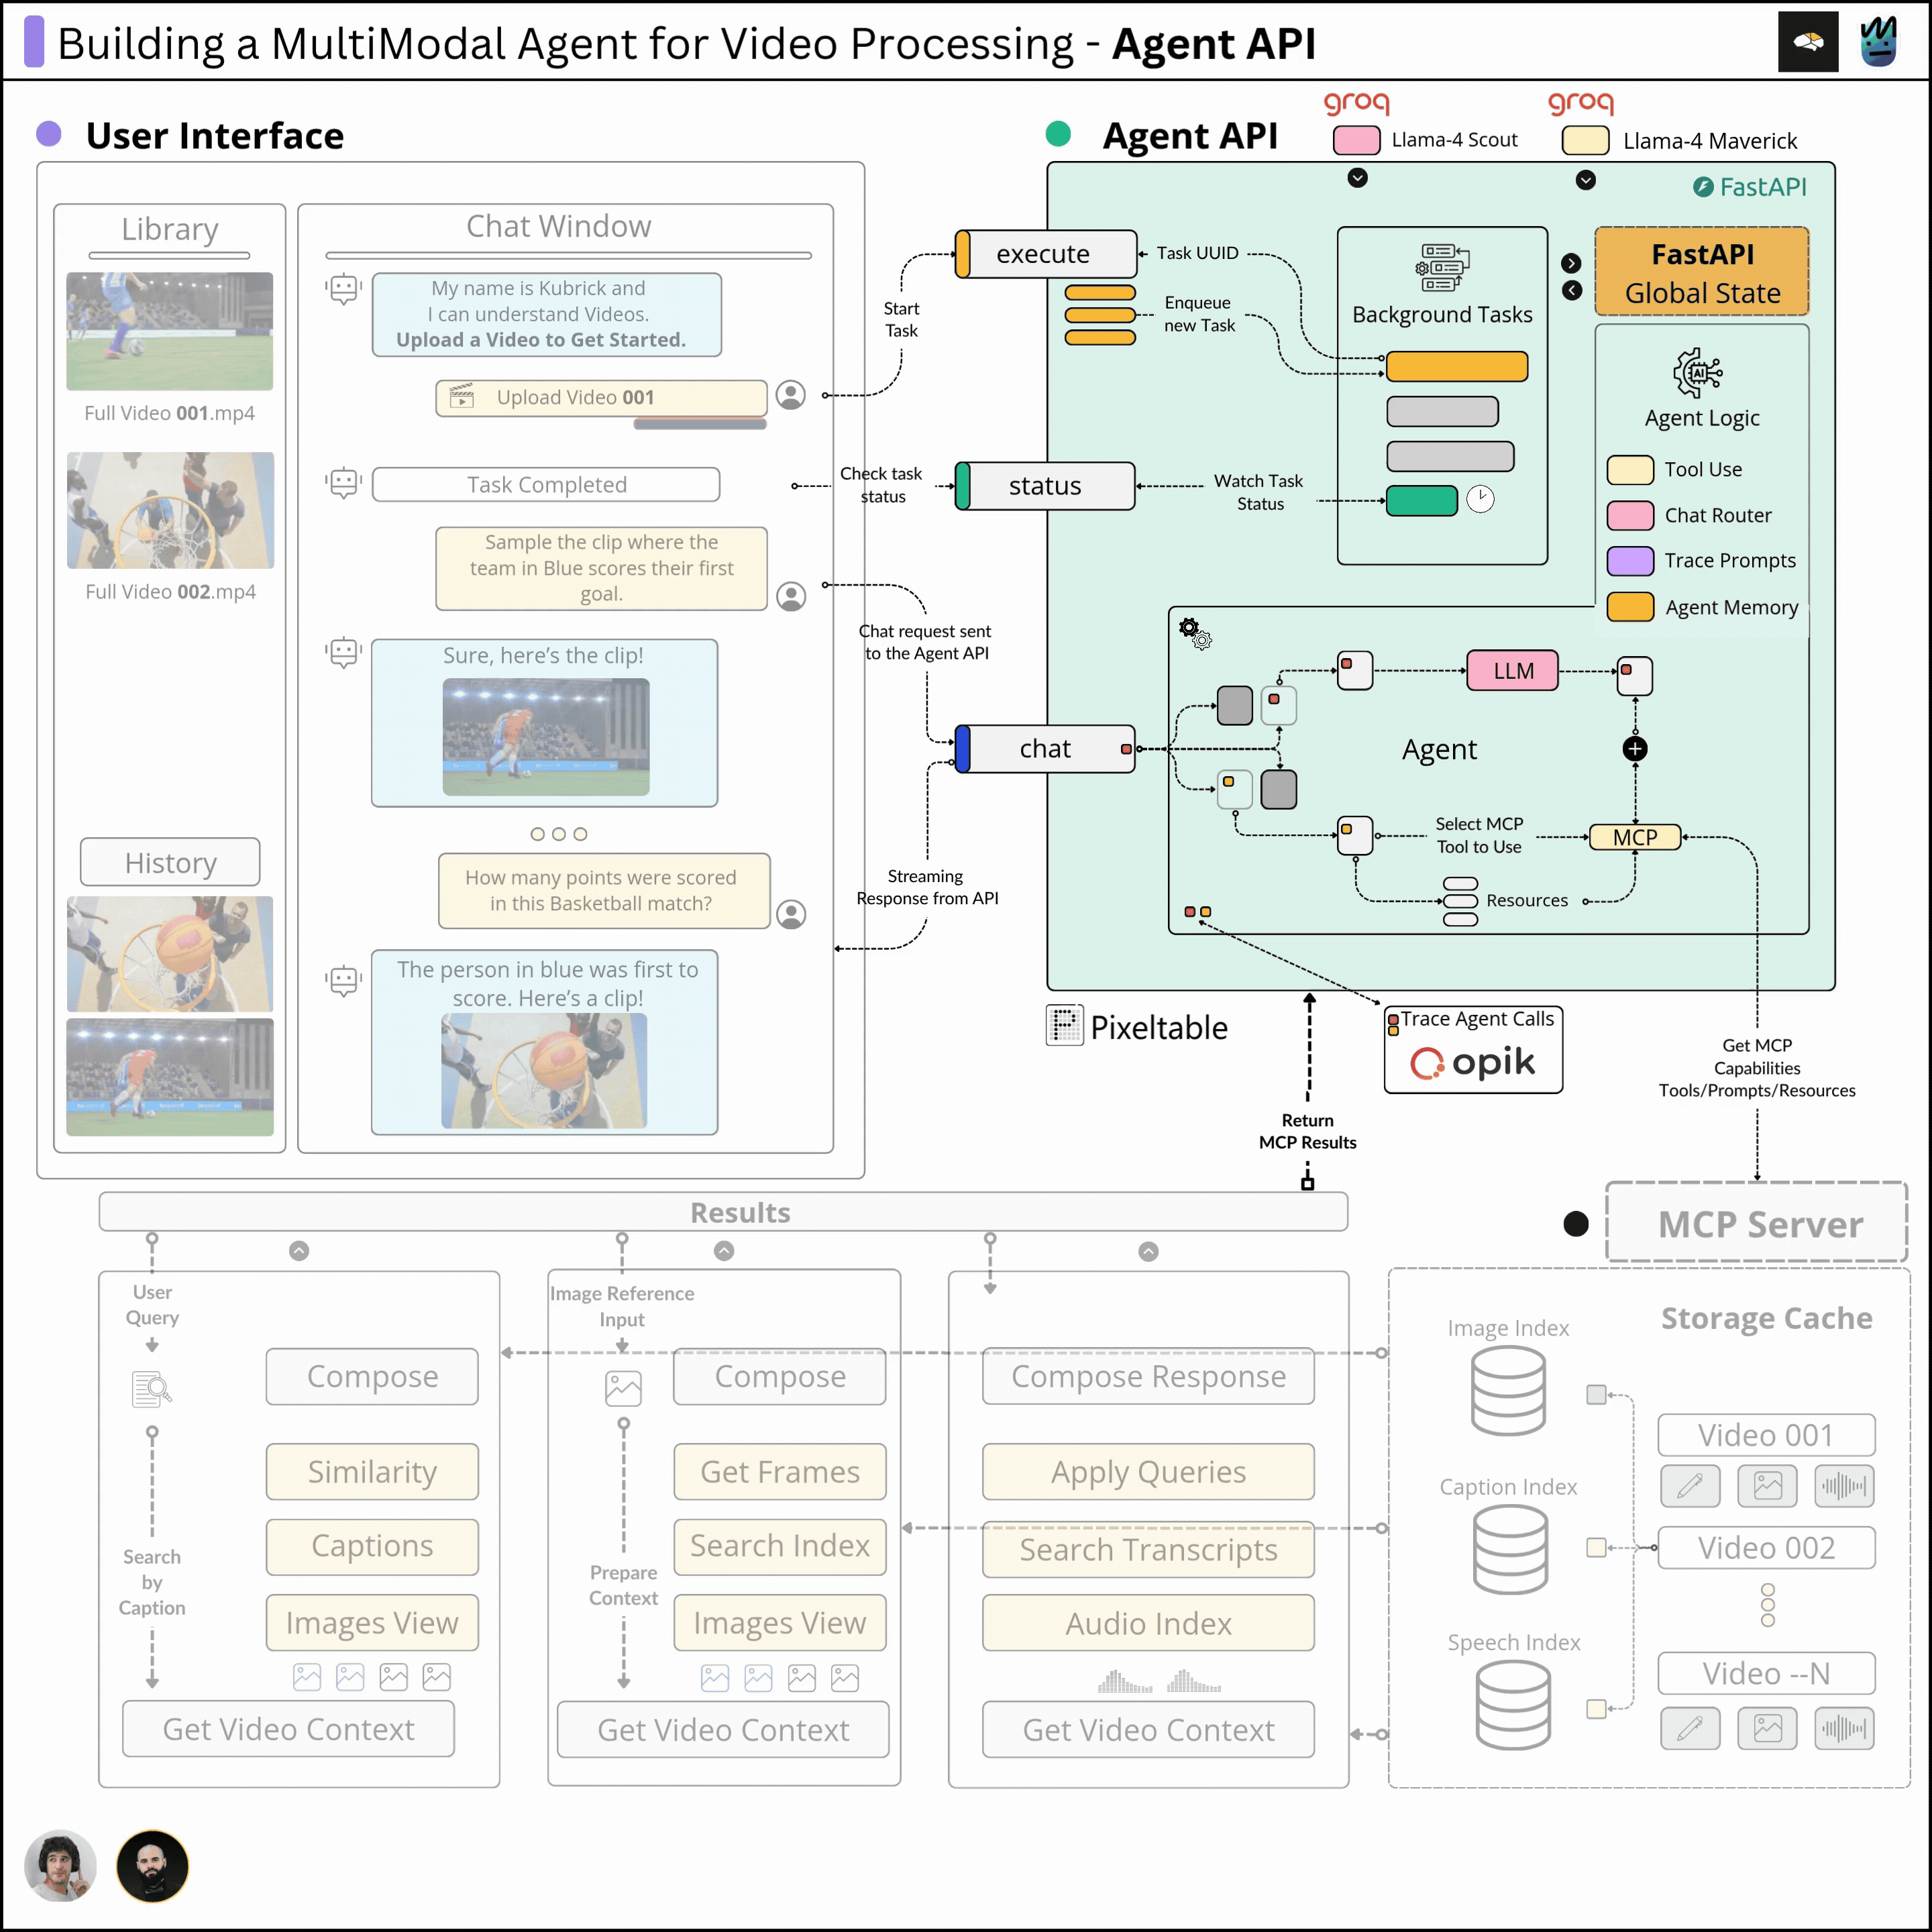
Building a FullStack (BE/FE) Agent ↔ UI Application
In the first module, we covered the multimodal data pipeline with Pixeltable.
In the second module, we covered the implementation of the MCP Server.
In the third module, we implemented the Agent logic from scratch.
In this fourth module, we’ll build the API to serve our Agent, cover the React implementation, and add LLMOps with Opik (by Comet).
Table of Contents:
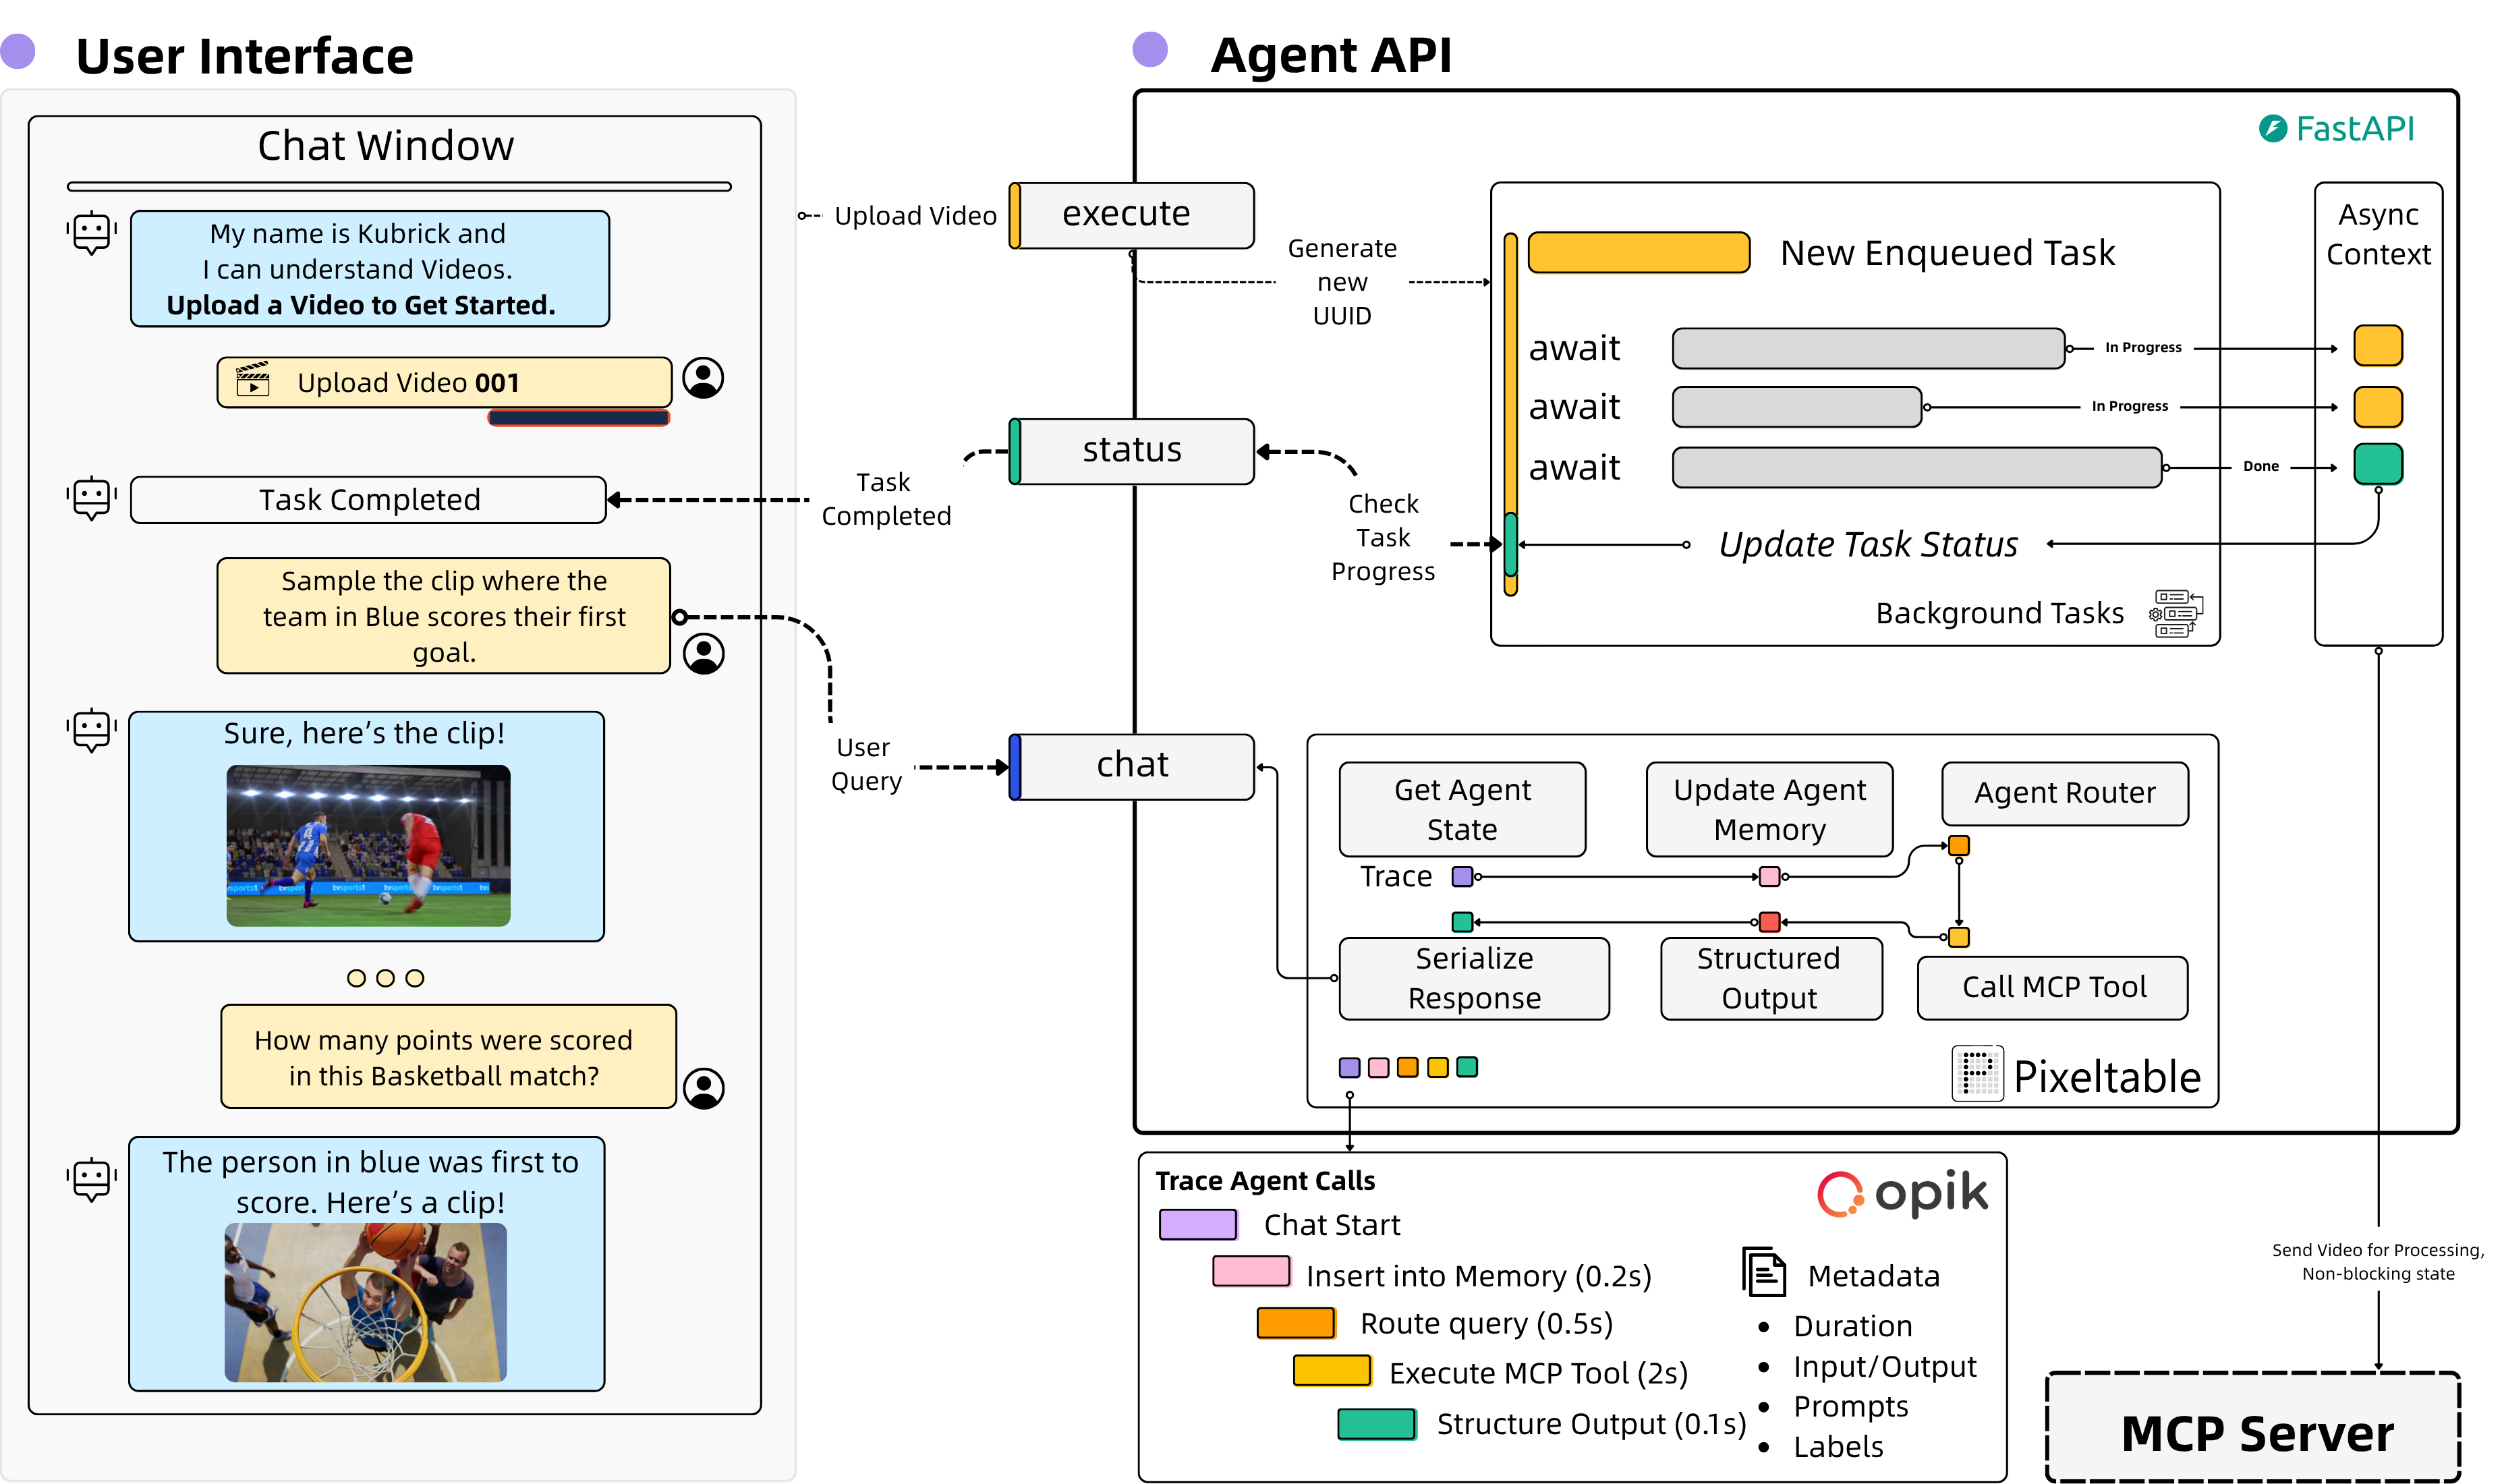
FastAPI and Background Tasks
What happens on the Frontend?
Agent Monitoring with Opik
Conclusion
1. FastAPI and Background Tasks
In production APIs, not every task needs to block the client while it is being completed. For instance, sending emails, logging user actions, or updating analytics can all happen after you've returned a response. FastAPI provides a clean, native way to do this using BackgroundTasks.
FastAPI's BackgroundTasks allows developers to defer function execution until after the response is sent. It is not a replacement for full-blown async workers like Celery, but it works great for third-party API calls, or and non-critical operations.

A service with long-running tasks, such as CPU-bound tasks, would follow a completely separate asynchronous task management workflow. As shown in the attached image, the long-running task is delegated to a Redis Broker, which schedules task execution on a Celery task queue.
Further, the Client could interrogate the Task Queue, using the Task ID to find out the task status and its duration.
In our example, the heavy processing is done on the MCP Part, and the Agent, which sits behind an API, submits a tool call request to the MCP to process it. Instead of using a separate Redis + Celery setup, we use Background Tasks to keep track of each task's status.
In this case, we have the `process_video` tool, which takes a video and generates the 3 multi-modal embedding indexes for Audio, Images, and Image Captions.
For each task, we create a unique ID (UUID) and push it to our BackgroundTasks queue. Further, we poll the task status via its UUID and update the frontend accordingly.
Here’s how we implemented it.
1.1/ We start by defining the TaskStatus Enum
We’ll use this to filter for the task status in a readable and reproducible way.
class TaskStatus(str, Enum):
    PENDING = "pending"
    IN_PROGRESS = "in_progress"
    COMPLETED = "completed"
    FAILED = "failed"
    NOT_FOUND = "not_found"
1.2/ We define a Background Tasks object on API Startup
@asynccontextmanager
async def lifespan(app: FastAPI):
    app.state.agent = GroqAgent(
        name="kubrick",
        mcp_server=settings.MCP_SERVER,
        disable_tools=["process_video"],
    )
    app.state.bg_task_states = dict()
    yield
    app.state.agent.reset_memory()
FastAPI, in the latest versions, offers a `lifespan` workflow that developers could use to define one-time, globally accessible attributes. These will be kept in the state object and accessible across all API requests and routers.
In older versions of FastAPI, this would be done using hooks such as `@app.on_event('startup')` for instantiations, and `@app.on_event('shutdown')` for deallocations. These hooks were deprecated, and replaced with the `lifespan` workflow.
In our example, we define the `bg_task_states` as a `dict()` that we’ll keep globally in the API state, hence `app.state.bg_task_states = dict()`.
Next, let’s see the API endpoint implementation for processing a video, which uses Background Tasks to enqueue the task and its state.
@app.post("/process-video")
async def process_video(request: ProcessVideoRequest, bg_tasks: BackgroundTasks, fastapi_request: Request):
    task_id = str(uuid4())
    bg_task_states = fastapi_request.app.state.bg_task_states

    async def background_process_video(video_path: str, task_id: str):
        """
        Background task to process the video
        """
        bg_task_states[task_id] = TaskStatus.IN_PROGRESS

        if not Path(video_path).exists():
            bg_task_states[task_id] = TaskStatus.FAILED
            raise HTTPException(status_code=404, detail="Video file not found")

        try:
            mcp_client = Client(settings.MCP_SERVER)
            async with mcp_client:
                _ = await mcp_client.call_tool("process_video", {"video_path": request.video_path})
        except Exception as e:
            logger.error(f"Error processing video {video_path}: {e}")
            bg_task_states[task_id] = TaskStatus.FAILED
            raise HTTPException(status_code=500, detail=str(e))
        bg_task_states[task_id] = TaskStatus.COMPLETED

    bg_tasks.add_task(background_process_video, request.video_path, task_id)
    return ProcessVideoResponse(message="Task enqueued for processing", task_id=task_id)
Let’s start with the method’s definition. Here we pass the `request`, `bg_tasks`, and `fastapi_request`.
`request` - comes from the UI and gets serialized as a Pydantic Model we built, which contains the video_path.
`bg_tasks` - is the global BackgroundTasks handler that FastAPI can inject into all requests.
`fastapi_request` - is the request object, which gives us access to FastAPI global state, and any other instantiations defined in the `lifespan` mechanism.
We proceed by creating a new UUID for the current task and capturing the task states dictionary we defined in the FastAPI State. Then, inside the same method, we define a sub-method to handle the task-enqueuing logic and return the newly-added task state.
For a new task ID, we set its status to the enum variable IN_PROGRESS, and proceed by connecting to the MCP Server and executing the `process_video` tool.
Since the media storage between the API and the MCP server is shared, we won’t return anything from the Tool Execution, asides from setting the Task Status to COMPLETED after the tool execution was successful.
After task completion, the video ID from the UI will point to the ID of the processed multimodal indexes that Pixeltable has generated, such that whenever we use another MCP tool, we could access the right embedding index using only these IDs.
Finally, the last call from this method is adding the newly created task to the Background Tasks, which will trigger the processing, without blocking the main API thread. This will allow us to send a response back to the frontend, right after we enqueued the task, enhancing the user experience.
2. What happens on the Frontend?
We built the frontend for Kubrick, using React.
React is a JavaScript library, developed by Meta (Facebook), for building user interfaces used to create web applications. The main advantage of React is that it allows developers to build interactive UIs using a component-based architecture.
Besides React, two other popular frameworks are Angular and Vue.js.
React is best for flexibility, Angular for large-scale applications, since it has a lot of built-in functionality, but is also stricter, and Vue can be considered as a mix of both.
Although we’ll not cover the UI implementation in all its detail, we’ll go over the key functionality steps of the frontend code. First, let’s see the component that handles a new video upload.
2.1/ The UploadedVideo Interface
In JavaScript (specifically TypeScript), an interface is similar to a Pydantic model or a dataclass in Python, as it defines the shape and expected types of an object.
When a field is followed by a question mark (?), it means the field is optional. For example, in the case of `taskId?: string`, the taskId can either hold a string value or be undefined (which is None in Python).
Fields without a question mark, like `id: string`, are required, and they must be present when the object is created.
interface UploadedVideo {
  id: string;
  url: string;
  file: File;
  timestamp: Date;
  videoPath?: string;
  taskId?: string;
  processingStatus?: 'pending' | 'in_progress' | 'completed' | 'failed';
}
Using this interface, we’ll have an Object model to keep track of the Videos we upload from the frontend and send to our backend API for processing.
2.2/ The UseState Hooks
After we define the required interfaces, we implement a functional React component to handle the logic.

In React we could have two types of components: Functional or Class based.
With the newset React version (v19), Functional components and Hooks became a standard.
Functional ones are simpler, more concise, and align closely with JavaScript code practices. We can control the app state or side effects, like data field updates in HTML using React Hooks, useState for state management, or useEffect to handle side effects.
A Class component is more verbose, similar to a Python class. We can implement the same functionality as with a Functional component, but this time we’ll use this.state to read the app state, or this.setState to change it.
A key detail of Class components is that they have Lifecycle methods built in, so instead of `useEffect` hooks, we’ll use `componentDidMount`, `componentDidUpdate` that target a specific side effect of a component update.
Done with the theory, let’s dive into the implementation!
2.3/ Implementing the Index Arrow Function ( () => {impl})
const Index = () => {
...
  const [uploadedVideos, setUploadedVideos] = useState<UploadedVideo[]>([]);
  const [activeVideo, setActiveVideo] = useState<UploadedVideo | null>(null);
  const [isProcessingVideo, setIsProcessingVideo] = useState(false);
  const [uploadProgress, setUploadProgress] = useState(0);
The anatomy of a UseState hook is the following:
const [read_value, update_value] = useState<value_type]2.4/ Implementing UploadVideo functionality
In the frontend, we have the `handleVideoUpload` method, which calls the `upload_video` endpoint of our API, passing in the video path, using the fetch library. The payload is structured as a `formData` object, which will automatically be serialized by FastAPI to a Pydantic Model we’ve defined for this schema.
  const handleVideoUpload = async (file: File) => {

    setIsProcessingVideo(true);

    try {
      const formData = new FormData();
      formData.append('file', file);

      const uploadResponse = await fetch('http://localhost:8080/upload-video', {
        method: 'POST',
        body: formData,
      });
...
}
Now, in the backend endpoint, we capture the formData into a `VideoUploadResponse` Pydantic model, and save the video under a unique ID, which will be used across all the processing requests. This helps the frontend and backend know which video to select whenever the user sends a query.
@app.post("/upload-video", response_model=VideoUploadResponse)
async def upload_video(file: UploadFile = File(...)):
    """
    Upload a video and return the path
    """
    if not file.filename:
        raise HTTPException(status_code=400, detail="No file uploaded")

    try:
        shared_media_dir = Path("shared_media")
        shared_media_dir.mkdir(exist_ok=True)

        video_path = Path(shared_media_dir / file.filename)
        if not video_path.exists():
            with open(video_path, "wb") as f:
                shutil.copyfileobj(file.file, f)

        return VideoUploadResponse(message="Video uploaded successfully", video_path=str(video_path))
    except Exception as e:
        logger.error(f"Error uploading video: {e}")
        raise HTTPException(status_code=500, detail=str(e))
2.5/ Implementing ProcessVideo functionality
On the frontend, after it receives a success status, we call the `process_video` endpoint of our API, which will create a Background task we discussed above.
...
      const processResponse = await fetch('http://localhost:8080/process-video', {
        method: 'POST',
        headers: {
          'Content-Type': 'application/json',
        },
        body: JSON.stringify({
          video_path: uploadData.video_path
        }),
      });
...
Same as in Section 2.4, we pass the payload as a JSON object with the video_path, and FastAPI will automatically serialize it into the `ProcessVideoRequest` Pydantic Model. Then, the background task is created, the MCP tool is executed, and we return the Task ID to the Frontend.
Once the Frontend function captures the response, we update our `uploadedVideos` from the useState hook with a new object.
const newVideo: UploadedVideo = {
        id: uploadData.video_path,
        url: fileUrl,
        file,
        timestamp: new Date(),
        videoPath: uploadData.video_path,
        taskId: processData.task_id,
        processingStatus: 'in_progress'
      };

      setUploadedVideos(prev => [...prev, newVideo]);
      console.log('🎬 New video uploaded and set as active:', newVideo.videoPath);
      setActiveVideo(newVideo);
Now, while we wait for the video to be processed in the Backend, we poll the task queue using the UUID of the video to see its current status.
2.6/ Polling the Video Task Status
The backend endpoint for task-polling gets a `task_id` as input, checks the TaskStatuses dict from our global FastAPI state, and returns its status as an Enum Value from the ones mentioned in Section 1.2.
@app.get("/task-status/{task_id}")
async def get_task_status(task_id: str, fastapi_request: Request):
    status = fastapi_request.app.state.bg_task_states.get(task_id, TaskStatus.NOT_FOUND)
    return {"task_id": task_id, "status": status}
On the frontend side, we have an `useEffect` hook, which polls this endpoint once every N (e.g 7) seconds.
  useEffect(() => {
    const pollInterval = setInterval(() => {
      uploadedVideos.forEach(async (video) => {
        if (video.taskId && video.processingStatus === 'in_progress') {
          try {
            const response = await fetch(`http://localhost:8080/task-status/${video.taskId}`);
            if (response.ok) {
              const data = await response.json();
              if (data.status === 'completed' || data.status === 'failed') {
                setUploadedVideos(prev => prev.map(v =>
                  v.id === video.id
                    ? { ...v, processingStatus: data.status }
                    : v
                ));
              }
            }
          } catch (error) {
            console.error('Error polling task status:', error);
          }
        }
      });
    }, 7000); // Poll every 2 seconds

    return () => clearInterval(pollInterval);
  }, [uploadedVideos]);
Here, we iterate through all the `uploadedVideos`, check their task IDs, and update their statuses. Once a task is completed for a specific video, the video component in the Video Library UI, a green Ready checkmark will be added at the bottom of that video.
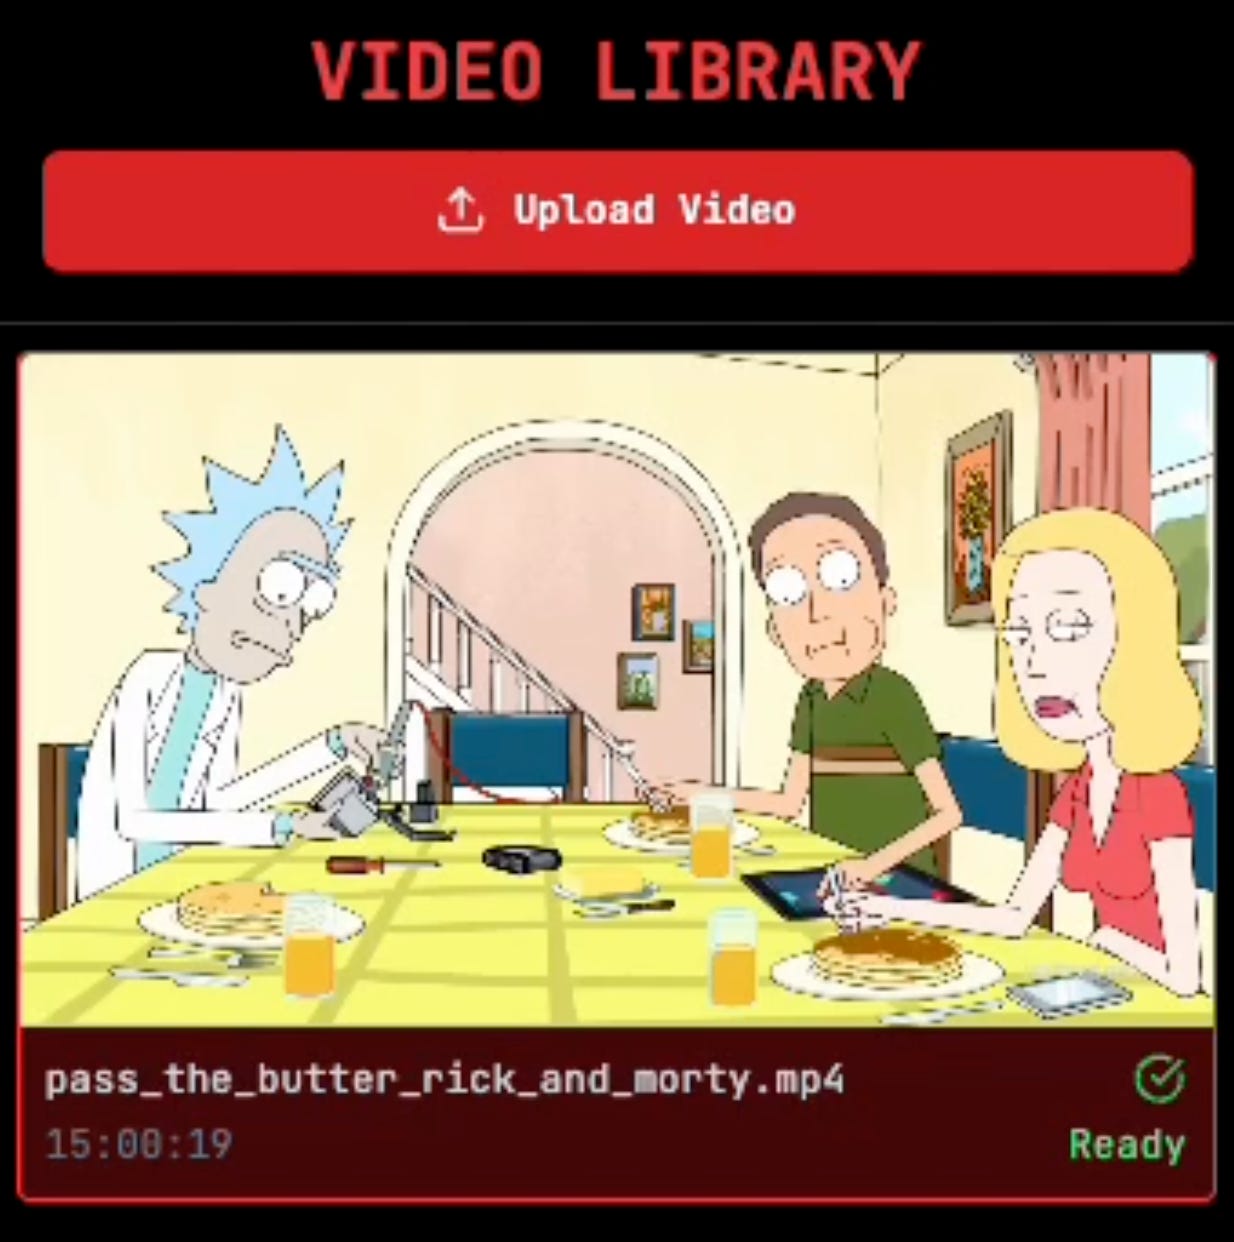
In case we have multiple videos uploaded, the videos that are not currently active, besides the `Ready` checkmark, will have a gray color transparent overlay, as shown in this example:
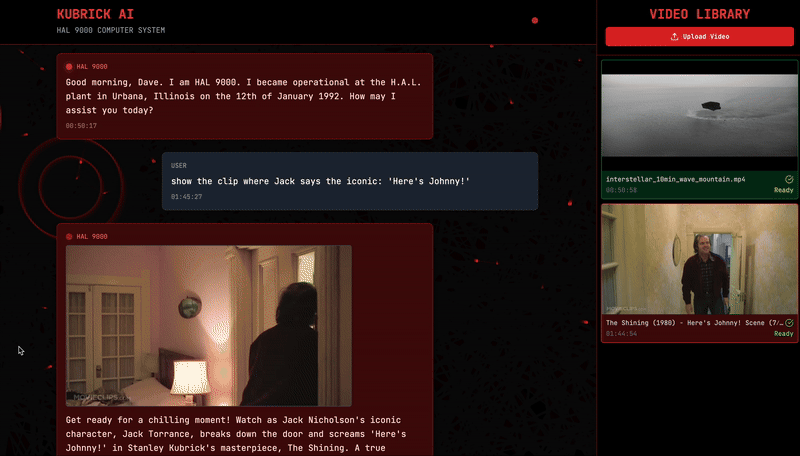
Now we can start chatting with the video, and the Agent will process, route, and answer our queries.
3. Agent Monitoring with Opik
Opik is an open‑source platform (by Comet ML) designed to help developers evaluate, test, track, and monitor applications built with LLMs and RAG. It provides key observability features for both development and production environments.
In our project, we used Opik for observability across the entire MCP Server - Backend Agent - Frontend UI system, to log and store Prompts in a Prompt Library for Prompt Engineering and full Agent Traces for end-to-end evaluation of how the Agent performs.
In code, we configure the Opik handler once, using the API key and Project Key we created on Opik’s Web dashboard, which sets the context across the runtime or the entire application.
import os

import opik
from loguru import logger
from opik.configurator.configure import OpikConfigurator

from kubrick_api.config import get_settings

settings = get_settings()


def configure() -> None:
    if settings.OPIK_API_KEY and settings.OPIK_PROJECT:
        try:
            client = OpikConfigurator(api_key=settings.OPIK_API_KEY)
            default_workspace = client._get_default_workspace()
        except Exception:
            logger.warning(
                "Default workspace not found. Setting workspace to None and enabling interactive mode."
            )
            default_workspace = None

        os.environ["OPIK_PROJECT_NAME"] = settings.OPIK_PROJECT

        try:
            opik.configure(
                api_key=settings.OPIK_API_KEY,
                workspace=default_workspace,
                use_local=False,
                force=True,
            )
            logger.info(
                f"Opik configured successfully using workspace '{default_workspace}'"
            )
        except Exception as e:
            logger.error(e)
            logger.warning(
                "Couldn't configure Opik. There is probably a problem with the COMET_API_KEY or COMET_PROJECT environment variables or with the Opik server."
            )
    else:
        logger.warning(
            "COMET_API_KEY and COMET_PROJECT are not set. Set them to enable prompt monitoring with Opik (powered by Comet ML)."
        )
Further, we use it to manage and version prompts on the MCP Server:
...
configure()
...
import opik
client = opik.Opik()

def routing_system_prompt() -> str:
    _prompt_id = "routing-system-prompt"
    try:
        prompt = client.get_prompt(_prompt_id)
        if prompt is None:
            prompt = client.create_prompt(
                name=_prompt_id,
                prompt=ROUTING_SYSTEM_PROMPT,
            )
        return prompt.prompt
    except Exception:
        prompt = ROUTING_SYSTEM_PROMPT
    return prompt
For the Agent interactions, we define a structured `Trace` composed of Agent interaction steps, using the `@opik.track(<trace_name>)` decorator, as shown in the GroqAgent implementation we covered in the previous Module 3.
For a short recap, we have this traced chain:
@opik.track(name="build-chat-history")
def _build_chat_history(...)

@opik.track(name="router", type="llm")
def _should_use_tool(self, message: str) -> bool:

@opik.track(name="tool-use", type="tool")
async def _run_with_tool(self, message: str, video_path: str, image_base64: str | None = None) -> str:

@opik.track(name="generate-response", type="llm")
def _respond_general(self, message: str) -> str:

@opik.track(name="memory-insertion", type="general")
def _add_memory_pair(self, user_message: str, assistant_message: str) -> None:

@opik.track(name="chat", type="general")
async def chat(...)
With each processing step our Agent executes, we will track verbose metadata.

And if we zoom in on a specific Trace (Figure 6), we can see the flow across the entire execution time-span, where each item has defined `inputs/outputs` and additional metadata logged alongside it.
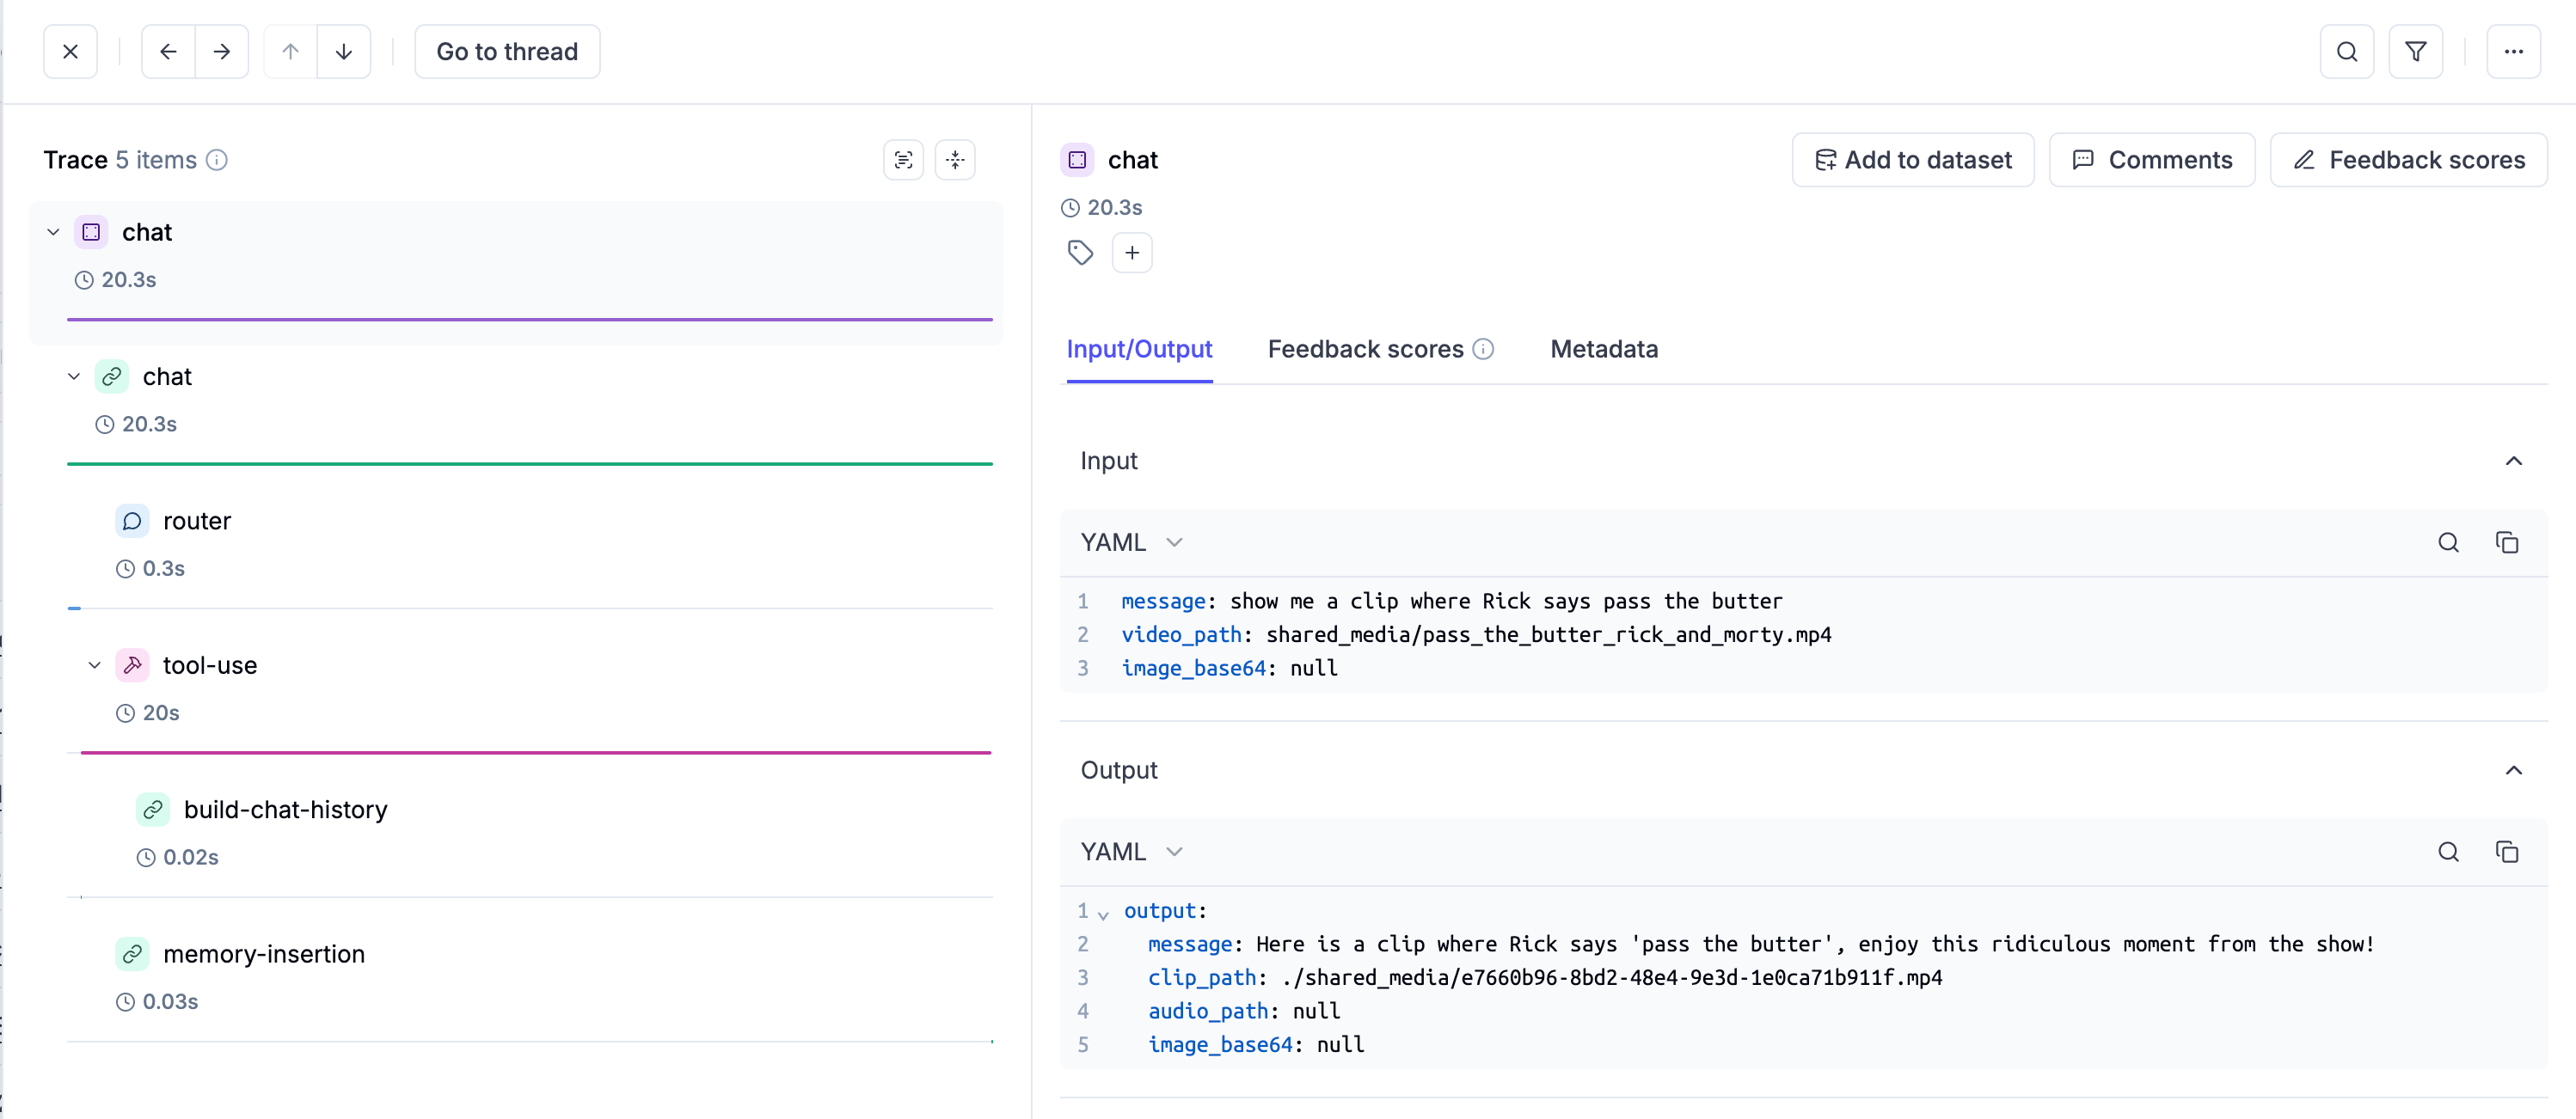
Additionally, for each method, we used the `@opik.track` decorator we set a unique thread ID using the opik context, which will help group Traces as part of the same conversation flow. Adding the following line:
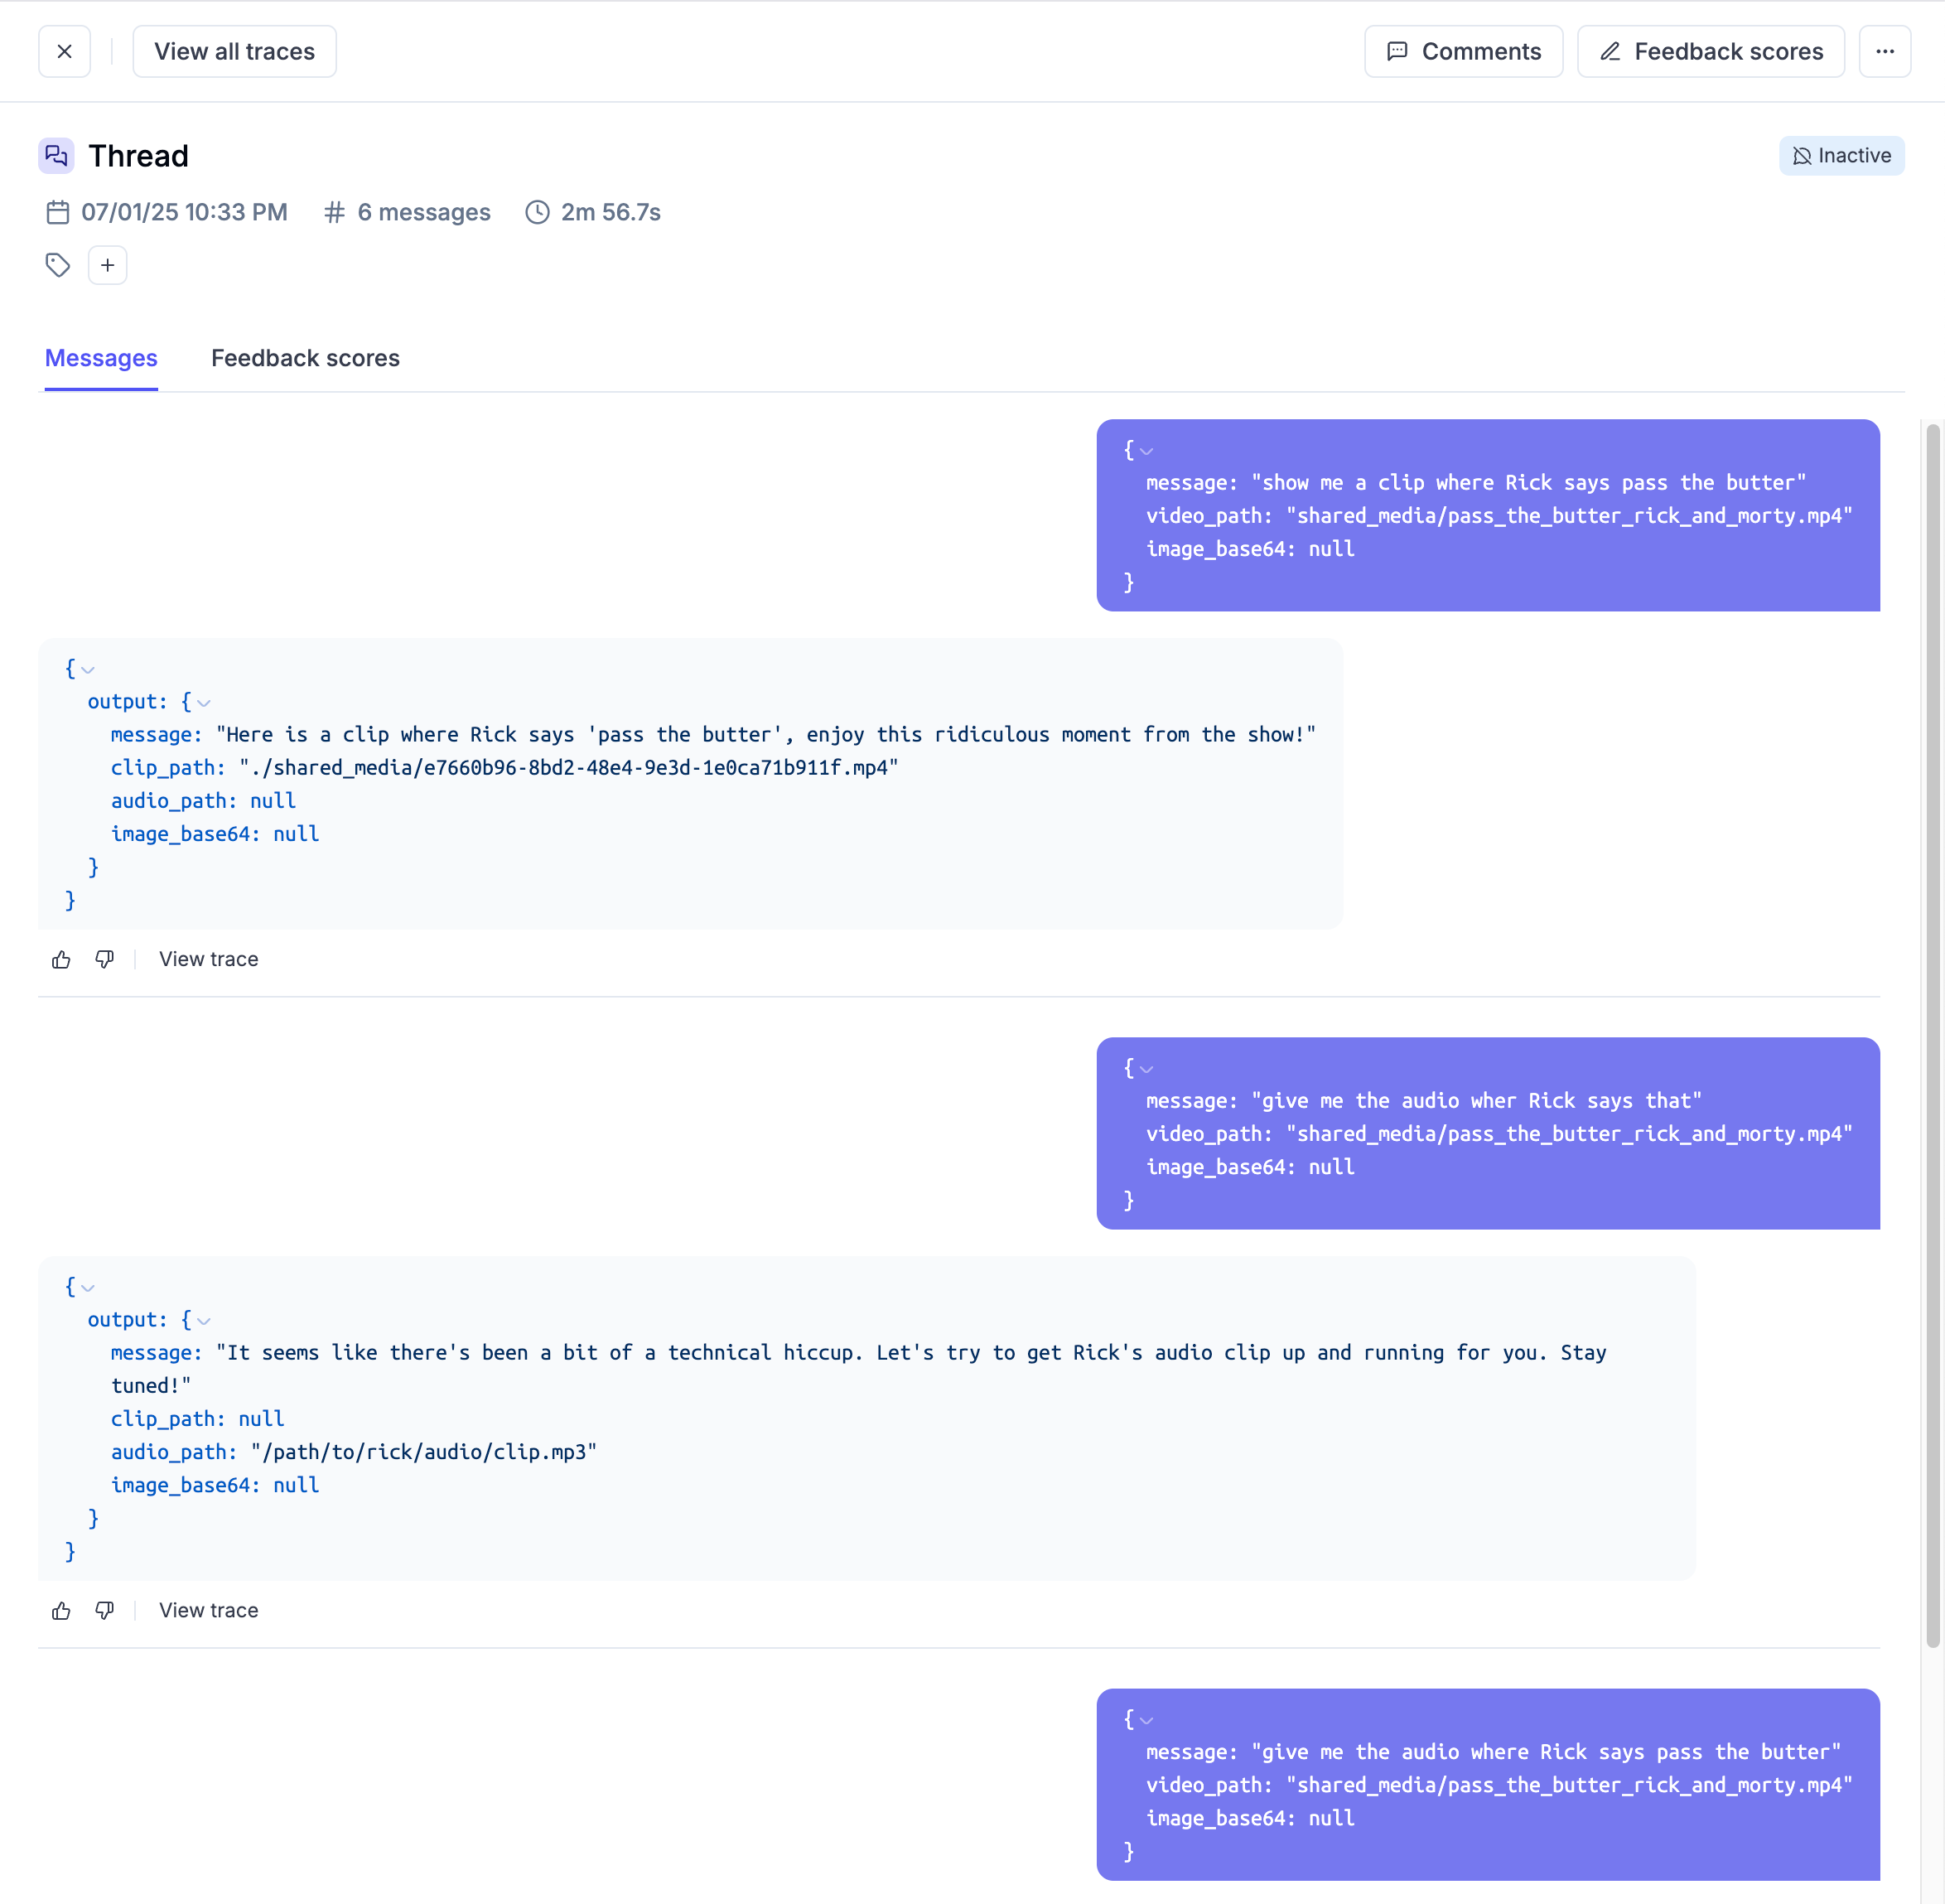
opik_context.update_current_trace(thread_id=self.thread_id)Will enable us to select the `Go to Thread` (Figure 6) button from the previous image and see an expanded view of the entire conversation, linked to this tracing thread, as shown in Figure 7.
For a deeper dive into Opik and the Agent integration, please see
’s video.

4. Conclusion
Let’s do a short recap!
In this module, we came full circle, covering the Agent API, the Backend implementation, and how the full-stack application works.
We started by unpacking how we delegate long-running tasks using FastAPI’s Background Tasks.
We then covered all the major functionalities of the Backend and the Frontend components, and how they work together.
Finally, we went over Opik and Observability, explaining the implementation details and providing examples from the Opik Web dashboard, to showcase what Traces are, how we version Prompts for Prompt Engineering purposes, and how we track Agent conversations.
In the fifth module, we’ll do a full recap, to put everything in perspective, and announce the next steps :)
Stay tuned, keep learning and start building!
Why is this course free?
This course is free and Open Source - thanks to our sponsors: Pixeltable and Opik!

References
Github, Kubrick Course: An MCP Multimodal AI Agent with eyes and ears! (n.d.). https://github.com/multi-modal-ai/multimodal-agents-course
Background Tasks - BackgroundTasks - FastAPI. (2025). Tiangolo.com. https://fastapi.tiangolo.com/reference/background/
React DOM APIs – React. (2025). React.dev. https://react.dev/reference/react-dom
Built-in React Hooks – React. (2025). https://react.dev/reference/react/hooks
comet-ml/opik: Debug, evaluate, and monitor your LLM applications, RAG systems, and agentic workflows with comprehensive tracing, automated evaluations, and production-ready dashboards. (2025, July 24). GitHub. https://github.com/comet-ml/opik
Herman, M. (2021, May 10). Asynchronous Tasks with FastAPI and Celery. Testdriven.io. https://testdriven.io/blog/fastapi-and-celery/
Chauhan, S. (2025, July 25). React Lifecycle Methods. Scholarhat.com; ScholarHat. https://www.scholarhat.com/tutorial/react/react-lifecycle-methods
Images and Videos
All images are created by the author, if not otherwise stated.
Amazing lesson Alex!!