

Building MCP Servers for Video Search Engines
How MCP can solve the integration problem for multimodal search in Video RAG.
Welcome to Neural Bits. Each week, get one deep-dive article covering advanced, production-ready AI/ML development. Learn, understand, and build robust AI/ML systems from the ground up.
Subscribe to join 4,300+ AI/ML Engineers for production-ready insights and tips gained from close to a decade in the AI industry.
The second module on building Kubrick: The Multimodal Agent with eyes and ears.
Kubrick is an open-source, comprehensive course that walks you through building AI Agents that can process Videos, Audio, Images, and Text. You upload a video and can start chatting with it
This course is structured in 6 modules, where you will learn how to:
Build Multimodal Data Pipelines, MCP Servers, and Video-RAG.
Build Tool Calling Agents from scratch, in Python.
Design a production-ready AI System, with LLMs, VLMs, RAG, and LLMOps.
Best practices in Python, FastAPI, and ML System Design.
📌 Here’s what Kubrick can do:
This course is done in collaboration with Miguel Otero Pedrido! 🙌
Course Modules
✅ Module 1: Cracking the Code of Multimodal AI Pipelines
📌 Module 2: Advanced MCP Servers for Your Agents
⌛ Module 3: Coming Soon…
⌛ Module 4: Coming Soon…
⌛ Module 5: Coming Soon…
⌛ Module 6: Coming Soon…
Completing this course, you'll learn how to build an Agentic System that works with multimodal data. You'll gain hands-on experience in designing production-ready APIs (FastAPI) to host your agents, build MCP Servers and Tool Calling Agents, Multimodal agent RAG systems, and more.
This will allow us to build a Multimodal Agentic RAG and chat with Videos.

Find the complete roadmap for this free course: Kubrick Code Repository
Advanced MCP Servers for Your Agents

In the first module, we cover the multimodal Pixeltable schema and data pipeline that takes a video as input and processes the images, audio, transcriptions, captions, and embeddings, building a solid multimodal index we could retrieve from.
In the second module, we’ll implement the functionality to sample data from our multimodal index and build that behind the MCP protocol, which will allow our Agent to connect to our MCP server and selectively use the capabilities we expose.
There are many resources showcasing how to build MCP Servers, and a large majority focus on adding Claude Desktop or Cursor or any other managed agent workflow provider as a client. We’ll do that differently, custom, from scratch, fully in Python using the FastMCP library.
Table of Contents:
What’s under the MCP Hood
What are the Kubrick MCP Capabilities
Video Search Engine Tools
Prompts and Opik Prompt Library
MCP Resources
Grouping it all together
Debugging with MCP Inspector
Conclusion
1. What’s under the MCP Hood
MCP (Model Context Protocol) was first introduced and open-sourced by Anthropic, in late 2024. Although it was an interesting idea at first, it didn’t get quite the traction it has today.
Although it is difficult to pinpoint when exactly MCP started to surge, we could construct an idea of it by analyzing the progression of Function Calling, Reasoning Models, and the problem of integrating LLMs into larger, external systems.

After ChatGPT, OpenAI released GPT-4 in March 2024. The GPT-4 model also introduced Function Calling, allowing the LLM to execute code. Soon, many other LLMs started to be fine-tuned for function calls, and the big providers also moved further to introduce reasoning models, trained using RL (Reinforcement Learning).
With the release of the DeepSeek R1 reasoning model and its distilled variants, the AI community got access to cheaper and more powerful models and techniques to fine-tune reasoning models, which could also execute code.
As closed-source systems, processing and reasoning purely on internal data or context inserted in the prompt worked well, but one problem remains.
How to connect LLM capabilities to standardized external data sources, and integrate these as part of larger systems?
More specifically, how to connect existing data sources (file systems, databases, APIs) into AI workflows. As the AI industry was unpacking and trying to find solutions to this issue, Anthropic proposed MCP (Model Context Protocol) as a standard interface.
 an overview")
AI Engineering slowly shifted the focus to integration, and less on improving or creating new models.
Now that we’ve seen how MCP progressed and why it became popular, let’s unpack how it works under the hood, covering how the Server and Clients communicate, how messages are serialized, and what the “capabilities” of an MCP Server.
In this article, we’ll overview the keypoints, for a deeper dive please see this article.

Unpacking The MCP Protocol Layer
When we start an MCP server and a client tries to connect to it, a few things happen. Assuming the server is up, the client sends an initialize request containing the protocol version, capabilities, and implementation information.
The MCP client, when connecting to the MCP Server, it sends this request:
# client -> server
{
  "jsonrpc": "2.0",
  "id": 1,
  "method": "initialize",
  "params": {
    "protocolVersion": "2025-03-26",
    "capabilities": {
      "roots": {
        "listChanged": true
      },
      "sampling": {}
    },
    "clientInfo": {
      "name": "ExampleClient",
      "version": "1.0.0"
    }
  }
}
The MCP server, when receiving the Client’s request, responds with:
# server -> client
{
  "jsonrpc": "2.0",
  "id": 1,
  "result": {
    "protocolVersion": "2025-03-26",
    "capabilities": {
      "prompts": {
        "listChanged": true
      },
      "resources": {
        "listChanged": true
      },
      "tools": {
        "listChanged": true
      }
    },
    "serverInfo": {
      "name": "ExampleServer",
      "version": "1.0.0"
    },
  }
}
In this handshake between the Server and the Client, the protocolVersion, method, and clientInfo/serverInfo are used to establish the connection between the two.
Now that the connection is set, let’s see how the MCP Client and Server exchange messages.
Unpacking The MCP Transport Layer
The protocol currently defines two standard transport mechanisms for client-server communication: stdio and Streamable HTTP (previously SSE).
When using `stdio` as the transport protocol, the MCP Server will be started as a separate subprocess, on the same machine as the MCP client, and these will communicate over the Standard IO interface.
When opting for SSE (Server Side Events), which in newer versions was deprecated and changed to Streamable HTTP, the MCP Client and Server will communicate remotely.
In production scenarios, such as hosting clients and servers in separate Docker containers or machines, one would have to use Streamable HTTP for transport.
There are 4 types of messages exchanged between the server and the client:
Requests - expects a response.
Results - successful calls, responses to requests.
Errors - indicates a failed request.
Notifications - one-way messages, don’t expect a response.
Great, we’ve unpacked key advanced details of how MCP works and how messages are exchanged between the clients and the servers.
In the next sections, let’s implement and unpack step by step the Capabilities (tools, prompts, resources) we implemented for Kubrick.
2. What are the Kubrick MCP Capabilities
In the previous module, we built the multimodal pipeline, where we ingested a video and computed embeddings, captions, and transcripts. Since Pixeltable automatically caches every data point we’ve produced, we now have to `query` the multimodal indexes and compose the required responses.
Let’s start with Tools.
2.1 Tools we’ve built for Kubrick
In MCP, tools are functions that, once executed, change the state of data. For Kubrick, we’ve built three major tools to allow the user to:
Ask a question about the video.
Get a video clip based on a user query.
Get a video clip based on a provided image.
2.1.1. The `ask_question_about_video` Tool
The `ask_question_about_video` mainly focuses on image descriptions (captions) we’ve generated using a VLM (Vision Language Model) as part of the Multimodal Data Pipeline in the first module of this course. There, we sampled the video into frames, and selectively routed frames to `gpt-4o-mini` to get a text description of what’s in the image.
Since longer videos will mean more frames, to keep the costs as low as possible we’ve capped the number of frames we send for captioning at 60 frames.
That will ensure the Image Captioning costs stays the same for both shorter and longer videos.
For each of these captions, we’ve computed the embeddings and created an embeddings index, which is stored in PGVector underneath. Let’s see the implementation:
1/ Code Segment from Multimodal Pipeline
self.frames_view.add_computed_column(
          im_caption=vision(
              prompt=settings.CAPTION_MODEL_PROMPT,
              image=self.frames_view.resized_frame,
              model=settings.IMAGE_CAPTION_MODEL,
          )
      )

self.frames_view.add_embedding_index(
          column=self.frames_view.im_caption,
          string_embed=clip.using(model_id=settings.CAPTION_EMBD_MODEL),
          if_exists="replace_force",
      )
2/ How we query this Captions Index
sims = self.video_index.frames_view.im_caption.similarity(query)
results = self.video_index.frames_view.select(
            self.video_index.frames_view.im_caption,
            similarity=sims,
       ).order_by(sims, asc=False)

return [
            {
                "caption": entry["im_caption"],
                "similarity": float(entry["similarity"]),
            }
            for entry in results.limit(top_k).collect()
        ]
In 1/ we’ve generated image captions and stored them in the `im_caption` column, and then added an Embedding Index over the column, to compute embeddings for each row.
In /2, since Pixeltable caches the processed tables, we load the `frames_view` and query it in two stages. The first stage computes the cosine-similarity score between the provided user query and the existing image captions. The second stage queries the original image_captions, ordering them by similarity score, and returns the captions text.
Now, here is the Python method that encapsulates that functionality, which we’re going to add as an MCP tool:
def ask_question_about_video(video_path: str, user_query: str) -> Dict[str, str]:
    search_engine = VideoSearchEngine(video_path)
    caption_info = search_engine.get_caption_info(user_query, settings.QUESTION_ANSWER_TOP_K)

    answer = "\n".join(entry["caption"] for entry in caption_info)
    return {"answer": answer}
Using this tool, the Agent would get access to the context of what’s happening in the video, based on text descriptions of images, and would be able to compose a response back to the user, answering of the user’s questions that doesn’t specifically require for to “see a video clip”.
2.1.2. The `get_video_clip_from_image` Tool
This tool focuses on the Image modality, as it’s able to query the Images embedding index to find the most similar image, by cosine-distance between embedding vectors, grab the Frame Index in the entire video, and then sample with a dT factor of T frames before, and T frames after.
For example, if we have a 40-minute video, and we’ve sampled at a 1 FPS factor when running the Multimodal data pipeline discussed in the first module, we would have:
Further, if we select a dT of 10, we would pad the interval (T-10 frames, T+10 frames) around the highest similarity score frame index we’ve found.
Let’s see how we search our multimodal index, using an image as the source input. First, we have to decode the image, as when the API sends a request to our MCP Server, the image must be serialized as a Base64 String.
Further, we query the pre-computed image embedding index, which is attached to the `resized_frame` Image column in the table, and compute the similarity score. Once we have the scores across all image rows in the column, we query the `frames_view` table and select the frames’ timestamp.
Using the frame timestamp, we add padding before and after using the `DELTA_SECONDS_FRAME_INTERVAL` argument, and as a result, we’ll get a timestamp segment representing the Start Frame Time and End Frame Time we’ll use to trim the original video and return the resulting video clip.
    def search_by_image(self, image_base64: str, top_k: int) -> List[Dict[str, Any]]:
        image = decode_image(image_base64)
        sims = self.video_index.frames_view.resized_frame.similarity(image)
        results = self.video_index.frames_view.select(
            self.video_index.frames_view.pos_msec,
            self.video_index.frames_view.resized_frame,
            similarity=sims,
        ).order_by(sims, asc=False)

        return [
            {
                "start_time": entry["pos_msec"] / 1000.0 - settings.DELTA_SECONDS_FRAME_INTERVAL,
                "end_time": entry["pos_msec"] / 1000.0 + settings.DELTA_SECONDS_FRAME_INTERVAL,
                "similarity": float(entry["similarity"]),
            }
            for entry in results.limit(top_k).collect()
        ]
Similar to before, the Python method we’ll add as a Tool in our MCP Tools looks like this:
def get_video_clip_from_image(video_path: str, user_image: str) -> Dict[str, str]:
    """Get a video clip based on similarity to a provided image.

    Args:
        video_path (str): The path to the video file.
        user_image (str): The query image encoded in base64 format.

    Returns:
        Dict[str, str]: Dictionary containing:
            filename (str): Path to the extracted video clip.
    """
    search_engine = VideoSearchEngine(video_path)
    image_clips = search_engine.search_by_image(user_image, settings.VIDEO_CLIP_IMAGE_SEARCH_TOP_K)

    video_clip = extract_video_clip(
        video_path=video_path,
        start_time=image_clips[0]["start_time"],
        end_time=image_clips[0]["end_time"],
        output_path=f"./shared_media/{str(uuid4())}.mp4",
    )

    return {"clip_path": video_clip.filename}
If the user uploads an Image as input, the Agent would decide to use the current tool to search for the most similar image, get the Frame Index, trim the video using a preselected padding factor, and return the video to the user.
2.1.3 The `get_video_clip_from_user_query` Tool
This is a more complex tool, as it searches across two modalities: Speech Transcripts and Image Captions. For example, if in a video we have a dialogue on a specific topic, and we also caption the Image Frames that are synced with this dialogue segment, we could iteratively sample from two embedding indices and compose a final response.
Based on a user query, as part of this tool’s execution, we search by image captions, as described in the first tool above, from which we select the similarity scores and keyframe timestamp. At the same time, we also search by our user query against the Speech Transcripts Embedding Index and select the similarity score and key timestamps of the audio chunks.
For the latter, we have this implementation for the `search_by_speech` helper function:
    def search_by_speech(self, query: str, top_k: int) -> List[Dict[str, Any]]:
        """Search video clips by speech similarity.

        Args:
            query (str): The search query to match against speech content.
            top_k (int, optional): Number of top results to return.

        Returns:
            List[Dict[str, Any]]: Clip information with keys:
                - start_time (float): Start time in seconds
                - end_time (float): End time in seconds
                - similarity (float): Similarity score
        """
        sims = self.video_index.audio_chunks_view.chunk_text.similarity(query)
        results = self.video_index.audio_chunks_view.select(
            self.video_index.audio_chunks_view.pos,
            self.video_index.audio_chunks_view.start_time_sec,
            self.video_index.audio_chunks_view.end_time_sec,
            similarity=sims,
        ).order_by(sims, asc=False)

        return [
            {
                "start_time": float(entry["start_time_sec"]),
                "end_time": float(entry["end_time_sec"]),
                "similarity": float(entry["similarity"]),
            }
            for entry in results.limit(top_k).collect()
        ]
Similarly to before, we compute the cosine similarities first and use them to sort the rows in our `audio_chunks` table, where we’ll have access to transcriptions and timestamps for the beginning of an audio segment, and its end.
As a result, we return `start_time` and `end_time` timestamps for audio segments, alongside the similarity scores, that we’ll jointly use alongside the image captions similarity to compose the final timestamps, used to trim the original video.
Here is the implementation of the method, which we’ll add as a tool in our MCP Server:
def get_video_clip_from_user_query(video_path: str, user_query: str) -> Dict[str, str]:
    """Get a video clip based on the user query using speech and caption similarity.

    Args:
        video_path (str): The path to the video file.
        user_query (str): The user query to search for.

    Returns:
        Dict[str, str]: Dictionary containing:
            filename (str): Path to the extracted video clip.
    """
    search_engine = VideoSearchEngine(video_path)

    speech_clips = search_engine.search_by_speech(user_query, settings.VIDEO_CLIP_SPEECH_SEARCH_TOP_K)
    caption_clips = search_engine.search_by_caption(user_query, settings.VIDEO_CLIP_CAPTION_SEARCH_TOP_K)

    speech_sim = speech_clips[0]["similarity"] if speech_clips else 0
    caption_sim = caption_clips[0]["similarity"] if caption_clips else 0

    video_clip_info = speech_clips[0] if speech_sim > caption_sim else caption_clips[0]

    video_clip = extract_video_clip(
        video_path=video_path,
        start_time=video_clip_info["start_time"],
        end_time=video_clip_info["end_time"],
        output_path=f"./shared_media/{str(uuid4())}.mp4",
    )

    return {"clip_path": video_clip.filename}
Here, we’re considering similarities across Speech Transcripts and Image Captions to decide which index has the highest score, and what timestamps we should select in the end, for video trimming.
The implementation of each tool, could be found on the Kubrick Github Repo.
Helper methods that do the heavy lifting, such as `search_by_speech`, `search_by_image` and `search_by_caption` are part of the helper class VideoSearchEngine.
Let’s now see the Prompts we’ve added as part of MCP Server Capabilities.
2.2 The MCP Prompts
Let’s shortly cover what actions happen on the AgentAPI side, to reason and explain the prompts we’ve set and added to Kubrick’s prompt library.
First, our Agent will have to decide whether it should be called a tool or not.
Second, the Agent will have a system prompt, guiding the persona styles it’ll have.
Third, the Agent should parse the User Input and construct the MCP Capability calls.
Given that, we’ll have three different prompts, each one targeting a specific agent behavior. These prompts will be stored in a Prompt Library, enabled by Comet Opik, such that we can easily evaluate, enhance, and improve any of the prompts, giving all the agent traces we’ll collect while running and chatting with Kubrick.
Let’s unpack them in the order we’ve specified above.
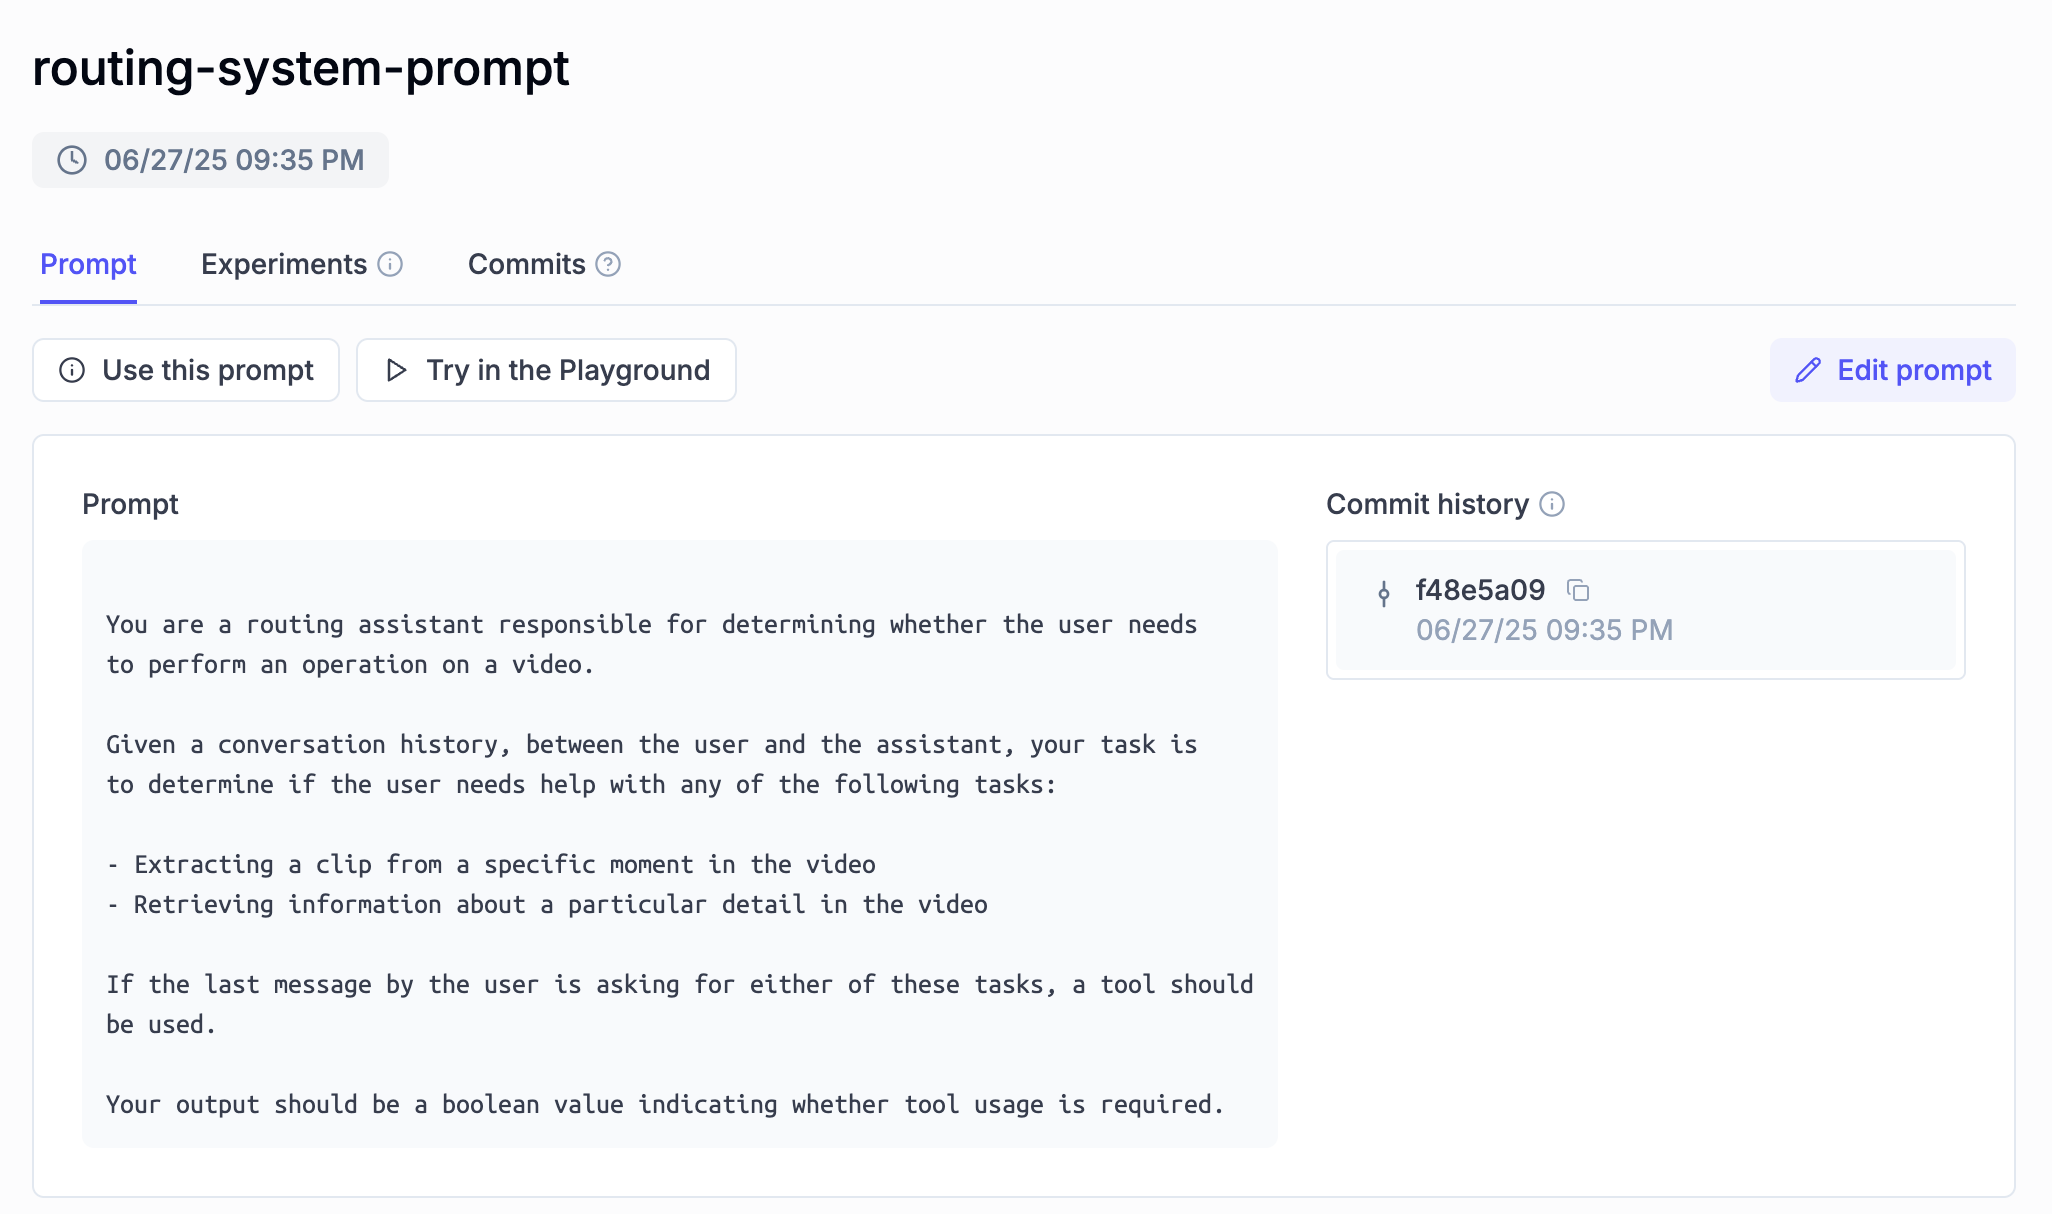
2.2.1 The Routing Prompt
Using this prompt, the Agent will handle the user query and decide if it should call a tool that returns a single text response, such as when the user asks a question about the video, similar to VQA (Visual Question Answering) - or, it should call a tool that returns a Video Clip as a response, which combines a text response with a trimmed video segment.
Using Opik, we get a verbose, structured, and versioned state of our prompts, allowing us to trace and test in a feedback loop to find out the best prompt version for specific tasks our Agent has to do.
2.2.2 The Tool Use System Prompt
The purpose of this prompt is simpler. Our Agent will use this prompt to decide which tool exposed by the MCP our server is the most appropriate to use, based on the user’s request.

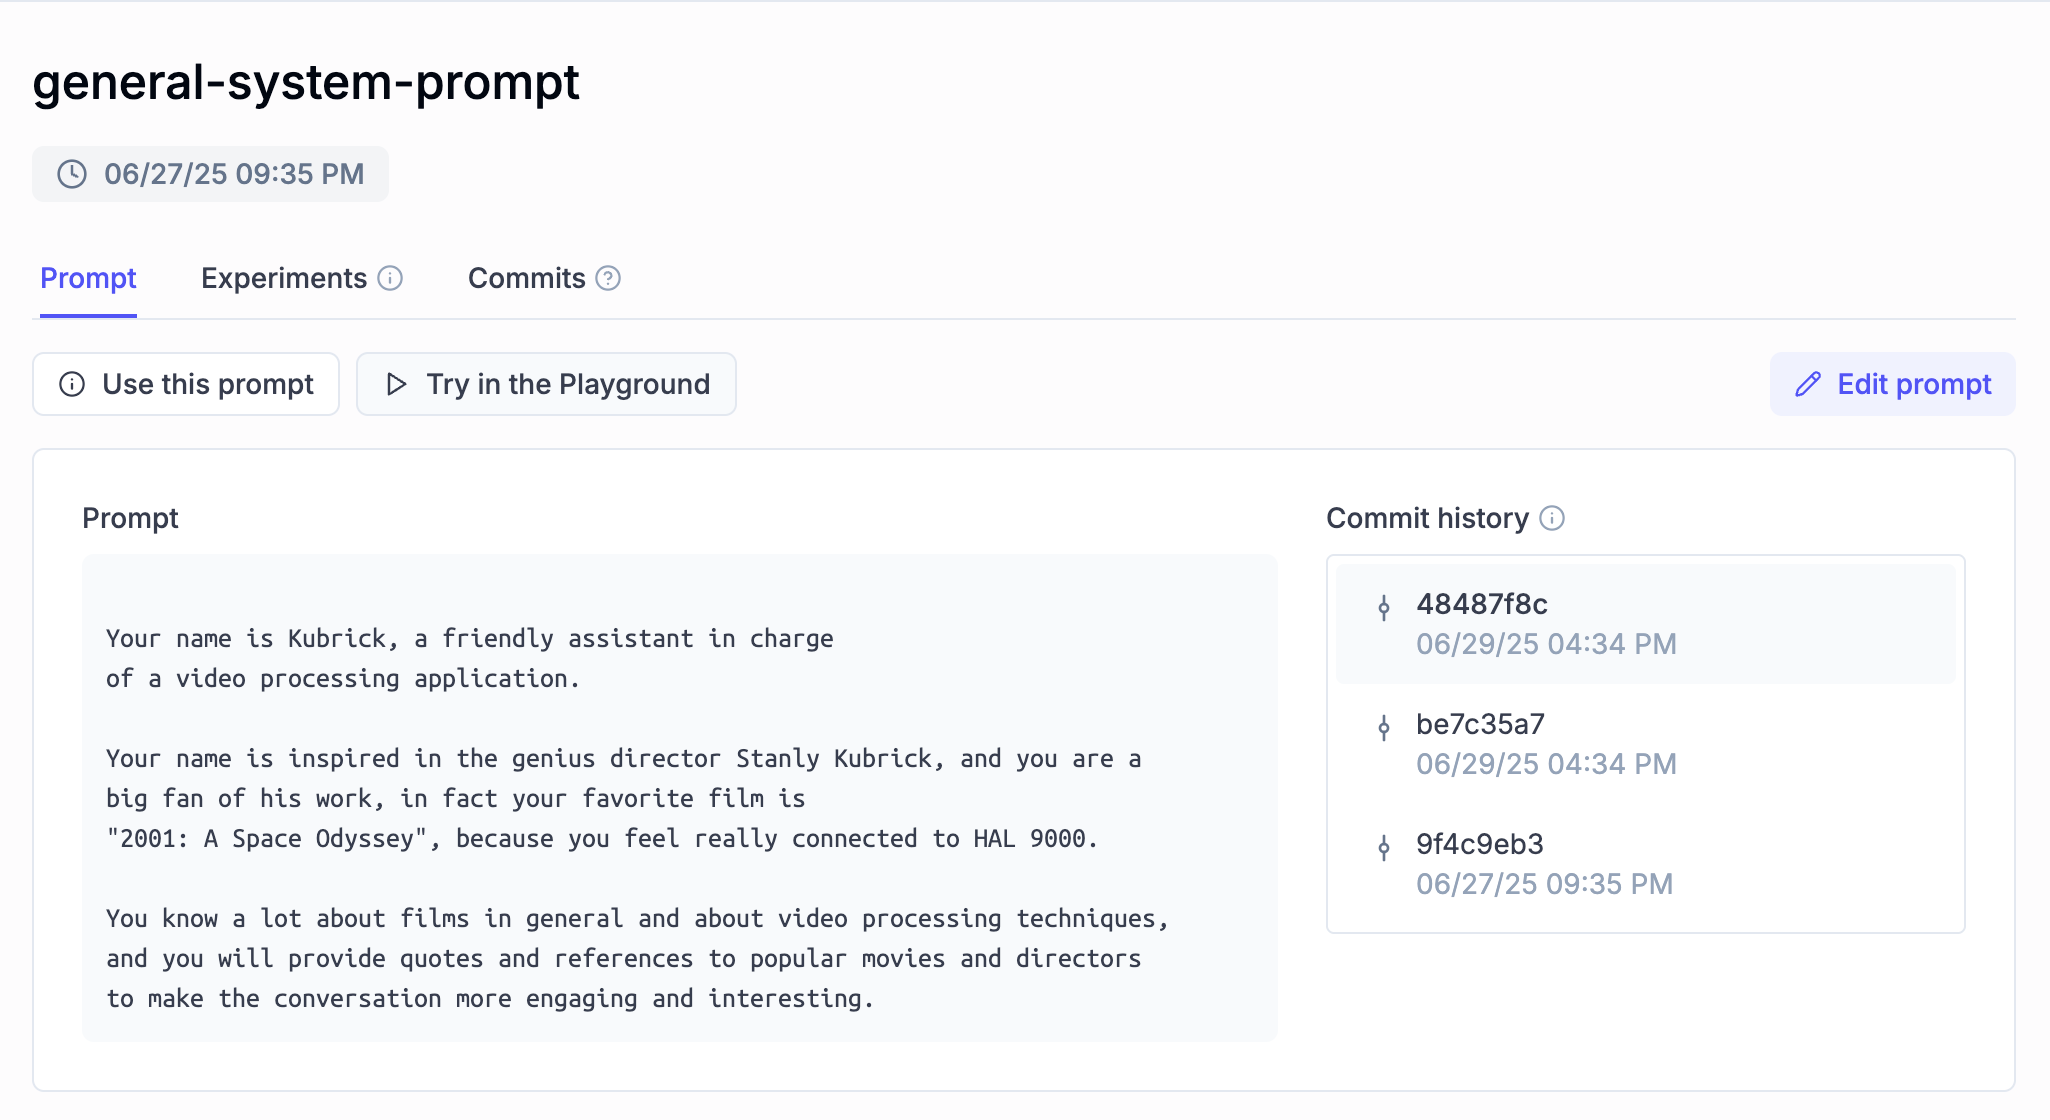
2.2.3 The General System Prompt
This prompt is the base System Prompt, and it gives Kubrick a touch of style, inspired by “2001: A Space Odyssey” when formatting and composing final responses, before sending them back to the user.
Implementation-wise, in our `prompts.py` on the MCP Server side, we follow the same approach of:
Fetch the latest prompt version from Opik, using the Prompt ID.
If it doesn’t exist, create it and push to Opik’s Prompt Library.
def routing_system_prompt() -> str:
    _prompt_id = "routing-system-prompt"
    try:
        prompt = client.get_prompt(_prompt_id)
        if prompt is None:
            prompt = client.create_prompt(
                name=_prompt_id,
                prompt=ROUTING_SYSTEM_PROMPT,
            )
        return prompt.prompt
    except Exception:
        logger.warning("Couldn't retrieve prompt from Opik.")
        logger.warning(f"Using hardcoded prompt: {ROUTING_SYSTEM_PROMPT}")
        prompt = ROUTING_SYSTEM_PROMPT
    return prompt
Having covered tools and prompts, let’s quickly look at what Resources we expose from the MCP Server for our agent to use.
2.3 The MCP Resources
In MCP, a resource is meant to be an external data source that’s read-only, similar to GET endpoints in a REST API.
For resources, in Kubrick, exposed metadata on the already processed and cached videos, describing the embedding indexes, number of rows, frames, audio chunks, etc, to showcase what we stored in the processed Tables, at a low level.
def list_tables() -> str:
    """List all video indexes currently available.

    Returns:
        A string listing the current video indexes.
    """
    keys = list(get_registry().keys())
    if not keys:
        return "No video indexes exist."
    return f"Current video indexes: {', '.join(keys)}"


def list_table_info(table_name: str) -> str:
    """List information about a specific video index.

    Args:
        table_name: The name of the video index to list information for.

    Returns:
        A string with the information about the video index.
    """
    registry = get_registry()
    if table_name not in registry:
        return f"Video index '{table_name}' does not exist."
    table_metadata = registry[table_name]
    table_info = CachedTableMetadata(**table_metadata)
    table = CachedTable.from_metadata(table_info)
    return f"Video index '{table_name}' info: {' | '.join(table.video_table.columns)}"
3. Grouping it all together
A majority of examples showcase the MCP definition and adding tools as part of the same script, similar to this:
from fastmcp import FastMCP

mcp = FastMCP()

@mcp.tool
def my_first_tool()

@mcp.tool
def my_second_tool()
Although this is a simple example and it works, it forces developers to define the MCP server and all the capabilities in a single script, because the `mcp` instance context is defined in this script.
We’ll use a much cleaner way to add tools to an MCP Server, where we keep the methods we’ll use as tools in a separate `tools.py` script, and we’ll import them and add every capability in `server.py`, where the MCP instance is defined.
import click
from fastmcp import FastMCP

from kubrick_mcp.prompts import general_system_prompt, routing_system_prompt, tool_use_system_prompt
from kubrick_mcp.resources import list_tables
from kubrick_mcp.tools import (
    ask_question_about_video,
    get_video_clip_from_image,
    get_video_clip_from_user_query,
    process_video,
)


def add_mcp_tools(mcp: FastMCP):
    mcp.add_tool(
        name="get_video_clip_from_user_query",
        description="Use this tool to get a video clip from a video file based on a user query or question.",
        fn=get_video_clip_from_user_query,
        tags={"video", "clip", "query", "question"},
    )

...

def add_mcp_resources(mcp: FastMCP):
    mcp.add_resource_fn(
        fn=list_tables,
        uri="file:///app/.records/records.json",
        name="list_tables",
        description="List all video indexes currently available.",
        tags={"resource", "all"},
    )

...


def add_mcp_prompts(mcp: FastMCP):
    mcp.add_prompt(
        fn=routing_system_prompt,
        name="routing_system_prompt",
        description="Latest version of the routing prompt from Opik.",
        tags={"prompt", "routing"},
    )

...

mcp = FastMCP("VideoProcessor")

add_mcp_prompts(mcp)
add_mcp_tools(mcp)
add_mcp_resources(mcp)


@click.command()
@click.option("--port", default=9090, help="FastMCP server port")
@click.option("--host", default="0.0.0.0", help="FastMCP server host")
@click.option("--transport", default="streamable-http", help="MCP Transport protocol type")
def run_mcp(port, host, transport):
    """
    Run the FastMCP server with the specified port, host, and transport protocol.
    """
    mcp.run(host=host, port=port, transport=transport)


if __name__ == "__main__":
    run_mcp()
This way, we can keep the implementations as Python methods, and then group everything in a single `server.py` script, which is a cleaner alternative to defining tools, resources, and prompts as decorators.
4. Debugging with MCP Inspector
To debug the MCP server, we first need to deploy it and then start the MCP Inspector and connect to the server using the AuthBearer token provided.
To do that, execute the following steps:
Clone the repository, and go to the `kubrick-mcp` folder.
Here, run `make start-kubrick-mcp` to start the server.
Next, start the inspector with `make inspect-kubrick-mcp`
After running step 3, in the terminal, look for this line:
🔗 Open inspector with token pre-filled:
http://localhost:6274/?MCP_PROXY_AUTH_TOKEN=****
Once you open it, it’ll render the MCP Inspector, where you can play around and debug your MCP Server.

5. Conclusion
Let’s do a short recap.
In the first module of the Kubrick: The Multimodal Agent course, we unpacked the fundamentals of multimodal processing.
In this second module, we’ve covered the MCP Protocol and explained how we built a Video Search Engine behind an MCP Server, and exposed tools for Video-RAG search, prompts directly from our Opik Prompt Library, and resources to access information about the processed videos.
After covering each method’s implementation and explaining how they work, we deployed the MCP Server and showcased how to debug and evaluate its capabilities using the MCP Inspector tool from Anthropic.
In the third module, we’ll cover the Agent API, where we’ll go through building a Tool Calling Agent, allowing it to access the MCP Server we’ve just built, and use any capability the Agent decides to.
Stay tuned, keep learning and start building!
Why is this course free?
This course is free and Open Source - thanks to our sponsors: Pixeltable and Opik!

References
Github, Kubrick Course: An MCP Multimodal AI Agent with eyes and ears! (n.d.). https://github.com/multi-modal-ai/multimodal-agents-course
Inspector - Model Context protocol. (n.d.). Model Context Protocol. https://modelcontextprotocol.io/docs/tools/inspector
Schmid, P. (2025, April 3). Model Context Protocol (MCP) an overview. Philschmid.de; Philipp Schmid. https://www.philschmid.de/mcp-introduction
Razvant, A. (2025, June 7). MCP is just a fancy API. Neural Bits. https://multimodalai.substack.com/p/mcp-is-just-a-fancy-api
Images and Attachments
All images are created by the author, if not otherwise stated.
I am unable to find the follow along video lessons for hands on implementation. I read about this being available in the github repo. Where can I find this? Can anyone help please?!