

Building Tool Use (MCP) Agents from Scratch
No frameworks, no abstractions - build an Agent and connect it to MCP, implementing each step on your own.

Welcome to Neural Bits. Each week, get one deep-dive article covering advanced, production-ready AI/ML development.
Subscribe to join 4,600+ AI/ML Engineers for production-ready insights and tips gained from close to a decade in the AI industry.
The 3rd module on building Kubrick: The Multimodal Agent with eyes and ears.
Kubrick is an open-source, comprehensive course that walks you through building AI Agents that can process Videos, Audio, Images, and Text. You upload a video and can start chatting with it.
This course is structured in 6 modules, where you will learn how to:
Build Multimodal Data Pipelines, MCP Servers, and Video-RAG.
Build Tool Calling Agents from scratch, in Python.
Design a production-ready AI System, with LLMs, VLMs, RAG, and LLMOps.
Best practices in Python, FastAPI, and ML System Design.
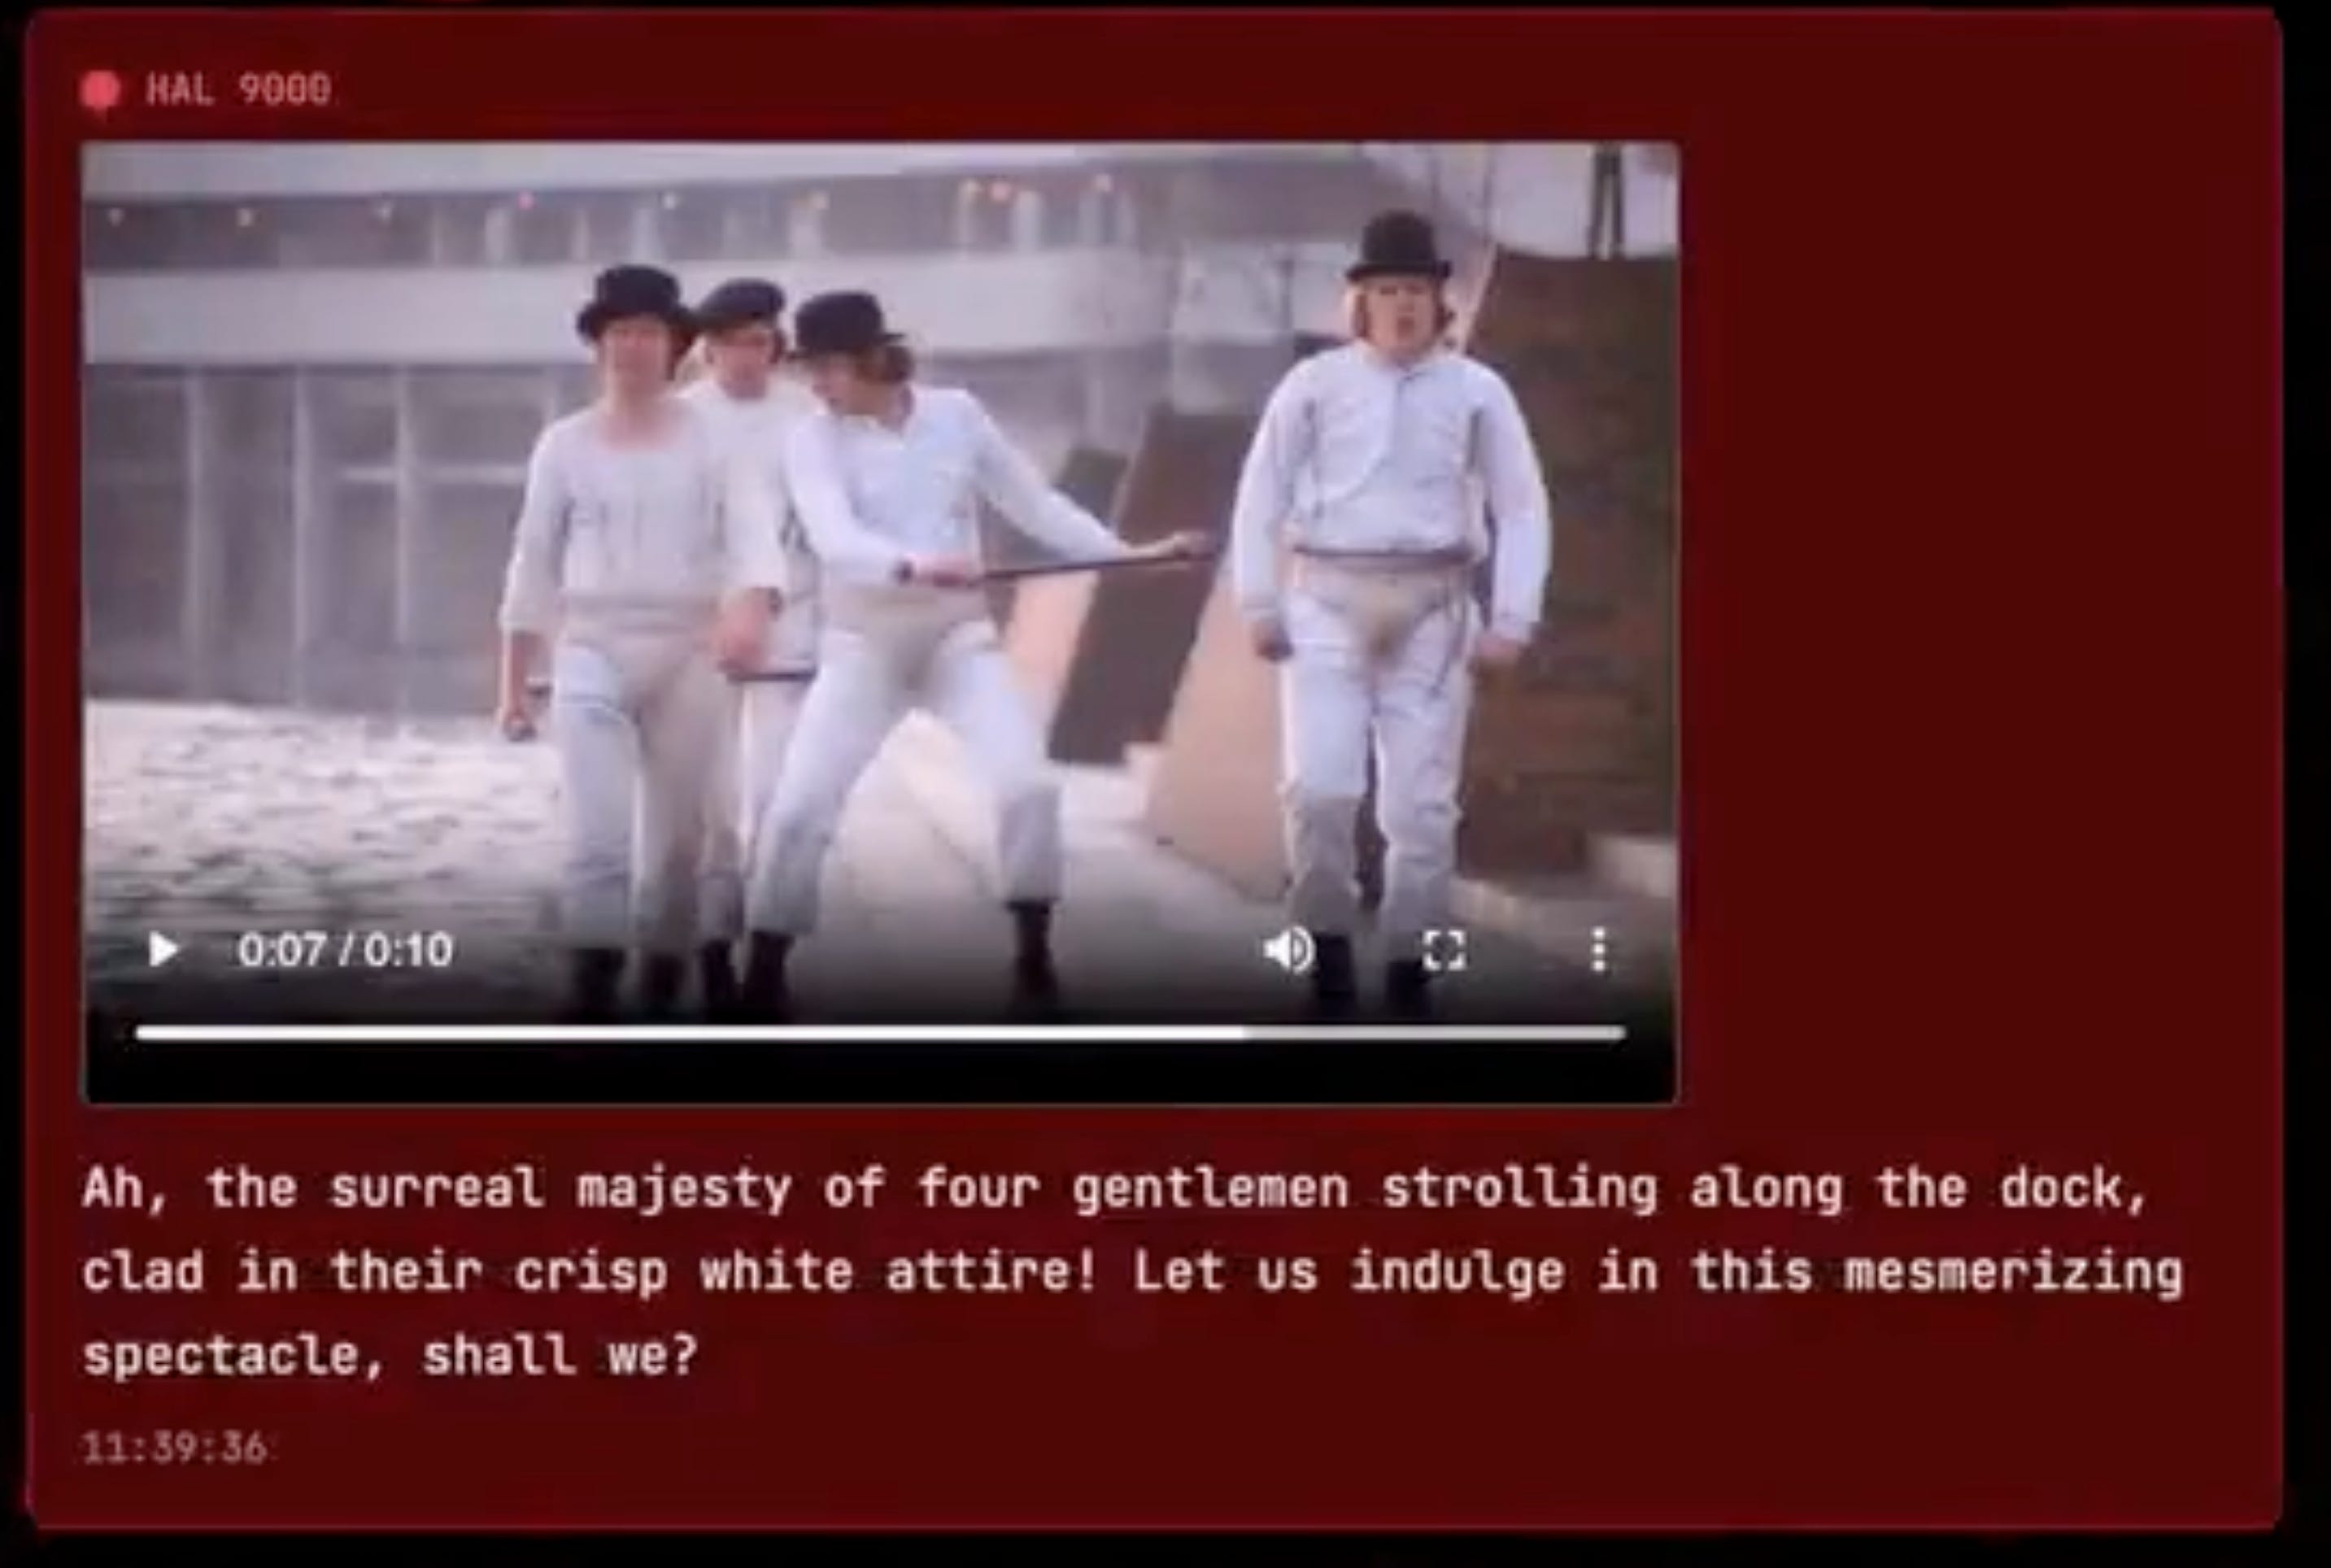
📌 Here’s what Kubrick can do:
This course is done in collaboration with Miguel Otero Pedrido! 🙌
Course Modules
✅ Module 1: Cracking the Code of Multimodal AI Pipelines
✅ Module 2: Advanced MCP Servers for Your Agents
📌 Module 3: Tool Calling Agents from Scratch
⌛ Module 4: Coming Soon…
⌛ Module 5: Coming Soon…
⌛ Module 6: Coming Soon…
Completing this course, you'll learn how to build an Agentic System that works with multimodal data. You'll gain hands-on experience in designing production-ready APIs (FastAPI) to host your agents, build MCP Servers and Tool Calling Agents, Multimodal agent RAG systems, and more.
This will allow us to build a Multimodal Agentic RAG and chat with Videos.

Find the complete roadmap for this free course: Kubrick Code Repository
Tool Calling Agents from Scratch
In the first module, we cover the multimodal Pixeltable schema and data pipeline, which takes a video as input and creates the multimodal embedding indexes.
In the second module, we covered the MCP Server implementation, along with tools for sampling from these multimodal indexes.
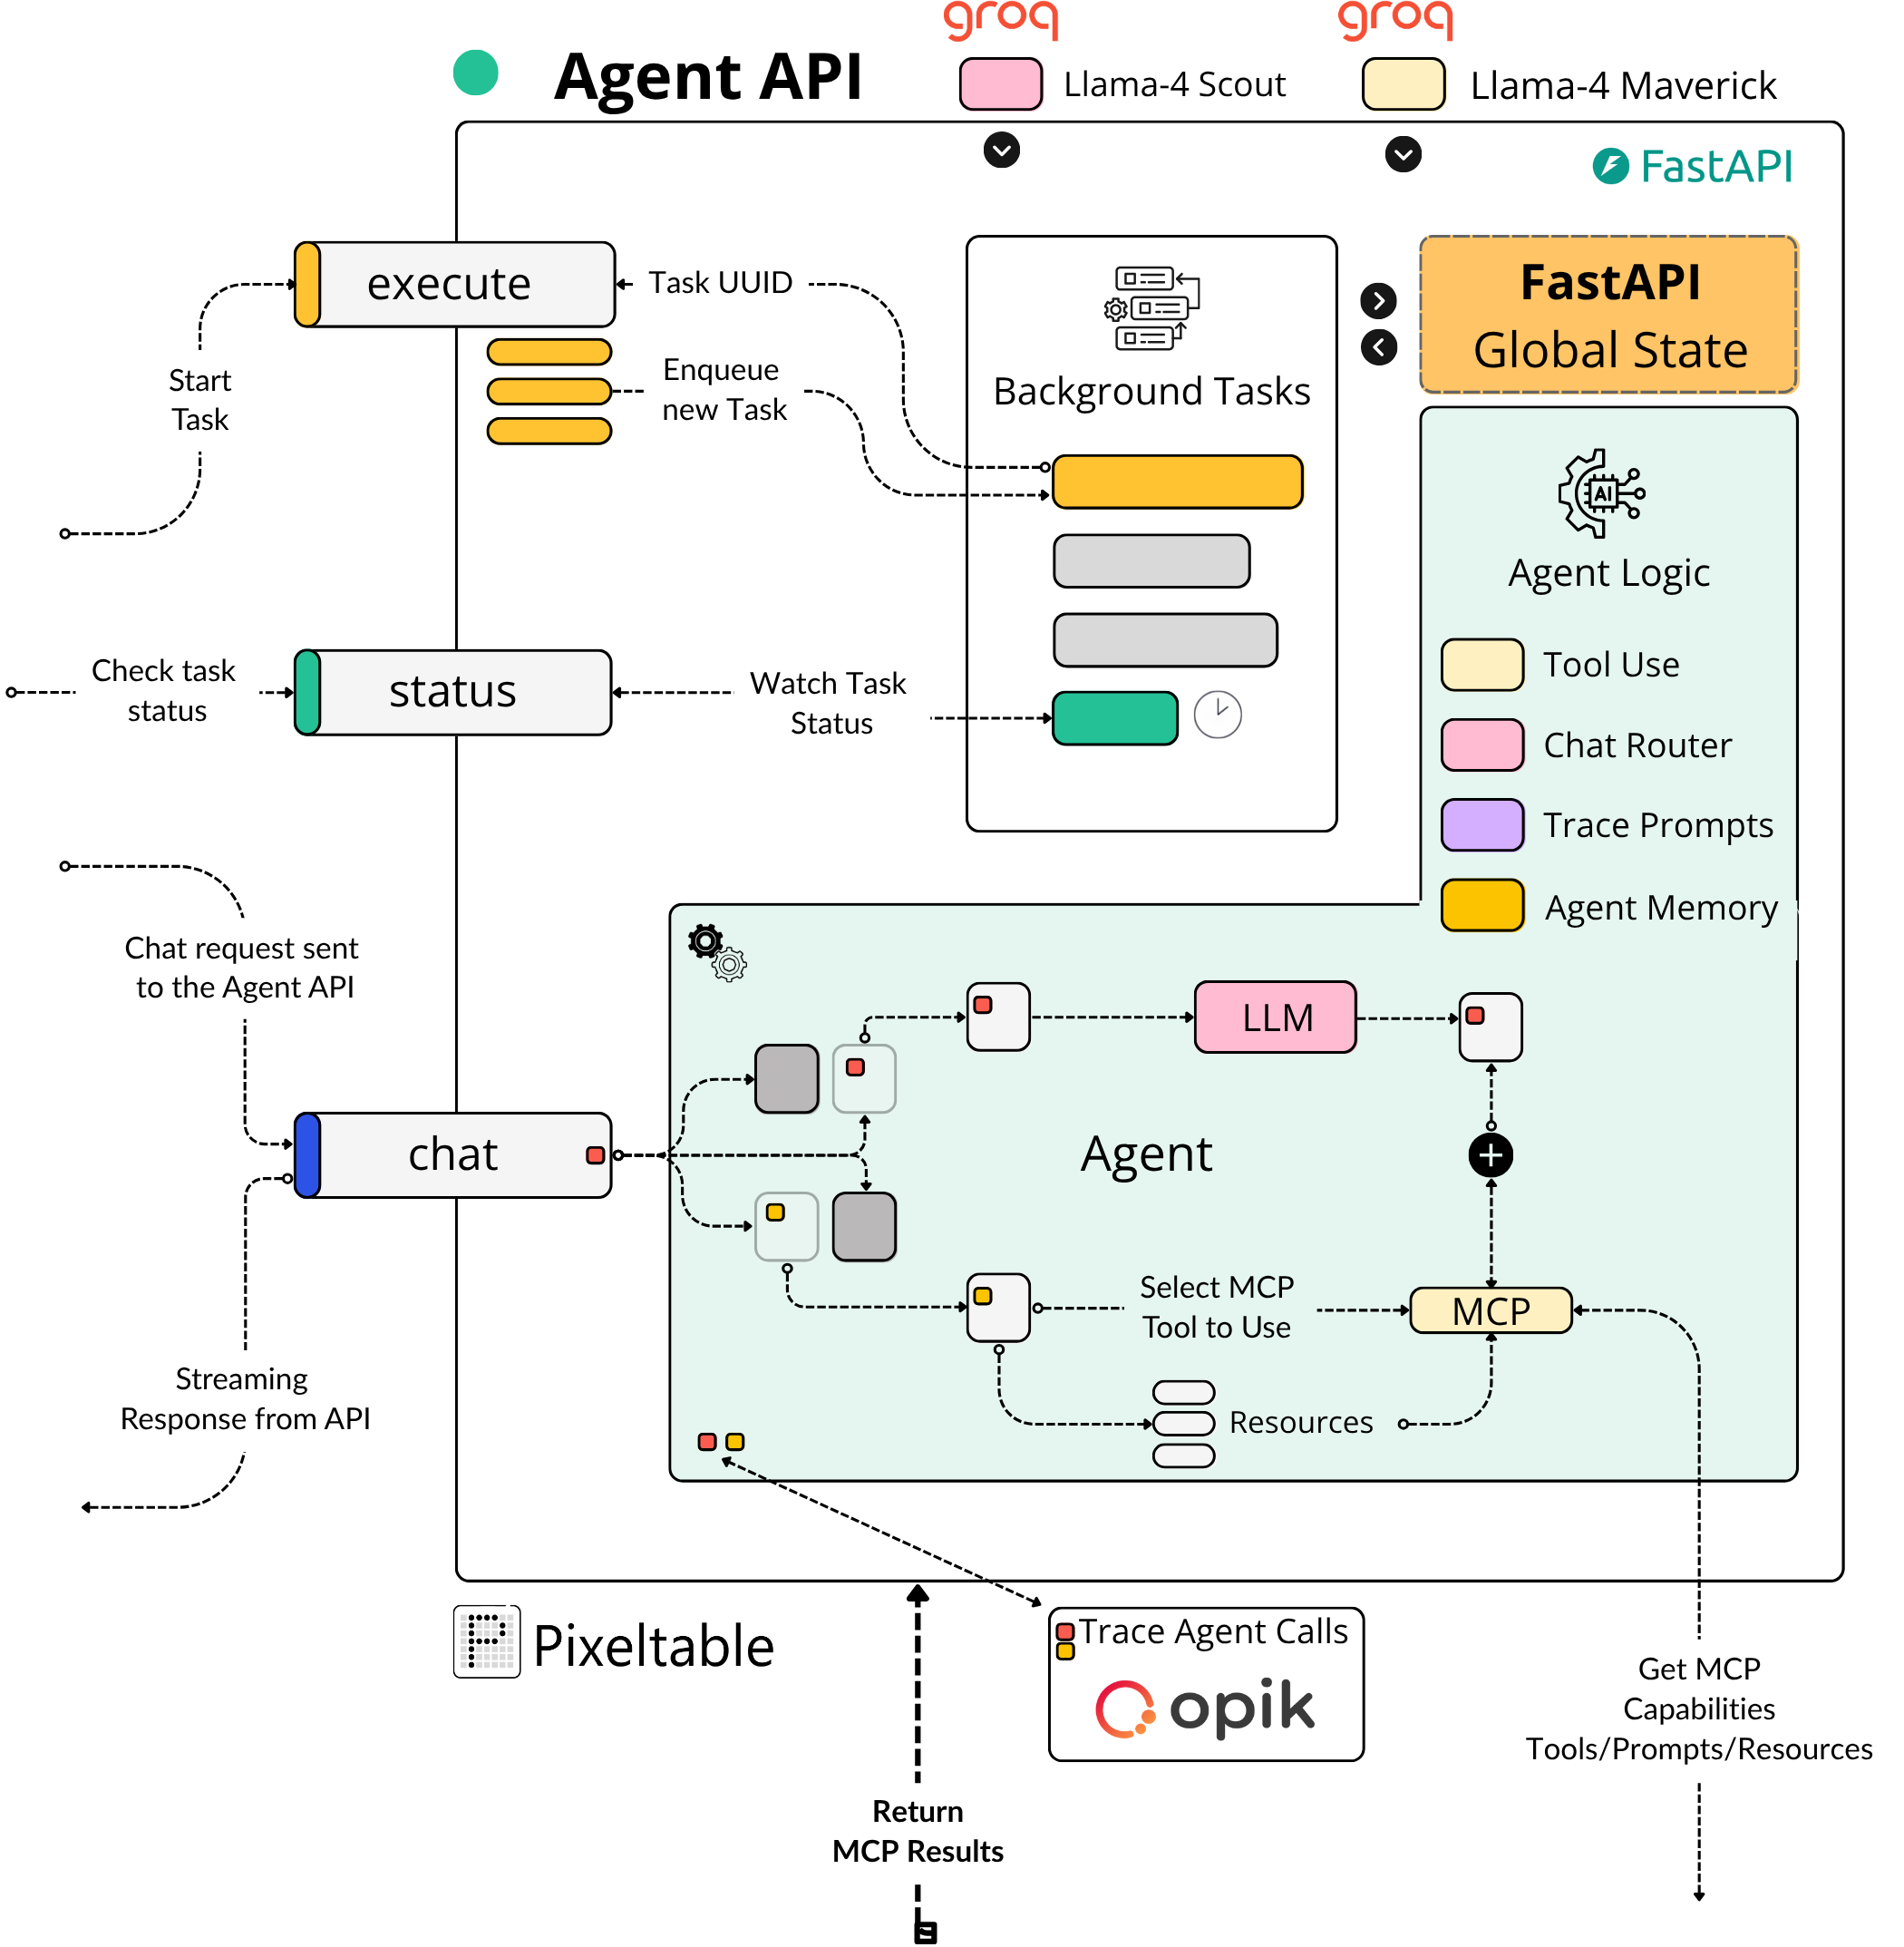
In this third module, we’ll implement the Agent scratch, including Tool Use and Routing patterns, as well as the MCP Client and Agent memory using Pixeltable.
Table of Contents:
The 4 Agentic Design Patterns
The Base Agent Class
Implementing the Groq Agent
Agent memory with Pixeltable
Conclusion
1. The 4 Agentic Design Patterns
There are many keywords around Agents. Agentic Workflows, Agentic Architectures, or Agentic AI, Agentic, Agentic Systems. Despite their variations, they all point toward a fundamental concept:
Systems described with these terms, use LLMs to decide the execution flow of an application at different autonomy levels.
When designing solutions that leverage AI agents, it's easy to view them as deterministic. We prompt the system and get back a response. In reality, the internal processes can feature dynamic elements that make the outcome more complex than a simple input-output mapping.
If a user asks, “Should I invest in Bitcoin today?”, an agent-based system might decompose the question into a multi-step analytical workflow:
Retrieve the recent price progression of BTC.
Analyze 4-hour or 1-month candlestick charts for patterns.
Evaluate MACD trends at those intervals to identify shifts.
Compose the findings and generate a recommendation for the user.
Each of these steps can be executed as a tool or routed to other agents in a multi-agent system. The degree of "agenticity" is defined by how much decision-making is delegated to the LLM.
MACD and Fibonacci Retracement are technical indicators to help investors identify entry points for buying or selling or short-term price trends.
When working with Agents, we could outline two guidelines for building applications: structured workflows, such as Prompt Chaining, Routing, Parallelization, or dynamic patterns such as Reflection, Tool Use, Planning, and Multi-Agent.
Let’s provide a short description of each of the above. For structured workflows, we have the following:
1/ Prompt Chaining
The output of one LLM call feeds into the input of the next LLM call. One example could be generating a structured essay, using multiple prompts, where the first LLM creates an outline, second LLM writes short paragraphs for each point in the outline.
2/ Routing
An LLM could act as a router, which, for example, could classify the user’s input and direct it to a specialized SLM (Small Language Model).
3/ Parallelization
A good example that applies here is query decomposition, where a larger user query is broken down into a set of subtasks, and they’re executed simultaneously by multiple LLMs, finally aggregating the results.
On the other side, for more dynamic patterns, we have:
1/ Reflection Pattern
This implies that the Agent runs in a feedback loop, evaluating its output to refine the response.
2/ Tool Use Pattern
This is the most popular one, also known as Function Calling, and is a core pattern we use in this project. It implies that a set of tools with their definitions (name, description, and arguments) is passed to the LLM alongside the user’s input. The LLM could then decide if based on the user’s query, whether it should use a tool or not, and execute the tool call, post-processing the response.
3/ Planning Pattern
This involves a central LLM to break down a complex task, and then delegating sub-tasks to specialized workers, via Tool Calling for execution. Used in multi-step reasoning tasks.
4/ Multi-Agent Pattern
This implies having a swarm of specialized worker agents, each one with different capabilities, and a coordinator Agent that routes the tasks, and processes the responses. The Google A2A (Agent to Agent) protocol is a good example of implementing this pattern.
The above are only short descriptions of what each pattern represents, for an in-depth walkthrough on Agentic Patterns, please see this article series from Miguel.

2. The Base Agent Class
In popular frameworks, such as Langchain, CrewAI, LlamaIndex, or smolagents, the Agent implementations could quickly round up to 100s of lines of code. It is rightly so since these are frameworks, and they should cover complex use cases.
In our use case, we built everything from scratch in Python and tried to keep everything light.
In the BaseAgent class, we have 10 methods implementing setting up the Agent, fetching the required prompts, handling the chat functionality, and managing memory.
class BaseAgent(ABC):
    """
    Base class for all agents.
    """

    def __init__(
        self,
        name: str,
        mcp_server: str,
        memory: Memory = None,
        disable_tools: list = None,
    ):
        self.name = name
        self.mcp_client = Client(mcp_server)
        self.memory = memory if memory else Memory(name)
        self.disable_tools = disable_tools if disable_tools else []

        self.tools = None
        self.routing_system_prompt = None
        self.tool_use_system_prompt = None
        self.general_system_prompt = None

    async def setup(self):
        pass

    async def _get_routing_system_prompt(self) -> str:
        pass

    async def _get_tool_use_system_prompt(self) -> str:
        pass

    async def _get_general_system_prompt(self) -> str:
        pass

    def reset_memory(self):
        self.memory.reset_memory()

    def filter_active_tools(self, tools: list) -> list:
        pass

    async def discover_tools(self) -> list:
        pass

    @abstractmethod
    async def _get_tools(self) -> list:
        raise NotImplementedError("Tools are not implemented in the base class.")

    async def call_tool(self, function_name: str, function_args: dict) -> str:
        pass

    @abstractmethod
    async def chat(self, message: str) -> str:
        raise NotImplementedError("Chat is not implemented in the base class.")
Since we’re using an MCP Server to implement our tools, the class constructor of this BaseAgent class requires the `mcp_server` URL, an instance of a Memory object, and an optional list of `disabled_tools`. The latter is used for filtering the tools we make available for our Agent.
Let’s unpack this implementation in more detail:
We have 3 methods to get our task-specific prompts from our MCP Server
_get_routing_system_prompt
_get_tool_use_system_prompt
_get_general_system_prompt
All these involve connecting to the MCP Server, via the MCP Client that’s hosted inside our Agent class, and reading the prompts, which on the MCP Server side are versioned and stored in Opik.
mcp_prompt = await self.mcp_client.get_prompt("<prompt_id>")
mcp_prompt.messages[0].content.text
That way, we can improve and fine-tune our prompts on Opik, keeping them isolated and external from our application, without adding changes into the code, and get the latest version each time we do a fetch call.
We have a method for tool discovery to read the list of tools from the MCP.
        try:
            async with self.mcp_client as client:
                tools = await client.list_tools()
                if not tools:
                    logger.info("No tools from the MCP server")
                    return []
                logger.info(f"Discovered {len(tools)} tools:")
                tools = self.filter_active_tools(tools)
                logger.info(f"Keeping {len(tools)} active tools")
                for tool in tools:
                    logger.info(f"- {tool.name}: {tool.description}")
                return tools
        except ConnectionError as e:
            logger.error(f"Failed to connect to MCP server: {e}")
            raise
        except Exception as e:
            logger.error(f"Tool discovery failed: {e}")
            raise
MCP serializes our tools and generates Annotated schemas for each one, containing the tool name, arguments, types of these arguments, their order and a tool description.
Between the MCP tools, we have a `process_video` tool which is meant to be used only once by the Agent, since we need to process the video once and have it persisted in Pixeltable’s cache. So we add this tool name into the `disable_tools` list, and once we get the list of tools from the MCP Server, we filter and disable it:
  def filter_active_tools(self, tools: list) -> list:
        """
        Filter the list of tools to only include the active tools.
        """
        return [tool for tool in tools if tool.name not in self.disable_tools]
We have 2 other methods for Agent interaction, which will be implemented by the subclasses, the `get_tools` and `chat` endpoints.
    @abstractmethod
    async def _get_tools(self) -> list:
        raise NotImplementedError("Tools are not implemented in the base class.")


    @abstractmethod
    async def chat(self, message: str) -> str:
        raise NotImplementedError("Chat is not implemented in the base class.")
Finally, we have a `setup` method which will prepare our Agent by executing everything discussed above.
    async def setup(self):
        """Initialize async components of the agent."""
        async with self.mcp_client as _:
            self.tools = await self._get_tools()
            self.routing_system_prompt = await self._get_routing_system_prompt()
            self.tool_use_system_prompt = await self._get_tool_use_system_prompt()
            self.general_system_prompt = await self._get_general_system_prompt()
Now, when implementing an Agent based on this BaseAgent class, we’ll have the prompts, list of tools, memory, and chat functionality populated and ready. Let’s further see how we implemented the GroqAgent.
3. Implementing the Groq Agent
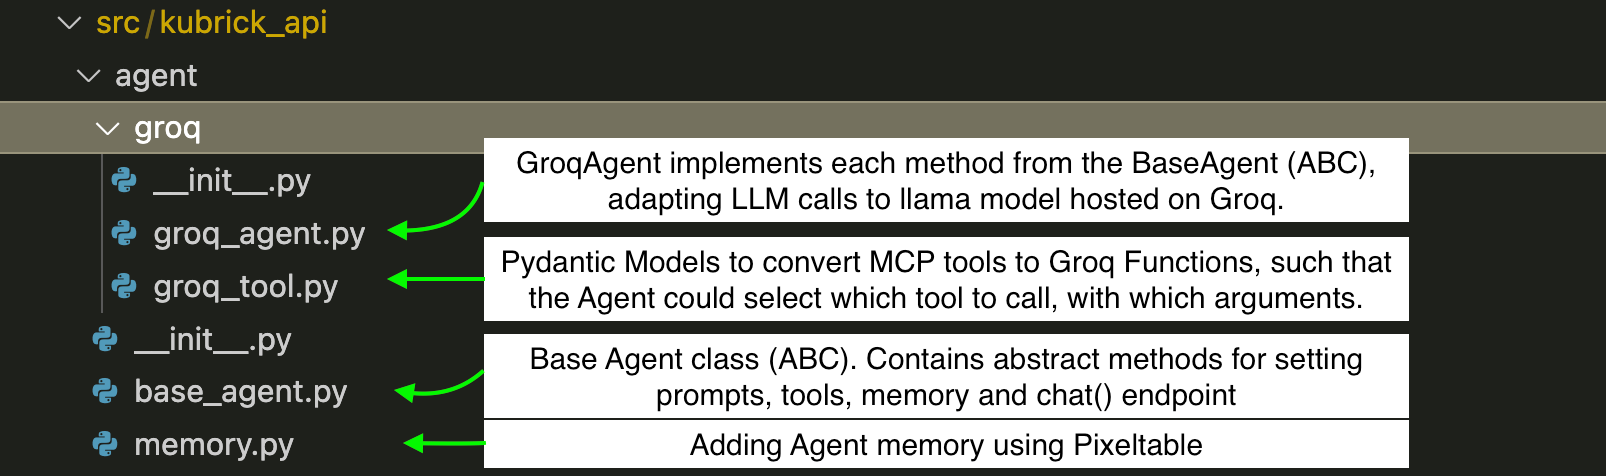
Having covered the BaseAgent, the GroqAgent class is implemented on top of our base class with specific functionality compatible with Groq’s API. Same as above, the GroqAgent receives the same arguments in the constructor and implements the abstract methods slightly differently.
class GroqAgent(BaseAgent):
    def __init__(
        self,
        name: str,
        mcp_server: str,
        memory: Optional[Memory] = None,
        disable_tools: list = None,
    ):
        super().__init__(
            name,
            mcp_server,
            memory,
            disable_tools,
        )
        self.client = Groq(api_key=settings.GROQ_API_KEY)
        self.instructor_client = instructor.from_groq(self.client, mode=instructor.Mode.JSON)
        self.thread_id = str(uuid.uuid4())

    async def _get_tools(self) -> List[Dict[str, Any]]:
        tools = await self.discover_tools()
        return [transform_tool_definition(tool) for tool in tools]

    @opik.track(name="build-chat-history")
    def _build_chat_history(
        self,
        system_prompt: str,
        user_message: str,
        image_base64: Optional[str] = None,
        n: int = settings.AGENT_MEMORY_SIZE,
    ) -> List[Dict[str, Any]]:
        pass

    @opik.track(name="router", type="llm")
    def _should_use_tool(self, message: str) -> bool:
        pass

    async def _execute_tool_call(self, tool_call: Any, video_path: str, image_base64: str | None = None) -> str:
        pass

    @opik.track(name="tool-use", type="tool")
    async def _run_with_tool(self, message: str, video_path: str, image_base64: str | None = None) -> str:
        pass

    @opik.track(name="generate-response", type="llm")
    def _respond_general(self, message: str) -> str:
        pass

    def _add_to_memory(self, role: str, content: str) -> None:
        pass

    @opik.track(name="memory-insertion", type="general")
    def _add_memory_pair(self, user_message: str, assistant_message: str) -> None:
        pass

    @opik.track(name="chat", type="general")
    async def chat(
        self,
        message: str,
        video_path: Optional[str] = None,
        image_base64: Optional[str] = None,
    ) -> AssistantMessageResponse:
        pass
Here, we call the super().init() to execute the constructor from our ABC class, which will set up the prompts and memory, and will add additional functionality with custom methods.
Our agent will perform the following set of tasks:
Handle routing based on the user’s query. If it should use a tool, it processes the prompt and selects a tool from the available ones; otherwise, it’ll respond as a default LLM.
If a tool is selected, the Agent constructs the tool call using the name and arguments and then submits a tool_call() request to the MCP Server.
With each conversation exchange, we’ll store the user-assistant messages into the Memory object, which builds on top of Pixeltable.
How does our Agent know which tool to select?
In Tool Calling Agents, the LLM should know the entire tool definition, including name, arguments, and their types.
For instance, we might specify the `ask_question_on_video` tool name for our Agent, and if the user asks “What is one interesting detail in this video?”, the Agent could reason that a question is asked, but will not be able to execute the tool as it doesn’t know its arguments.
For that, we need to inject the entire JSON schema for each tool into the LLM’s context.
Since we’re using a Groq LLM, but our tools come from our MCP Server, we must translate the tool definitions to Groq-compatible schemas. For that, we need to implement the following:
    async def _get_tools(self) -> List[Dict[str, Any]]:
        tools = await self.discover_tools()
        return [transform_tool_definition(tool) for tool in tools]
Here, we first fetch the tools from the MCP Server, and then transform definitions to Groq Function schemas, using Pydantic models.
class GroqTool(BaseModel):
    """Represents a Groq tool definition."""

    type: str = "function"
    function: GroqFunction

    @classmethod
    def from_mcp_tool(cls, tool) -> "GroqTool":
        """Create a GroqTool instance from an MCP Tool."""
        properties = {}

        for field_name, field_info in tool.inputSchema["properties"].items():
            properties[field_name] = GroqParameter(
                type=field_info["type"],
                description=field_info["title"],
                default=field_info.get("default"),
            )

        parameters = GroqParameters(
            properties=properties, required=tool.inputSchema.get("required")
        )

        function = GroqFunction(
            name=tool.name, description=tool.description, parameters=parameters
        )

        return cls(function=function)
The full implementation for translating tools can be found here groq_tool.py
Two other important methods to unpack!
Next, we have the `_run_with_tool()` and `chat()` as these handle the main logic.
In `_run_with_tool()` we get the user’s query as input, alongside the video_path to be processed and an Optional `image_base64` to handle the use-case where we search by Image, instead of text prompt.
@opik.track(name="tool-use", type="tool")
    async def _run_with_tool(self, message: str, video_path: str, image_base64: str | None = None) -> str:
        """Execute chat completion with tool usage."""

        tool_use_system_prompt = self.tool_use_system_prompt.format(
            is_image_provided=bool(image_base64),
        )
        chat_history = self._build_chat_history(tool_use_system_prompt, message)

        response = (
            self.client.chat.completions.create(
                model=settings.GROQ_TOOL_USE_MODEL,
                messages=chat_history,
                tools=self.tools,
                tool_choice="auto",
                max_completion_tokens=4096,
            )
            .choices[0]
            .message
        )
        tool_calls = response.tool_calls
        logger.info(f"Tool calls: {tool_calls}")

        if not tool_calls:
            logger.info("No tool calls available, returning general response ...")
            return GeneralResponseModel(message=response.content)

        for tool_call in tool_calls:
            function_response = await self._execute_tool_call(tool_call, video_path, image_base64)
            logger.info(f"Function response: {function_response}")

            chat_history.append(
                {
                    "tool_call_id": tool_call.id,
                    "role": "tool",
                    "name": tool_call.function.name,
                    "content": function_response,
                }
            )

        response_model = (
            GeneralResponseModel if tool_call.function.name == "ask_question_about_video" else VideoClipResponseModel
        )

        followup_response = self.instructor_client.chat.completions.create(
            model=settings.GROQ_GENERAL_MODEL,
            messages=chat_history,
            response_model=response_model,
        )

        return followup_response
First, we get the `tool-use-system-prompt` and use the LLM to decide which tools should be called.
self.client.chat.completions.create(
                model=settings.GROQ_TOOL_USE_MODEL,
                messages=chat_history,
                tools=self.tools,
                tool_choice="auto",
                max_completion_tokens=4096,
            )
            .choices[0]
            .message
        )
We then capture the list of tools using `tool_calls = response.tool_calls` and will iterate through them for execution.
for tool_call in tool_calls:
            function_response = await self._execute_tool_call(tool_call, video_path, image_base64)
            logger.info(f"Function response: {function_response}")

            chat_history.append(
                {
                    "tool_call_id": tool_call.id,
                    "role": "tool",
                    "name": tool_call.function.name,
                    "content": function_response,
                }
            )

        response_model = (
            GeneralResponseModel if tool_call.function.name == "ask_question_about_video" else VideoClipResponseModel
        )
This will call tools from our MCP Server and capture the responses. Further, we take the tool response, add it to memory, and feed it into another LLM call, which will create a follow-up response. This follow-up response is what the user sees in the UI: the requested video clip and a Message.
The `chat()` method is the entry point.
    @opik.track(name="chat", type="general")
    async def chat(
        self,
        message: str,
        video_path: Optional[str] = None,
        image_base64: Optional[str] = None,
    ) -> AssistantMessageResponse:
        opik_context.update_current_trace(thread_id=self.thread_id)

        tool_required = video_path and self._should_use_tool(message)

        if tool_required:
            response = await self._run_with_tool(message, video_path, image_base64)
        else:
            response = self._respond_general(message)

        self._add_memory_pair(message, response.message)

        return AssistantMessageResponse(**response.dict())
Here, we take the user’s query, pass it to `_should_use_tool` method to decide if a tool call is required or not, and follow up with calling the MCP Server for a tool execution or a general LLM response. Finally, we add each conversation pair to memory and return the response back to the Frontend.
In all the examples above, you might’ve seen `opik.track()` calls. These decorators will log and trace every conversation turn between the user and the Agent, as part of Prompt Monitoring and LLMOps.
We’ll cover these in the following module!
4. Agent memory with Pixeltable
We covered Pixeltable, from basics to advanced in the first module of this course. To get a complete intro, please read Module 1: Cracking the Code to Multimodal Pipelines.
As a summary, Pixeltable allows for a declarative data infrastructure where complex functionality for AI workloads can be structured as Tables. In this course, Pixeltable is at the core of the heavy processing we do on the MCP Server side for processing videos. Also, on the Agent side, we use Pixeltable to handle the Agent’s memory.
class MemoryRecord(BaseModel):
    message_id: str
    role: str
    content: str
    timestamp: datetime


class Memory:
    def __init__(self, name: str):
        self.directory = name

        pxt.create_dir(self.directory, if_exists="replace_force")

        self._setup_table()
        self._memory_table = pxt.get_table(f"{self.directory}.memory")

    def _setup_table(self):
        self._memory_table = pxt.create_table(
            f"{self.directory}.memory",
            {
                "message_id": pxt.String,
                "role": pxt.String,
                "content": pxt.String,
                "timestamp": pxt.Timestamp,
            },
            if_exists="ignore",
        )

    def reset_memory(self):
        pxt.drop_dir(self.directory, if_not_exists="ignore", force=True)

    def insert(self, memory_record: MemoryRecord):
        self._memory_table.insert([memory_record.dict()])

    def get_all(self) -> list[MemoryRecord]:
        return [MemoryRecord(**record) for record in self._memory_table.collect()]

    def get_latest(self, n: int) -> list[MemoryRecord]:
        return self.get_all()[-n:]

    def get_by_message_id(self, message_id: str) -> MemoryRecord:
        return self._memory_table.where(self._memory_table.message_id == message_id).collect()[0]
What’s important to unpack here are the `_setup_table()`and `get_by_message_id` methods as they cover core functionalities. With Pixeltable, once we create a new table, it’ll persist the metadata in `~/.pixeltable` folder where it creates a cache.

In `_setup_table`, we define a new table schema with `message_id, role, content, timestamp` alongside their types. This will create a new entry into the Pixeltable database and a default cache entry in our HOME.
Further, we could add new memory entries to our Memory table using `.insert()`, which will persist them in the database.
In the `get_by_message_id` we query the memory table to select a specific entry using Pixeltable `where` clause and `collect` call. Pixeltable is built to be efficient such that when querying, we don’t get access to the real data underneath, but rather `links` to that data, which makes it fast regardless of how many records our table has.
Further, to access the data, we use `.collect()`, which will serialize entries to DataFrameResult objects that we can process.
In the GroqAgent code, we insert memory entries easily using:
def _add_to_memory(self, role: str, content: str) -> None:
        """Add a message to the agent's memory."""
        self.memory.insert(
            MemoryRecord(
                message_id=str(uuid.uuid4()),
                role=role,
                content=content,
                timestamp=datetime.now(),
            )
        )
The Pixeltable team has released series of notebooks with examples you could run.
5. Conclusion
Let’s do a short recap!
The first course module covered Multimodal Pipelines with Pixeltable.
The second course module showcased the MCP Server.
In this third module, we covered the Agent implemented from scratch in Python, explaining the common Agent Patterns, Tool Use, Agent Memory, and MCP Client-Server integration.
We then went step by step into key code sections, covering concepts and implementation details.
In the fourth module, we’ll cover the Agent API, where we’ll build an API using FastAPI to host our Agent and connect it to Opik for Conversation Tracing (LLMOps), and the React UI.
Stay tuned, keep learning and start building!
Why is this course free?
This course is free and Open Source - thanks to our sponsors: Pixeltable and Opik!

References
Github, Kubrick Course: An MCP Multimodal AI Agent with eyes and ears! (n.d.). https://github.com/multi-modal-ai/multimodal-agents-course
7 Practical Design Patterns for Agentic Systems. (2025). MongoDB. https://www.mongodb.com/resources/basics/artificial-intelligence/agentic-systems#agents
neural-maze/agentic-patterns-course: Implementing the 4 agentic patterns from scratch. (2024, October 25). GitHub. https://github.com/neural-maze/agentic-patterns-course
Schmid, P. (2025, May 5). Zero to One: Learning Agentic Patterns. Philschmid.de; Philipp Schmid. https://www.philschmid.de/agentic-pattern#pattern-overview
Pedrido, M. O. (2025, July 16). How we built an MCP Agent from scratch. Substack.com; The Neural Maze. https://theneuralmaze.substack.com/p/how-we-built-an-mcp-agent-from-scratch
Images and Videos
All images are created by the author, if not otherwise stated.
Dude, this article is AMAZING! 😍
super great tutorial , excuse my many question at each blog post
but i wonder , if i use the mcp server with steamtable http and host it on my company server , does the client implementation aka agent will be different ? also what if i used stdio on my server i think the client must be on the same server , right ?
could you wrap it up please
big thanks <3333