

The AI/ML Engineer's starter guide to GPU Programming
#1 Programming on GPUs from scratch by implementing CUDA Kernels in C++, CuPy Python and OpenAI Triton.

In this article, you’ll learn about:
How CUDA works with easy diagrams
How to build 2 C++ CUDA kernels from scratch and execute them
How to build CUDA kernels in Python with CuPy
AMD ROCm, OpenCL, and OpenAI Triton Language
You, as an ML/AI Engineer probably won’t have to write low-level CUDA code as all kernels and primitives are already abstracted and implemented by higher-level ML frameworks such as TensorFlow, and PyTorch.
But still, when working with Deep Learning models, either training or deploying for inference, you’ll at least get in contact with GPU-enabled environments, CUDA versions, NVCC on Cloud VMs, or NVIDIA Drivers.
On that note, this article aims to walk you through what CUDA is and does, by showing you how to write and execute a simple CUDA Kernel in C++, Python, and the new language in town - OpenAI Triton.
NVIDIA CUDA
CUDA is a parallel computing platform and programming model developed by NVIDIA for general computing on GPUs. As a high-level language, developers write CUDA code that runs on the parallel cores of an Nvidia GPU.
In the ML space, more specifically in Deep Learning and GenerativeAI, we can confidently say that each workload from data processing → model training → deployment, builds on a strong foundation of CUDA kernels that allow for fast and parallel distribution of tasks across GPU cores.
📝 PyTorch and Tensorflow have implemented a large set of highly optimized kernels to do max-pooling, convolutions or gradients propagation operations. Also, in transformers, the Attention operation, Multi-Head Attention (MHA), Multi-Head Latent Attention (MLA), or FlashAttention - all are highly optimized CUDA kernels.
To understand CUDA more simply, let’s unpack the 4 key components of CUDA.
Kernels - C/C++ functions that CUDA executes on the GPU, an array of CUDA threads executes each kernel.
Threads - CUDA organizes threads into blocks and grids. Each thread runs the kernel code but with different data.
Blocks - groups of threads that can be organized in 1D-3D structures. Threads in a block can synchronize and share a fast shared_memory.
Grids - are a collection of blocks. For example, a grid of 10x10 blocks with 256 threads/block will result in a total of 25600 threads.
When a kernel is launched, CUDA generates a grid of threads that are organized in a three-dimensional hierarchy.
Each grid is organized into an array of thread blocks or blocks.
Each block can contain up to 1,024 threads.
The number of threads in a block is given in the blockDim variable.
The dimension of thread blocks should be a multiple of 32.
Each thread in a block has a unique threadIdx value.
Combine the threadIdx and blockIdx values to create a unique global index
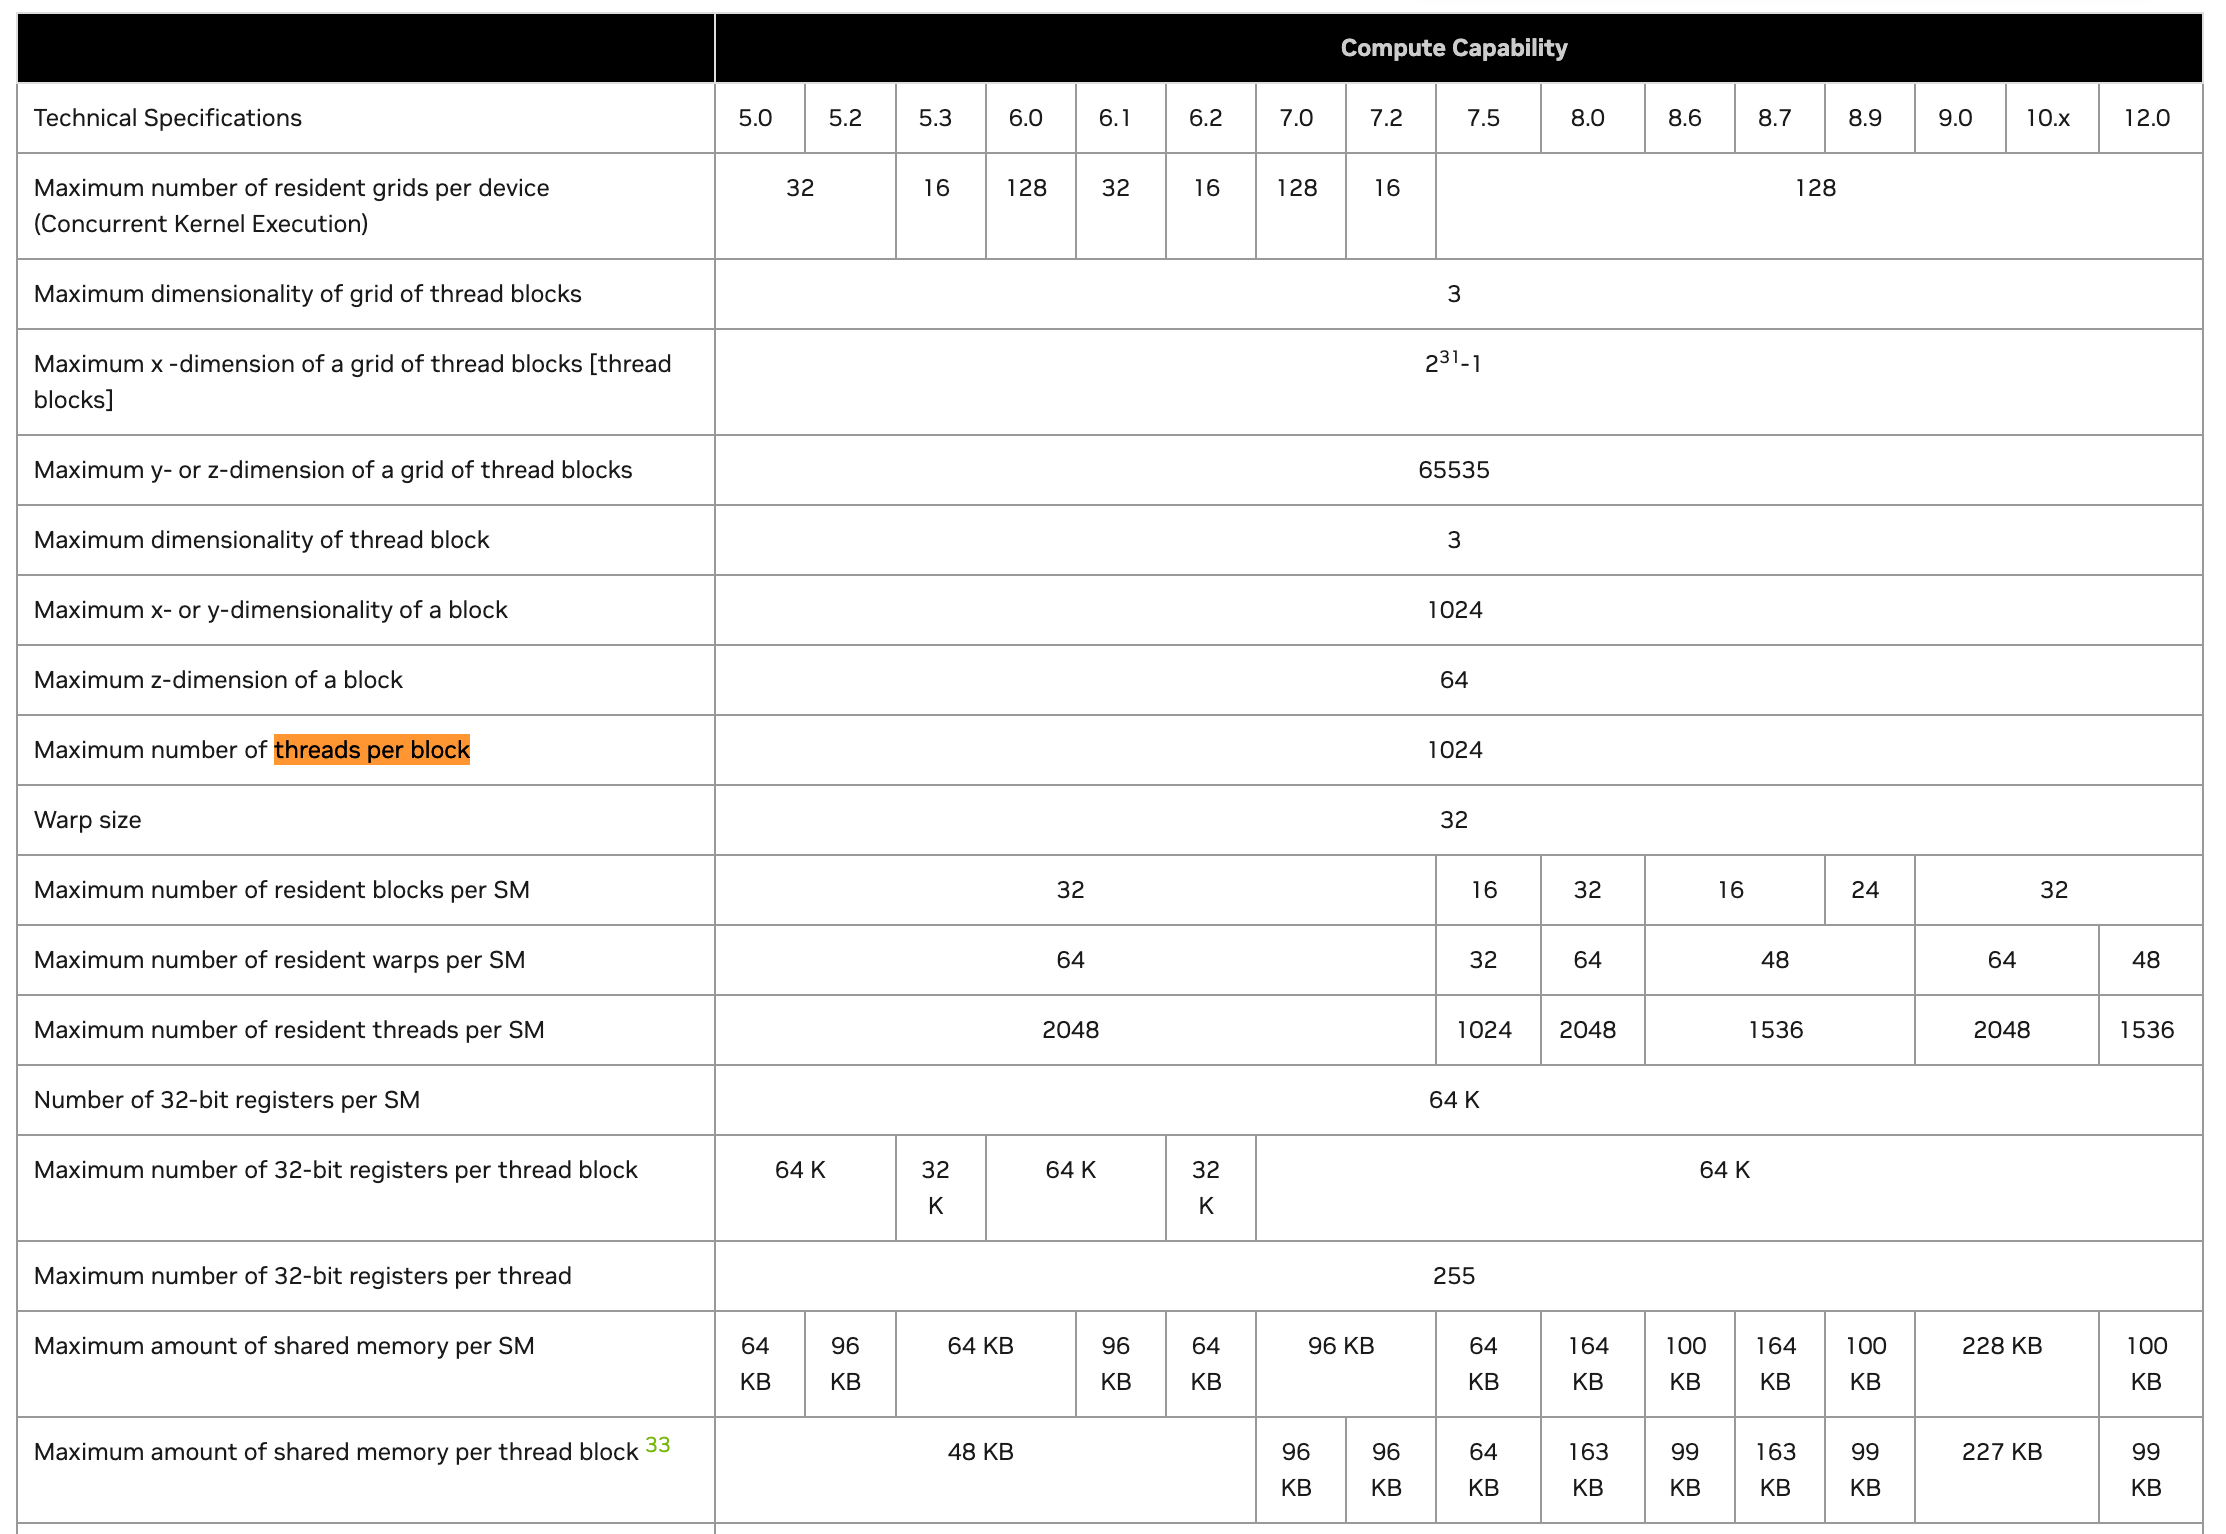
Below you can find the official CUDA documentation cheatsheet mapping GPU architecture specifications based on the Compute Capability factor.
Let’s build a basic C++ CUDA Kernel
To get a grasp of what CUDA code looks like, let’s build a simple vector add operation as a kernel and execute it on GPU.
Good News
You won’t need a NVIDIA GPU, as you can build and execute CUDA code on LeetGPU playground for free.
Let’s now unpack and see a basic vectorAdd CUDA kernel in C++, and how it works as described in the image below:
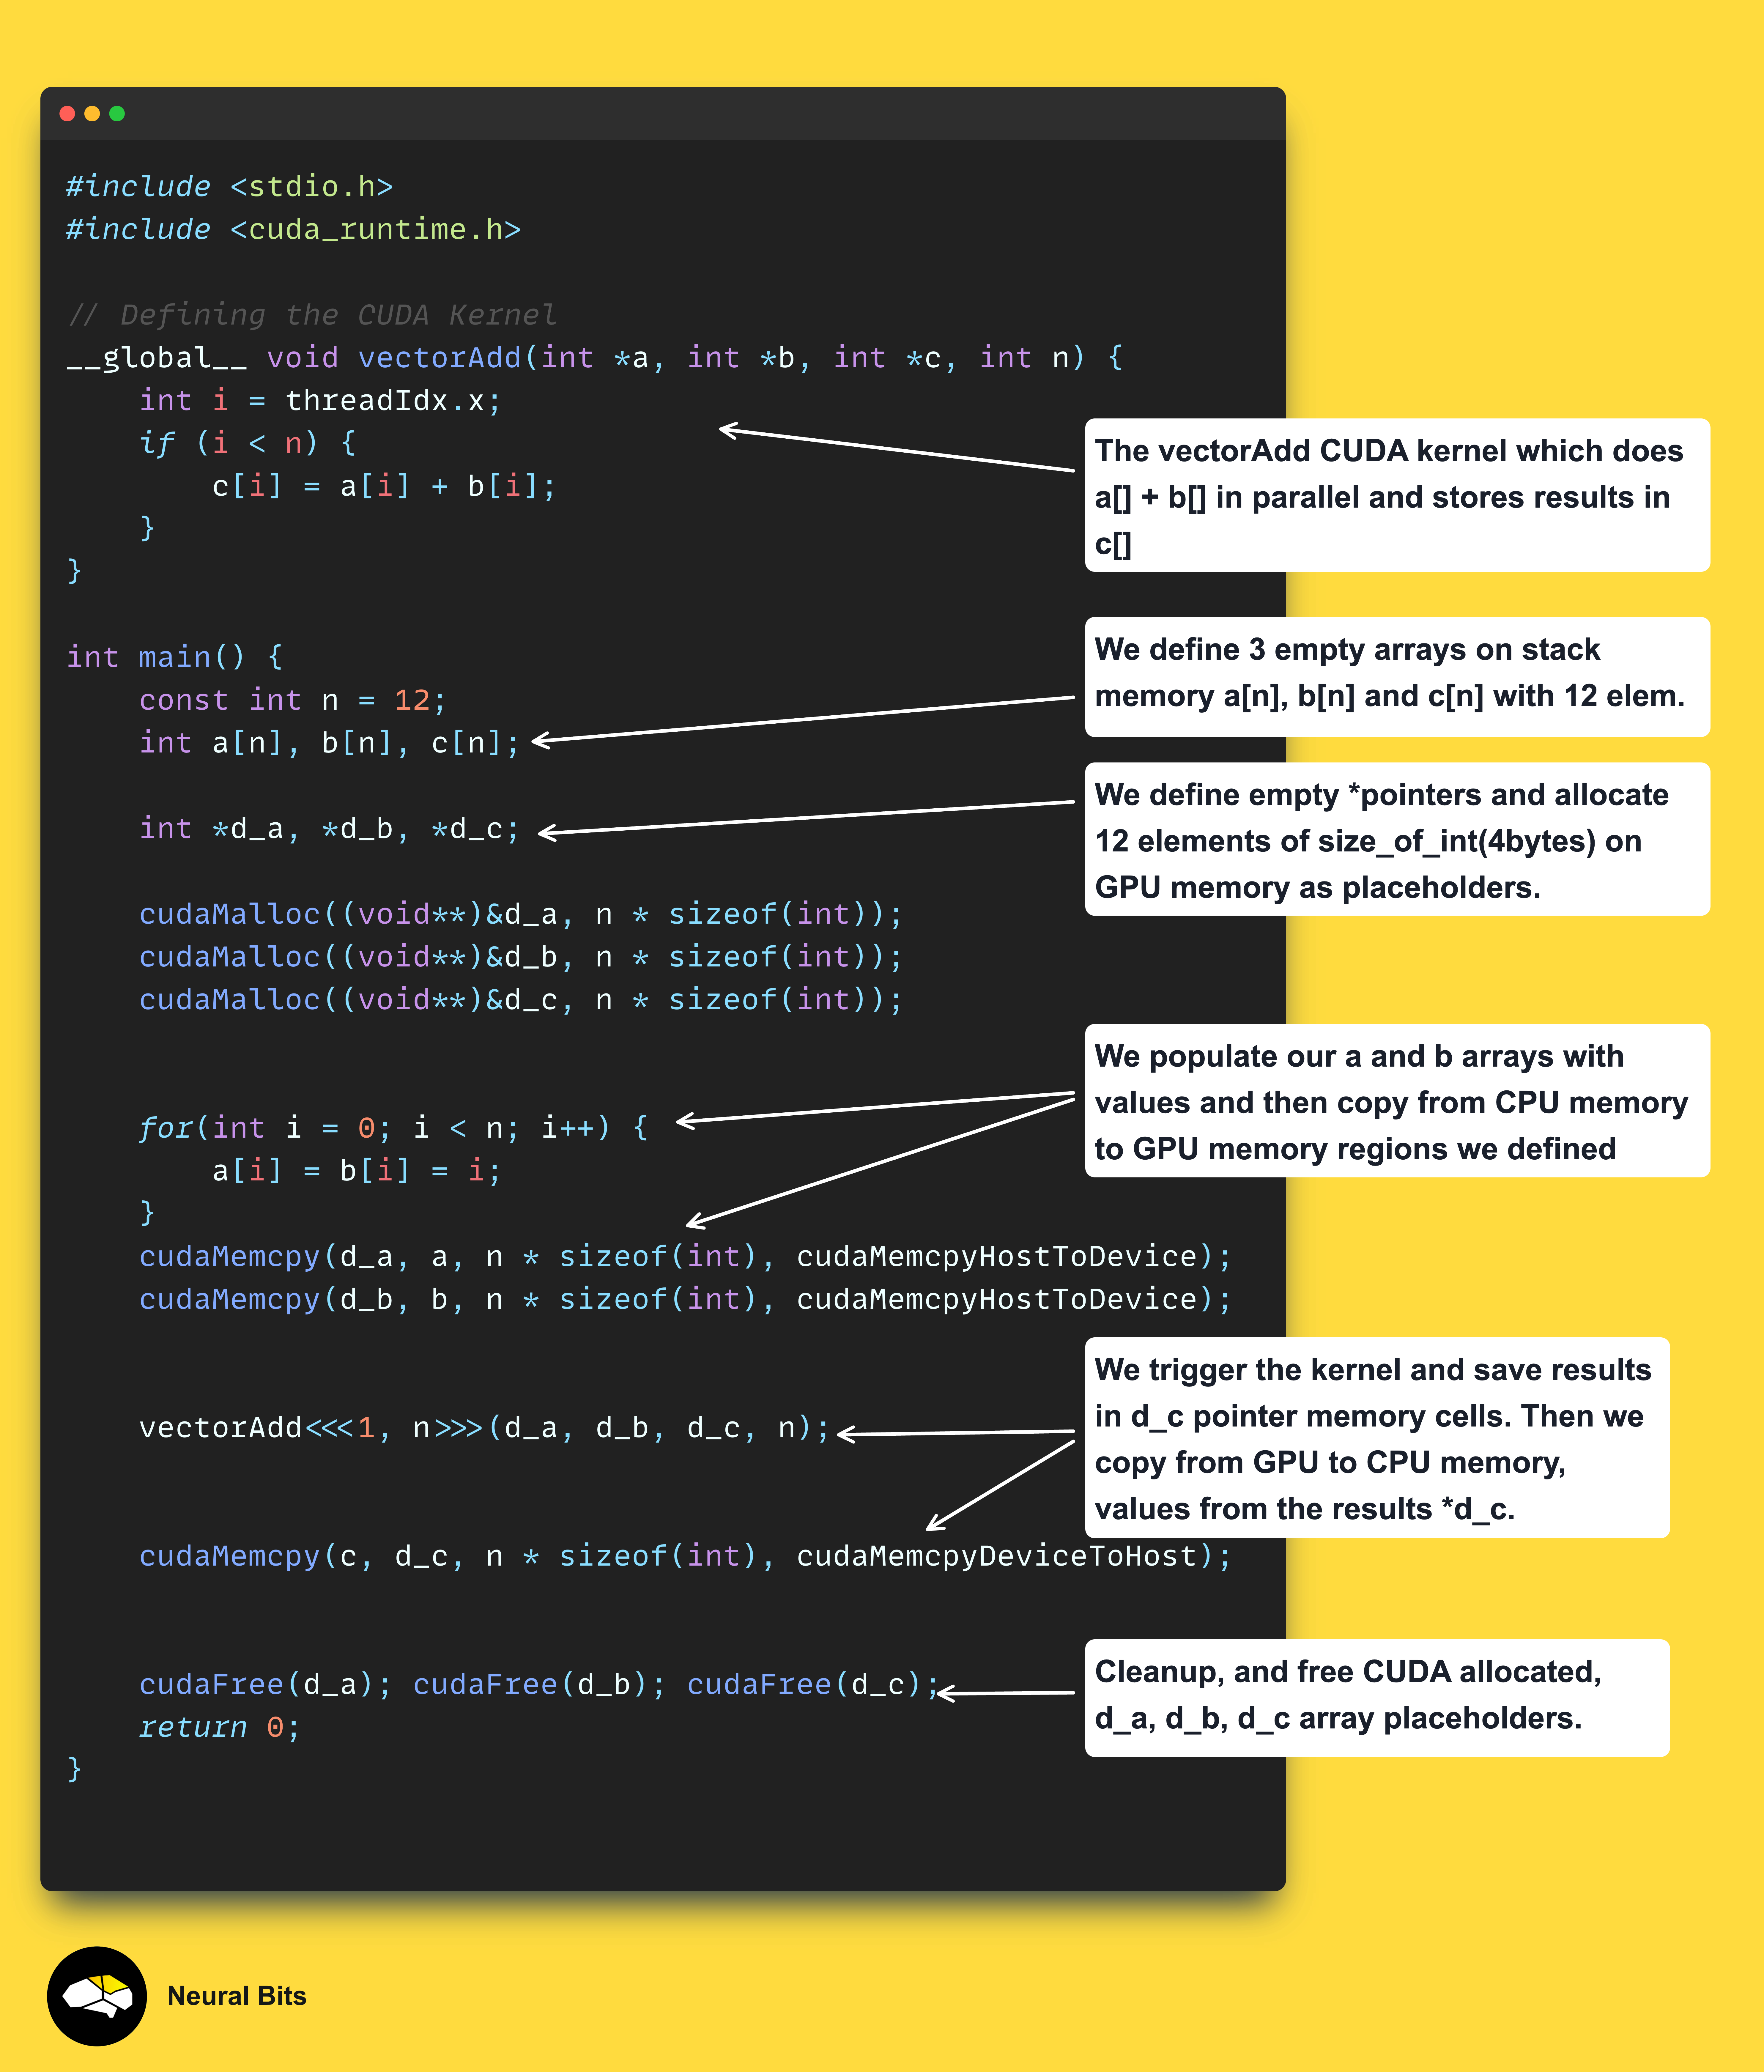
You can access this exact kernel and run it yourself on LeetGPU Free Playground.
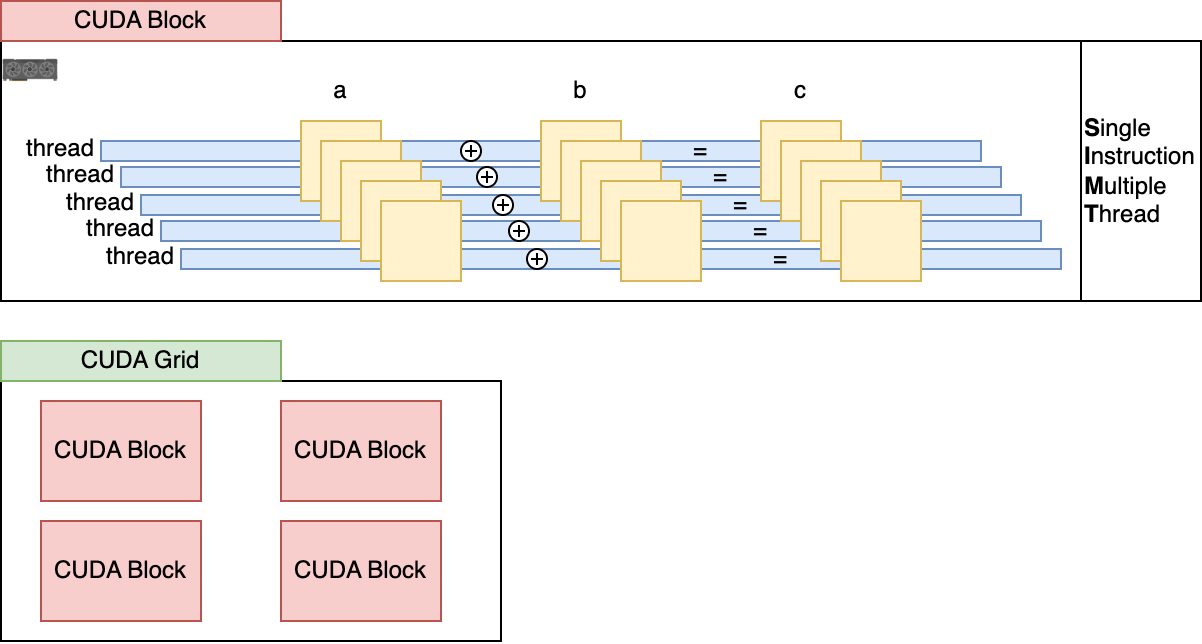
In the case above, given that N=12, this kernel will be executed in parallel on 12 threads at once, a concept called SIMT (Single Instruction Multiple Thread). The results are then pooled from the GPU memory to the CPU memory, where we can access them. Below is an illustration of how kernels are split into threads.
A more complex C++ CUDA Kernel
The following kernel does the matmul operation, which is fundamental in ML.
First, we define the matrix elements in CPU memory, then we allocate contiguous memory placeholders on the GPU with the required sizes.
In CUDA programming, values on the GPU are commonly stored as 1D vectors to simplify memory access. For matrices, the typical storage convention is in row-major order, meaning that the elements of each row are stored in consecutive order similar to how a Flatten Neural Network layer works.
Let’s see a basic illustration of how the values of a 3x3 matrix are stored:
M = [[1, 2, 3], [4, 5, 6], [7, 8, 9]] is stored as

| 1 - 2 - 3 - 4 - 5 - 6 - 7 - 8 - 9|
x --------|                           row 1
              x-------|                          row 2
                          x--------|  row 3
When the kernel is defined, we can control the index in GPU memory from where the value should be read, using the blockIdx, blockDim and threadId parameters.
Each blockIdx, blockDim, and threadIdx have a (.x, .y, .z) direction:
blockDim.x,y,z gives the number of threads in a block, in a particular direction.
gridDim.x,y,z gives the number of blocks in a grid, in a particular direction.
blockDim.x * gridDim.x gives the number of threads in a grid (in the x direction, in this case).
Using these parameters, we can access the rows and cols of the matrix and do matrix multiplication, as showcased in the kernel implementation below:
#include <iostream>
#include <cuda_runtime.h>

__global__ void matmul_kernel(const float* A, const float* B, float* C,
                              int m, int n, int k)
{
  int row = blockIdx.y * blockDim.y + threadIdx.y;
  int col = blockIdx.x * blockDim.x + threadIdx.x;

  if (row < m && col < k) {
    float sum = 0.0f;
    for (int i = 0; i < n; ++i) {
      sum += A[row * n + i] * B[i * k + col];
    }
    C[row * k + col] = sum;
  }
}

int main() {
  int m = 256;
  int n = 128;
  int k = 24;

  // Allocating memory placeholders
  float* h_A, *h_B, *h_C;
  h_A = (float*)malloc(m * n * sizeof(float));
  h_B = (float*)malloc(n * k * sizeof(float));
  h_C = (float*)malloc(m * k * sizeof(float));

  // We add random data here
  for (int i = 0; i < m * n; ++i) {
    h_A[i] = rand() / (float)RAND_MAX;
  }
  for (int i = 0; i < n * k; ++i) {
    h_B[i] = rand() / (float)RAND_MAX;
  }

  // Allocate device memory GPU
  float* d_A, *d_B, *d_C;
  cudaMalloc((void**)&d_A, m * n * sizeof(float));
  cudaMalloc((void**)&d_B, n * k * sizeof(float));
  cudaMalloc((void**)&d_C, m * k * sizeof(float));

  // Copy data from host to device (CPU to GPU)
  cudaMemcpy(d_A, h_A, m * n * sizeof(float), cudaMemcpyHostToDevice);
  cudaMemcpy(d_B, h_B, n * k * sizeof(float), cudaMemcpyHostToDevice);

  // Define grid and block dimensions
  dim3 blockDim(4, 4);
  dim3 gridDim((k + blockDim.x - 1) / blockDim.x,
               (m + blockDim.y - 1) / blockDim.y);

  // Launch the kernel parallelize in GridxBlock
  matrix_multiply_kernel<<<gridDim, blockDim>>>(d_A, d_B, d_C, m, n, k);

  // Copy results from GPU back to CPU in (h_C)
  cudaMemcpy(h_C, d_C, m * k * sizeof(float), cudaMemcpyDeviceToHost);

  std::cout << "Result matrix 10 elements: ";
  for (int i = 0; i < 10; ++i) {
    std::cout << h_C[i] << " ";
  }
  std::cout << std::endl;

  // Cleanup
  free(h_A);
  free(h_B);
  free(h_C);
  cudaFree(d_A);
  cudaFree(d_B);
  cudaFree(d_C);

  return 0;
}
To execute this kernel, copy the code onto this Playground to run it.
References:
[1] NVIDIA CUDA toolkit - free tools and training. (n.d.). NVIDIA Developer.
[2] Priya, B. (2022, November 2). Understanding NVIDIA CUDA: The Basics of GPU Parallel Computing.
[3] Jeremy Howard. (2024, January 28). Getting started with CUDA for Python programmers [Video]. YouTube.
Working with CUDA in Python (CuPy)
CuPy is an open-source array library for GPU-accelerated computing with Python and utilizes CUDA Toolkit libraries including cuBLAS, cuRAND, cuSOLVER, cuSPARSE, cuFFT, cuDNN, and NCCL to make full use of the GPU architecture.
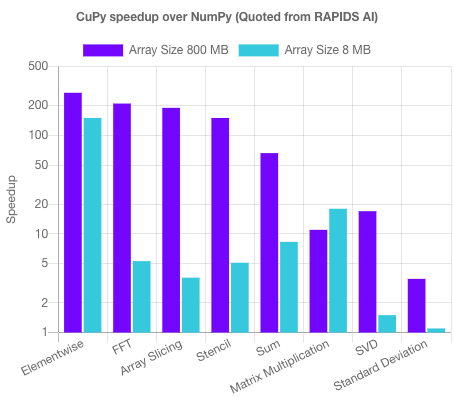
If you already work with numpy in a CUDA-enabled environment, you could drop in and replace it with cupy as its interface is highly compatible with NumPy and SciPy. Doing that you can benefit from a performance boost of up to 100x, as seen in the following chart:
To get started with CuPy, first install it using pip:
# For CUDA 11.2 ~ 11.x
pip install cupy-cuda11x

# For CUDA 12.x
pip install cupy-cuda12x
Then, you could import it as a Python package, simple as that, as shown in the following example of using CuPy as a replacement for NumPy for an array.sum operation:
>>> import cupy as cp
>>> x = cp.arange(6).reshape(2, 3).astype('f')
>>> x
array([[ 0.,  1.,  2.],
       [ 3.,  4.,  5.]], dtype=float32)
>>> x.sum(axis=1)
array([  3.,  12.], dtype=float32)
To write a CuPy kernel, there’s a special template we need to fill, as parts of it include data_types definitions and actual kernel code that will be compiled in C++. Here’s an example:
>>> import cupy as cp
>>> ewise_kernel = cp.ElementwiseKernel(
...     'float32 x, float32 y', 'float32 z',
...     '''
...     if (x - 2 > y) {
...       z = x * y;
...     } else {
...       z = x + y;
...     }
...     ''', 'ewise_kernel')
Here, we’ve created a cp.ElementwiseKernel where on the first line we’ve defined the datatypes of cupy (X, Y, Z) arrays the kernel is applied to:
'float32 x, float32 y', 'float32 z'Then we’ve added the actual C++ kernel code, in between the triple ``` [code] ``` and the kernel name for reference:
...     '''
...     if (x - 2 > y) {
...       z = x * y;
...     } else {
...       z = x + y;
...     }
...     '''
Now, if we define 2 CuPy arrays and apply the kernel, we’ll get:
>>> x = cp.arange(6, dtype='f').reshape(2, 3)
>>> y = cp.arange(3, dtype='f')
>>> kernel(x, y)
array([[ 0.,  2.,  4.],
       [ 0.,  4.,  10.]], dtype=float32)
References:
[1] CUPY. (2019). CuPy.
[2] Installation — CuPy 13.3.0 documentation. (n.d.).
[3] cupy/cupy: NumPy & SciPy for GPU. (n.d.). GitHub.
CUDA Alternatives
The largest part of the existing ML infrastructure is based on NVIDIA hardware, thanks to their mature ecosystem of software and hardware integrations. The 2 key reasons that weigh in the most are:
CUDA is the most mature and adopted GPU programming API, and the PyTorch, and Tensorflow frameworks already have a strong integration with CUDA.
Technologies such as NVLink, NVSwitch, and NCCL, enable the building of large clusters and data centers of GPUs that communicate at a high-speed bandwidth - enabling fast scaling, which is key in industry ML systems.
It is worth mentioning that current CUDA alternatives are also gaining traction:
OpenCL (Open Computing Language) which is GPU agnostic as it is a cross-vendor GPUGPU language (i.e. works on NVIDIA Architectures, ARM, AMD, or Intel)
AMD ROCm - the CUDA equivalent for AMD Radeon GPU architectures.
Triton Programming Language - released by OpenAI in 2021, Triton is an open-source language that proposes a new GPU programming model that is higher in abstraction compared with CUDA, and lower abstraction compared with Torch.
OpenAI Triton Language for GPU Programming
Triton [3] is a language and compiler for GPU parallel programming. As an analogy, if we take CUDA as level 0, and torch.compile as level 10 in abstraction levels, Triton sits at level 5 - allowing developers to build optimized GPU kernels without the burden of learning advanced CUDA and C++ intricacies.
Triton aims to provide a Python-based programming environment for writing compute kernels capable of running at maximum throughput on GPU hardware. Released in 2021 by OpenAI, the ML field has already started to adopt Triton, both at an Industry Level (e.g. PyTorch) and Open Source (e.g. Unsloth [2]).
For example, starting with version PyTorch 2.0, the core developers have introduced torch.compile() which makes your PyTorch code run faster by JIT (Just in Time) compiling it into optimized kernels, all while requiring minimal code changes.
On the other hand, one amazing library for efficient LLM Training is Unsloth, where the core team have implemented custom Triton Kernels to reduce memory up to 70-80% in some cases and speed up training to an x2, x3, and even x4 factor when training and fine-tuning Large Language Models.
By far, the biggest advantage of Triton is not the Python API, but that it is architecture-agnostic, meaning it can implement and compile kernels for NVIDIA GPUs as well as AMD GPUs, all from a single language.
Further, let’s implement a Triton Kernel [1] for vector addition and walk through it step by step.
import torch

import triton
import triton.language as tl

@triton.jit
def add_kernel(x_ptr, y_ptr, output_ptr, n_elements,
               BLOCK_SIZE: tl.constexpr):
    pid = tl.program_id(axis=0)
    block_start = pid * BLOCK_SIZE
    offsets = block_start + tl.arange(0, BLOCK_SIZE)
    mask = offsets < n_elements

    # Load x and y from DRAM
    x = tl.load(x_ptr + offsets, mask=mask)
    y = tl.load(y_ptr + offsets, mask=mask)
    output = x + y

    # Write x + y back to DRAM.
    tl.store(output_ptr + offsets, output, mask=mask)
Once we have the kernel defined, similarly to how we did for C++ CUDA and Python CuPy, we need the arrays, we need to copy data to GPU memory and execute the kernel. In this case, we’ll use torch tensors as the X and Y arrays since they’re allocated automatically on GPU by passing the torch device in constructor.
DEVICE = torch.device(torch.cuda.current_device())

torch.manual_seed(0)
x = torch.rand(1000000, device=DEVICE)
y = torch.rand(1000000, device=DEVICE)

# Preallocate memory for the output
output = torch.empty_like(x)
n_elements = output.numel()

# On how many GRIDS to parallelize
grid = lambda meta: (triton.cdiv(n_elements, meta['BLOCK_SIZE']), )

# Execute kernel
add_kernel[grid](x, y, output, n_elements, BLOCK_SIZE=1024)
If we run the kernel, we get this output:
Triton Kernel (1e6 + 1e6 elements)

51.5 µs ± 41.3 ns per loop (mean ± std. dev. of 7 runs, 10000 loops each)

First 100 elems:
 [1.0580295  0.60024124 0.380257   0.953608   1.346977   1.102268
 0.60675216 1.0032613  0.86939454 1.2298878  0.9303003  0.4085652
 1.3661846  0.9718058  1.151243   0.6168009  0.94763654 0.59371614
 0.62929857 1.044019   1.7451351  1.1336827  0.8944471  0.52017015
 1.0831068  1.6549752  0.36871785 0.50450313 1.2089772  1.5005345
 1.1835426  0.8194787  1.2251052  1.509915   0.65602064 0.3111179
 0.89059263 1.4773924  0.6913295  0.37352023 1.7693558  0.89777
 0.24462697 0.95883185 1.2573919  0.14796549 0.56460106 0.9696971
 1.5597597  1.142031   0.44822356 1.7983356  0.9706055  0.9147438
 0.8744095  1.1395291  0.9319906  0.9120484  1.3675749  0.5716095
 1.4544362  0.8439461  1.0386071  1.1976635  1.7780106  0.6549036
 1.5313892  0.95971394 0.36736047 1.0958441  1.3840077  1.4049904
 1.1860622  0.72485214 1.4449775  0.19742075 1.3271222  0.70788217
 1.7023203  1.8414879  1.6264505  1.1110214  0.4096907  0.932054
 1.2060302  1.2328844  1.3890231  1.6967683  0.8808336  1.1797054
 1.4054813  0.99125767 1.5379136  1.6439523  0.542809   1.1271181
 1.4279256  0.691152   1.4992441  1.5883477 ]
And done, you have successfully implemented and executed a Triton kernel for the vector add operation.
You can find the code for all experiments on this 👉 shared Colab Notebook and execute each on your own.
References:
[1] Vector Addition — Triton documentation. (n.d.).
[2] unslothai/unsloth: Finetune Llama 3.3, Mistral, Phi-4, Qwen 2.5 & Gemma LLMs 2-5x faster with 70% less memory. (n.d.).
[3] Introducing Triton: Open-source GPU programming for neural networks. (n.d.). OpenAI.
[4] Isozaki, I. (2024, June 6). Understanding the Triton Tutorials Part 1 - Isamu Isozaki - medium. Medium.
Conclusion
In this article, we covered the basics of GPU programming with CUDA, CuPy, and Triton. We’ve implemented the Vector Add compute kernel from scratch in C++ for native CUDA execution, CuPy for Python Cuda, and Triton Language and explained step by step the workflow involved in all three use cases.
Thank you for reading, stay tuned for the next! ✌️
Simply amazing ❤️. Without even knowing it, I've been waiting for this series my whole life.
Excellent please continue your CUDA series