

Practical techniques on processing Video for Vision AI Systems.
Understand Image Color formats. Use pre-allocated memory buffers to process images, learn 8 useful CLI commands for video/image manipulation.

Abstract:
Computer Vision is one of the most popular areas of Deep Learning applications. It’s been at the forefront of AI research for quite a while, starting with classical Neural Network architectures and currently having a large portion of the pie on Generative AI research with Vision Language Models and Multimodal learning.
This article will cover a few tools and techniques that allow AI Engineers to work more efficiently with Image/Video Data when either building real-time POCs or working on data engineering.

First, we’ll cover the more efficient YUV420p color formatting for faster video reading and processing and then we’ll cover 8 CLI commands that have helped me as a Senior AI engineer work with video data when curating and preparing datasets for specific use cases.
Table of Contents:
1. YUV420p Color Format
2. Real-time video with PyAV
3. Memory Efficient Frame Conversion
4. 8 commands in FFMpeg
5. Conclusion
YUV420p Color Format
YUV420p is a specific way of storing YUV data that takes advantage of the human eye’s limited sensitivity to color details.
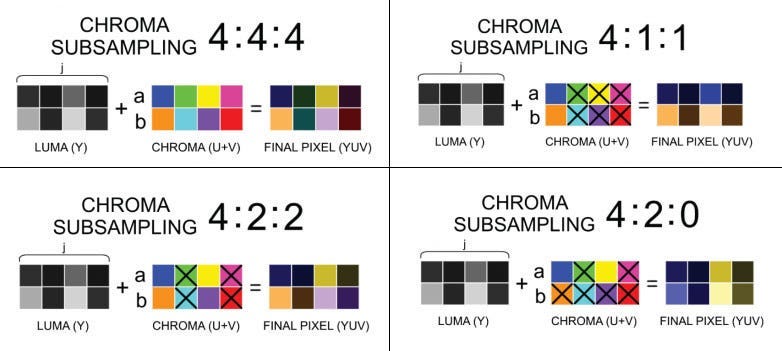
It is a chroma subsampling format, meaning it reduces the amount of color information (U and V channels) while maintaining the luminance (Y channel) detail.
This reduction allows for efficient compression without significantly affecting perceived image quality.
Here’s how YUV420p is structured:
4:2:0 chroma subsampling: The “420” refers to the pattern in which chroma information is subsampled. Specifically, for every four luminance (Y) samples, there are two U samples and two V samples.
Y: Full resolution (every pixel has its own Y value).
U and V: 1/4 resolution.
Chroma (U and V) values are sampled every two pixels horizontally and every two lines vertically.
This subsampling significantly reduces the file size or bandwidth needed for video transmission, which is why YUV420p is popular in video compression standards like MPEG, H.264, and VP8.

In YUV420p, an image is divided into blocks, with full Y data for each pixel and U and V data shared among groups of pixels. This means the color resolution is lower than the brightness, and for most use cases this is barely noticeable.
A nice parallel on color separation and how we perceive color is the example of anaglyph 3D glasses. They come with a red-blue lenses pair, where each lens separates everything but that color channel.
The brain is then tricked to compose the entire image from those color channels, creating the illusion of depth.
Here’s one actual example of how these channels look like:


Now that we have an idea of how the YUV420p format represents the color information in an image, let’s jump to some code examples.
Real-time video with PyAV
When working with Image/Video data, the first choice of everyone is using OpenCV Python (cv2) for all functionality.
That’s great, but in real-time video-processing scenarios, where low latency is key - using the cv2.VideoReader to read and decode video frames might become CPU intensive due to the default mode of decoding in OpenCV which is BGR (3 channel, Blue-Green-Red).
Most video codecs, like H.264 or VP8, store video in YUV420p format because it compresses the chrominance (color) information without sacrificing much visual quality.
For OpenCV, we have:
import cv2

video_path = 'example.mp4'
cap = cv2.VideoCapture(video_path)

while cap.isOpened():
    ret, frame = cap.read()
    if not ret:
        break

    cv2.imshow('Frame', frame) # decoded in BGR

    if cv2.waitKey(25) & 0xFF == ord('q'):
        break

cap.release()
cv2.destroyAllWindows()
Using PyAV, we have:
import av
import numpy as np
import cv2

container = av.open('example.mp4')

for frame in container.decode(video=0):
    yuv_frame = frame.to_ndarray(format='yuv420p')

    # Color conversion YUV -> BGR, for imshow
    bgr_frame = cv2.cvtColor(yuv_frame, cv2.COLOR_YUV2BGR_I420)

    cv2.imshow('Frame', bgr_frame)

    if cv2.waitKey(25) & 0xFF == ord('q'):
        break

cv2.destroyAllWindows()
The main difference we could spot here is the Decoding format. PyAV will iterate through the video faster because the memory allocated for each YUV frame is lower than for each RGB frame.
Let’s do the math:
RGB:
------
Full HD resolution:
1920 × 1080 = 2,073,600 pixels per frame.

Color:
1 byte x [R,G,B] = 3 bytes memory per pixel.

Total Size: 2,073,600 pixels x 3 bytes = 6.220.800 bytes ( 6mb )

YUV:
------
Full HD resolution:
1920 × 1080 = 2,073,600 pixels per frame.

Color:
Y channel: 1 byte (full res) x 1920 x 1080 = 2,073,600 bytes

U,V channels are subsampled (half res): (1920 / 2) × (1080 / 2)

U channel: 960 × 540 = 518,400 bytes
V channel: 960 × 540 = 518,400 bytes

Total Size:
2,073,600 + (518.400 x 2) = 3,110,400 bytes ( 3mb )
The YUV format frame is ~2x more memory efficient. On a powerful CPU, the differences might not be noticeable, but when running on Edge Devices or low-compute environments - this plays an important role.
Next, let’s see how we can further optimize the video frame processing with Python, by using pre-allocated memory buffers instead of dynamically allocating new memory on each VideoFrame decode.
Memory Efficient Frame Conversion
When using, cv2.VideoReader and av.Container to read videos, by default new memory will be allocated each time a Frame is decoded and made accessible to the user.
We could bypass that, by having a global buffer that we re-use each time and populate its contents, rather than allocating it on context start and deallocating on the context end of our method.
Here’s an example:
Here we have:
PREALLOC : a global dictionary that keeps an empty np.array of the same size as our Video.
YUV2RGB_cv2_prealloc: will point to this global buffer and replace its contents on each new frame, reducing the memory footprint.
When reading a video with PyAv, our frame object is an av.VideoFrame.
An av.VideoFrame instance has a `planes` object which is a list of the byte data for each image channel (Y - planes[0], U - planes[1], V - planes[2]).
Why is this useful?
In real-time computer vision applications, you want to do the pre-processing/postprocessing as fast as possible such that you can allow more compute-time for your AI model, to balance-out the entire workflow and give you real-time FPS.
Here are 2 powerful examples:
Using YUV color format + buffer memory preallocation will cut down the default processing time of cv2.VideoReader.
Using YUV, you directly have access to the Grayscale image without converting to a more memory-demanding RGB format.
You could use grayscale to look for motion in your video, and if there is → you can start converting YUV → RGB, and pass the images to your AI model (object detection, segmentation).
These examples might look advanced, but they will save you computing time and resources when building a real-time video processing pipeline.
[Bonus] 8 commands in FFMpeg
I was reading a blog post from 𝗠𝗲𝘁𝗮 𝗘𝗻𝗴𝗶𝗻𝗲𝗲𝗿𝗶𝗻𝗴, describing an approach that 𝗰𝘂𝘁 𝗱𝗼𝘄𝗻 𝘁𝗵𝗲 𝗜𝗻𝘀𝘁𝗮𝗴𝗿𝗮𝗺 𝘃𝗶𝗱𝗲𝗼 𝗰𝗼𝗺𝗽𝘂𝘁𝗲 time by ~94%!
The approach was to replace the basic ABR (adaptive bit rate) encodings with the progressive encodings’ video frames by repackaging them into an ABR-capable file structure.
While reading, I thought about sharing a list of 10 commands that everyone could use quickly when working with video/audio data, without writing any code.
Here are a few 𝗙𝗙𝗺𝗽𝗲𝗴 commands that I’ve frequently used when dealing with videos, images, RTSP streams, and audio streams:
Basic conversion 𝙛𝙛𝙢𝙥𝙚𝙜 -𝙞 𝙞𝙣𝙥𝙪𝙩.𝙢𝙥4 𝙤𝙪𝙩𝙥𝙪𝙩.𝙖𝙫𝙞
Extracting frames 𝙛𝙛𝙢𝙥𝙚𝙜 -𝙞 𝙫𝙞𝙙𝙚𝙤.𝙢𝙥4 -𝙧 1/1 $𝙛𝙞𝙡𝙚𝙣𝙖𝙢𝙚%03𝙙.𝙟𝙥𝙜
Resizing videos 𝙛𝙛𝙢𝙥𝙚𝙜 -𝙞 𝙞𝙣𝙥𝙪𝙩.𝙢𝙥4 -𝙫𝙛 𝙨𝙘𝙖𝙡𝙚=320:240 𝙤𝙪𝙩𝙥𝙪𝙩.𝙢𝙥4
Adjusting frame-rate 𝙛𝙛𝙢𝙥𝙚𝙜 -𝙞 𝙞𝙣𝙥𝙪𝙩.𝙢𝙥4 -𝙧 30 𝙤𝙪𝙩𝙥𝙪𝙩.𝙢𝙥4
Trimming videos 𝙛𝙛𝙢𝙥𝙚𝙜 -𝙞 𝙞𝙣𝙥𝙪𝙩.𝙢𝙥4 -𝙨𝙨 00:00:10 -𝙩𝙤 00:00:20 -𝙘 𝙘𝙤𝙥𝙮 𝙤𝙪𝙩𝙥𝙪𝙩.𝙢𝙥4
Merging Images to Video 𝙛𝙛𝙢𝙥𝙚𝙜 -𝙛𝙧𝙖𝙢𝙚𝙧𝙖𝙩𝙚 1 -𝙞 𝙞𝙢𝙜%03𝙙.𝙥𝙣𝙜 -𝙘:𝙫 𝙡𝙞𝙗𝙭264 -𝙧 30 -𝙥𝙞𝙭_𝙛𝙢𝙩 𝙮𝙪𝙫420𝙥 𝙤𝙪𝙩.𝙢𝙥4
Compressing Videos 𝙛𝙛𝙢𝙥𝙚𝙜 -𝙞 𝙞𝙣𝙥𝙪𝙩.𝙢𝙥4 -𝙫𝙘𝙤𝙙𝙚𝙘 𝙝264 -𝙖𝙘𝙤𝙙𝙚𝙘 𝙢𝙥2 𝙤𝙪𝙩𝙥𝙪𝙩.𝙢𝙥4
Adjust aspect ratio 𝙛𝙛𝙢𝙥𝙚𝙜 -𝙞 𝙞𝙣𝙥𝙪𝙩.𝙢𝙥4 -𝙖𝙨𝙥𝙚𝙘𝙩 1.7777 𝙤𝙪𝙩𝙥𝙪𝙩.𝙢𝙥4
Conclusion
In this article, we’ve covered the YUV color format, which is more efficient than RGB memory and performance-wise, and also given concrete examples of how to read/decode and use pre-allocated buffers to handle frame manipulation and color conversions.
We’ve also covered 8 useful CLI commands with FFmpeg, that will allow for quick video manipulation, such as resizing, changing framerate, displaying metadata, and more.
This article gives you a few practical insights on working with real-time video processing.
Subscribe if you haven’t, and stay tuned for the next deep-dive article series that I’ve been working on for the past few weeks.
Have a nice weekend! :)