

MCP is just a fancy API
Understand MCP as an Engineer, build and debug one, step-by-step in Python.

In this newsletter:
MCP Communication Details
How to build an MCP in Python using FastMCP
Unpack the MCP tools, prompts, and resources
Debug and test your MCP using MCP Inspector
The reason I decided to write an article on MCP is to provide context for the upcoming course I’m working on. As with every article I write, I like to dive into the details of how it works, aiming to fully understand what’s underneath the fancy names and titles.
In the upcoming course that I’m preparing for you guys, we’ll be building a network of specialized AI Agents, each one accessing domain-specific MCP Servers. Further on, we’ll also use Google A2A to enable inter-agent communication.
Note: Although MCP can enable some type of Agentic Behaviour, via the Sampling capability, where an MCP Server could request an LLM to generate a respose - A2A is specifically designed for cross-agent communication.
Okay, enough with that, let’s get to what we’re covering in this edition.
This article aims to do two things:
1/ Explain what’s underneath an MCP Server-Client connection, for engineers.
2/ Showcase how to build an MCP Server in Python using FastMCP

Let’s get started!
An interesting analogy
Leaving aside the original definition of MCP for a bit, let’s start by mirroring things differently. So, assuming everyone has worked with Python, or at least seen a class implemented in Python, we could make this analogy.
Suppose in Python we have this class:
class ExampleClass:
    def __init__(self):
      self.text_file = "long_description.txt"

    def one_tool(self, param) -> str:
      result = process(param)
      return f"Result: {result}"

    @property
    def file_resource(self) -> str:
      return open(self.text_file, "r").read()

    def formatting(self, subject: str) -> str:
        formatted = "Previous text ... [{subject}] ... Next text"
        return formatted
In it, we have the classic constructor via __init__, a property that returns a class attribute, and two methods. As per implementation, nothing fancy, we just process some things and return some basic results.
Now, from the original MCP Documentation (Anthropic), we have the definition of MCP as follows.
MCP is an open protocol that standardizes how applications provide context to LLMs. Think of MCP like a USB-C port for AI applications. Just as USB-C provides a standardized way to connect your devices to various peripherals and accessories, MCP provides a standardized way to connect AI models to different data sources and tools.
MCP servers can provide three main types of capabilities:
Resources: File-like data that can be read by clients (like API responses or file contents)
Tools: Functions that can be called by the LLM (with user approval)
Prompts: Pre-written templates that help users accomplish specific tasks
In other words, MCP is a communication standard for how developers expose services and resources that sit behind an API towards an LLM or an Agent.
Now, returning to our `ExampleClass`Python class from earlier, we can make an oversimplification to map MCP to how a class in Python works.
In MCP, we first have tools that, given an input, can change the state of data. Think of a math operation, a data processing step, or a database write. In our Python class, this concept can be mapped to class methods.
Secondly, in MCP, we have resources that are defined by a URI and return data as is. Think of a database read or a file read. In our Python class, this concept can be mapped to class properties via the property decorator.
Thirdly, we have prompts which act as templates. In our Python class, they can be mapped to __repr__ field, which returns the string representation of the class, or a method that takes arguments and returns a string.
Prompts and resources - don’t change the state of data given as input. Tools do.
MCP Core Internals
This section will be technical details, covering the core components of MCP, protocol and transport layers, JSON-RPC format, message types, and more. Although knowing all these concepts won’t necessarily help, you could feel free to skip this section.
MCP follows a client-server architecture where:
Hosts are LLM applications that initiate connections.
Clients maintain 1:1 connections with servers inside the host application.
Servers provide context, tools, and prompts to clients.
There are three core components a developer must know:
The Protocol Layer
The Transport Layer
Message Types
1/ The Protocol Layer
Handles message framing, request/response linking, and high-level communication patterns. This layer establishes the connection between MCP clients and servers.
When we start an MCP server and a client tries to connect to it, a few things happen. Assuming the server is up, the client sends an initialize request containing the protocol version, capabilities, and implementation information.
The request the client sends looks like this:
# client -> server
{
  "jsonrpc": "2.0",
  "id": 1,
  "method": "initialize",
  "params": {
    "protocolVersion": "2025-03-26",
    "capabilities": {
      "roots": {
        "listChanged": true
      },
      "sampling": {}
    },
    "clientInfo": {
      "name": "ExampleClient",
      "version": "1.0.0"
    }
  }
}
The listChanged flag is an optional notification flag that can be activated for each of the server’s capabilities to notify the client that the list of prompts, tools, or resources from the server has changed.

In the request above, the protocolVersion, method, and clientInfo are used to establish a handshake with the server. Upon receiving this request, the server responds with:
# server -> client
{
  "jsonrpc": "2.0",
  "id": 1,
  "result": {
    "protocolVersion": "2025-03-26",
    "capabilities": {
      "prompts": {
        "listChanged": true
      },
      "resources": {
        "listChanged": true
      },
      "tools": {
        "listChanged": true
      }
    },
    "serverInfo": {
      "name": "ExampleServer",
      "version": "1.0.0"
    },
  }
}
Here, the server outlines its core capabilities (prompts, resources, tools) I’ve described above. A request round-trip establishes the connection, and to complete the handshake, the client sends an initialized notification back to the server, which results in opening a session between the two.
# client -> server
{
  "jsonrpc": "2.0",
  "method": "notifications/initialized"
}
This approach is fairly similar to an older protocol for real-time communication WebRTC which is preponderently used in Browser ←→ Mobile, or Real Time Multimedia communication.
2/ The Transport Layer
The protocol currently defines two standard transport mechanisms for client-server communication: stdio and Streamable HTTP (previously SSE).
To simplify these two, the stdio transport involves spawning an MCP server as a subprocess of the MCP client, whereas with Streamable HTTP, the server runs as an independent process supporting multiple clients.
If you develop locally, stdio is fast to set up and test, once you move your MCP server as a Docker container or have deployed it, only Streamable HTTP will work.
3/ Message Types
MCP uses JSON-RPC 2.0 messaging format.
The transport layer converts MCP protocol messages into JSON-RPC when messages are sent through the network, and then in either the Server application or the client application, JSON-RPC is converted back to protocol messages. Think of it as a serde (serialize, deserialize) mechanism.
MCP has 4 types of messages: Requests, Results, Errors, and Notifications.
Requests expect a response from the other side:
interface Request {
  method: string;
  params?: { ... };
}
Results are successful responses to requests:
interface Result {
  [key: string]: unknown;
}
Errors indicate that a request failed.
interface Error {
  code: number;
  message: string;
  data?: unknown;
}
Notifications are one-way messages that don’t expect a response.
interface Notification {
  method: string;
  params?: { ... };
}
A request received by the server or sent by the client will always be in protocol message format. JSON-RPC happens in between.
All these details might not necessarily help you in building MCPs, as they’re not mandatory to know, but I think it’ll help in these cases:
You get specific JSON-RPC error codes and want to know what’s happening, or you want to define your custom error codes that you handle. Important note here, the custom error codes have to be above -32000.
You want to understand fully how client-server communication works and what the payload looks like.
You want to master MCP and everything that happens underneath.
Okay, in the next section, we’ll build an MCP server in Python using FastMCP and add prompts, resources, and tools that we’ll test from a separate Python client using the MCP Inspector.
Building an MCP in Python
First things first, what I like to do when I create a new project is to use UV for the overall setup. Before UV, I started with conda to manage environments and then switched to poetry, pretty much like everyone else.
Note: When using uv, pay attention to this one issue when building distributables, as noted here in one of my comment threads with Maria Vechtomova.
Let’s prepare our project. First, install UV using:
# On macOS and Linux.
curl -LsSf https://astral.sh/uv/install.sh | sh
Then, initialize a new Python project.
uv init mcp-getting-started --python=3.11This will create a Python package with the given name and pin the Python version to 3.11, which I use most frequently. Feel free to change the Python version as you wish. The next step is to prepare our environment, in that we’ll need the fastmcp Python package and some other utilities. Add the fastmcp dependency
uv add fastmcp Next, let’s set up the project structure.
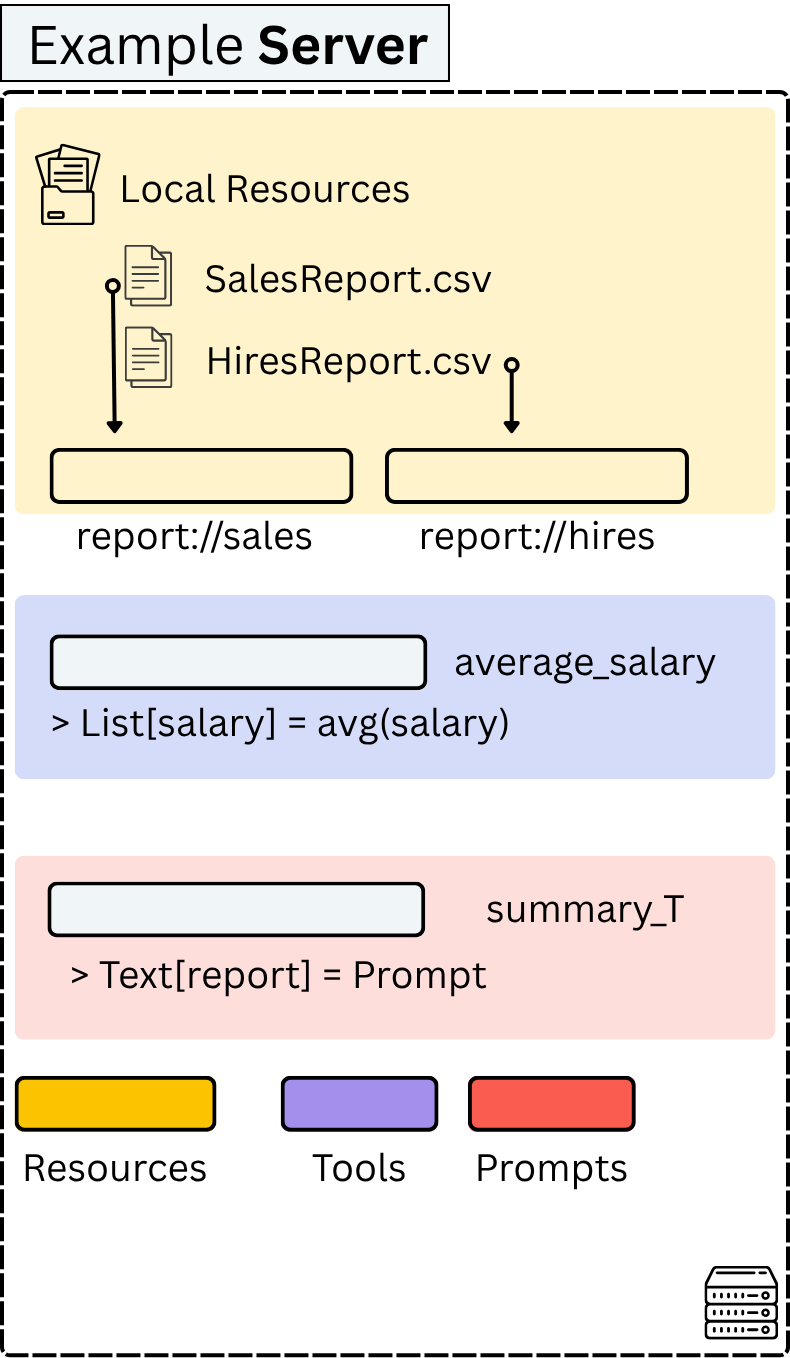
For this, under our UV created project, we add two more folders, `data` and `mcp. In the data folder, we’ll keep a few dummy report CSV files that our MCP server will ingest as resources, and in the mcp folder, we’ll define the server, tools, prompt, and resources.
mcp_getting_started/
├── .venv/
├── data/                 # Our report files
│   ├── hires.csv
│   └── sales.csv
├── mcp/
│   ├── prompts.py        # We keep all prompts here
│   ├── resources.py      # MCP resource here
│   ├── server.py         # The MCP server entrypoint
│   └── tools.py          # MCP tools here
├── .python-version
├── pyproject.toml
├── README.md
└── uv.lock
In the data/hires and data/sales, we have a few dummy data records, such as:
# hires.csv
Date,Position,Salary,
2025-06-01,SoftwareEngineer,120000,
2025-06-02,AI Engineer,150000,
2025-06-03,AI Engineer,110000,

# sales.csv
Date,Product,Units,UnitPrice,TotalSales
2025-05-01,Glasses,10,25.00,250.00
2025-05-01,Books,5,40.00,200.00
2025-05-02,Laptops,8,25.00,200.00
Next, we’re ready to start implementing our MCP server. But before that, let’s quickly cover what prompts, resources, and tools are in the MCP Context.
Resources:
Resources are a core primitive in MCP as they allow servers to expose data and content that can be read by clients and used as context for LLM interactions. Resources are designed to be application-controlled, meaning that the client application can decide how and when they should be used.
A resource is defined by a URI, either default ones such as “file://”, “screen://”, or user-defined ones, as we’ll see in the example we’re building.
Resources can’t change state, they’re data sources used as is.
Prompts
Prompts enable servers to define reusable prompt templates and workflows that clients can easily surface to users and LLMs.
Prompts are meant to be read as templates or given fields to populate a template.
Tools
Tools are the most popular ones, they expose executable functionality to clients. Through tools, LLMs can interact with external systems, perform computations, and take actions.
Tools, can change the state through dynamic operations.
Now that we’ve got an understanding of the core primitives an MCP Server can expose, let’s go ahead and implement them in our MCP server.
Implementation details
We’ll build a dummy MCP that handles business reports. Meaning it will have access to resources such as sales or hiring reports, can calculate average salary, or can format findings using a summarisation prompt template. This is enough to cover all the base concepts of an MCP server, and it’ll provide enough details for you to be able to customize and build your own.
1/ Adding Prompts in mcp/prompts.py
import json


def summarize_hires(report_jsonstr: str, position: str) -> str:
    return f"""
Please summarize the report {report_jsonstr} and provide a description of how many positions we've hired recently.
"""
Remember, prompts are nothing but templates.
2/ Adding Resources in mcp/resources.py
import csv
import os

REPORTS_FOLDER = os.path.join(os.path.dirname(__file__), "../data/")


def get_sales_data() -> str:
    path = os.path.join(REPORTS_FOLDER, "sales.csv")
    if os.path.exists(path):
        with open(path, mode="r") as file:
            reader = csv.DictReader(file)
            sales_data = [row for row in reader]
        return sales_data
    return "Report not found."


def get_hires_data() -> str:
    path = os.path.join(REPORTS_FOLDER, "hires.csv")
    if os.path.exists(path):
        with open(path, mode="r") as file:
            reader = csv.DictReader(file)
            sales_data = [row for row in reader]
        return sales_data
    return "Report not found."
Remember, resources expose read-only data, similar to GET requests.
3/ Adding tools in mcp/tools.py
from typing import List

def average_salary(salaries: List[int | float]) -> float:
    if not salaries:
        return 0.0
    sorted_salaries = sorted(salaries)
    n = len(sorted_salaries)
    return sum(sorted_salaries) / n
Remember, tools allow LLMs to perform dynamic actions by executing functions.
4/ Composing the MCP Server in mcp/server.py
from fastmcp import FastMCP
from prompts import summarize_hires
from resources import get_hires_data, get_sales_data
from tools import average_salary

mcp = FastMCP(name="Hiring Report Analysis")

mcp.add_resource_fn(
    fn=get_hires_data,
    uri="reports://hires",
    name="get_hires_data",
    description="Get the hires data from the CSV file.",
)

mcp.add_resource_fn(
    fn=get_sales_data,
    uri="reports://sales",
    name="get_sales_data",
    description="Get the sales data from the CSV file.",
)

mcp.prompt(
    name="summarize_hires",
    name_or_fn=summarize_hires,
    description="Summarize the number of hires for a specific position.",
)

mcp.tool(
    name_or_fn=average_salary,
    description="Calculate the average salary from a list of salaries.",
    name="average_salary",
)

if __name__ == "__main__":
    mcp.run(host="0.0.0.0", port=8000, transport="streamable-http")
I prefer organizing my MCP servers this way, because using decorators, as it’s presented in many examples will bound you to define everything in a single script, or have to import/pass the mcp = FastMCP() instance across modules.
This way, the tools, resources, and prompts are defined as default methods in Python and then composed in server.py. It’s a much cleaner and robust approach.
To run the server, we could use two methods:
Run the server.py as is, because it has mcp.run() callable defined in main.
Remove the Python main, and run server.py as a module from the terminal with
`fastmcp run server.py —port <P> —host <H> —transport <T>`
Debugging the MCP Server
The popular method to debug MCP servers is to use Anthropic’s MCP Inspector, which enables a UI interface. MCP Inspector is a web application built in TypeScript and Node. To run it, you’ll need Node installed on your system.
To install Node, follow this quick setup. Finally, run the inspector using `npx @modelcontextprotocol/inspector`. Next, in the inspector, set up the URL to the host and port we’ve defined for the server, and add the /mcp route, which is required for Streamable HTTP transport.

Alternatively, we could develop a client in Python to test it out. For that, we need to define the client connection first and use it within an async context.
MCP Client connection class implementation, defines the __aenter__ and __aexit__ methods of a context manager object as we can see here:
# fastmcp/Client.py

async def _connect(self):
    async with self._context_lock:
        need_to_start = self._session_task is None or self._session_task.done()
        if need_to_start:
            self._stop_event = anyio.Event()
            self._ready_event = anyio.Event()
            self._session_task = asyncio.create_task(self._session_runner())
        await self._ready_event.wait()
        self._nesting_counter += 1
    return self

async def __aenter__(self):
    await self._connect()
    return self
That means we should use async with <MCPClient>.
We’ll implement our client as a plain AsyncIO MCP client. However, when used in more complex applications that involve LLMs or Agents, the context management is handled in the Agent definition itself. For instance, for a simple client implementation, we have:
import json

from fastmcp import Client


async def main():
    client = Client("http://localhost:8000/mcp")
    async with client:
        hires_data = await client.read_resource("reports://hires")
        sales_data = await client.read_resource("reports://sales")

        print("Sales Data:", sales_data[0].text)

        fargs = {
          "report_jsonstr": hires_data[0].text,
          "position": "AI Engineer"
        }
        summary = await client.get_prompt(
            name="summarize_hires", arguments=fargs
        )

        print("Summary of Hires:", summary)

        salary_data = json.loads(hires_data[0].text)
        salaries = [
          float(entry["Salary"]) for entry in salary_data
          if "Salary" in entry
        ]

        fargs = {"salaries": salaries}
        avg_sal = await client.call_tool(name="average_salary", fargs)
        print("Average Salary:", avg_sal)


if __name__ == "__main__":
    import asyncio

    asyncio.run(main())
When we want to enable Agents to access MCP servers, in a framework such as PydanticAI, for example, we’d have to define the URL connection strings to our MCP Server, and the framework will handle initialization. Let’s see an example.
from pydantic_ai import Agent
from pydantic_ai.mcp import MCPServerHTTP

server = MCPServerHTTP(url='http://localhost:8000/mcp')
agent = Agent('openai:gpt-4o', mcp_servers=[server])

async def main():
    async with agent.run_mcp_servers():
        result = await agent.run('What's the average salary?')
    print(result.output)
    #> Average salary from the hiring report is 120k USD.
In here, the MCPServerHTTP class handles the MCP client connection, and upon connecting to the server, the capabilities (prompts, resources, tools) will be read from the Server and injected into the LLM’s system context with each call. That way, the Agent would be able to use the capabilities of our server.
Advanced Features
In this example, we exposed the communication in plain format, without a security component. However, in production environments, one should add Authentication. The MCP specification requires servers to implement full OAuth 2.1 authorization flows with dynamic client registration, server metadata discovery, and complete token endpoints.
To secure the MCP server, we could use the BearerAuthProvider
from fastmcp import FastMCP
from fastmcp.server.auth import BearerAuthProvider

auth = BearerAuthProvider(
    jwks_uri="<https://identity-provider.com/.well-known/jwks.json>",
    issuer="<https://identity-provider.com/>",
    audience="<mcp_server>"
)

mcp = FastMCP(name="My MCP Server", auth=auth)
Once secured, tools, resources, or prompts could be authenticated using the get_access_token() dependency, as follows:
from fastmcp import FastMCP, Context, ToolError
from fastmcp.server.dependencies import get_access_token, AccessToken

@mcp.tool
async def get_my_data(ctx: Context) -> dict:
    access_token: AccessToken = get_access_token()

    user_id = access_token.client_id
    user_scopes = access_token.scopes

    if "data:read_sensitive" not in user_scopes:
        raise ToolError("Insufficient permissions")

    return {
        "user": user_id,
        "sensitive_data": f"Private data for {user_id}",
        "granted_scopes": user_scopes
    }
Conclusion
In this article, we’ve covered core details of how MCP Communication works. We’ve described how the Protocol Layer and Transport Layer work together to serialize and deserialize messages.
Next, we’ve explained the MCP capabilities with prompts as templates, resources as read-only data sources, and tools as dynamic functions the LLM can request to execute. Further, we’ve built an MCP server in Python using FastMCP, added prompts, tools, and resources, and tested our server with a client from both the Python context and using the official Anthropic MCP Inspector UI.
Finally, we’ve described how to add the Security & Authentication feature, which is mandatory in production environments.
These should provide you with a nice start to understanding how MCP works and enable you to build your own!
Thanks for reading, see you next saturday!
References:
Core architecture - Model Context Protocol. (n.d.). Model Context Protocol. https://modelcontextprotocol.io/docs/concepts/architecture#error-handling
Lifecycle - model context protocol. (2025, March 26). Model Context Protocol. https://modelcontextprotocol.io/specification/2025-03-26/basic/lifecycle
Specification - model context protocol. (2025, March 26). Model Context Protocol. https://modelcontextprotocol.io/specification/2025-03-26
Sampling - model context protocol. (2025, March 26). Model Context Protocol. https://modelcontextprotocol.io/specification/2025-03-26/client/sampling
Transports - Model Context Protocol. (n.d.). Model Context Protocol. https://modelcontextprotocol.io/docs/concepts/transports
jlowin/fastmcp: 🚀 The fast, Pythonic way to build MCP servers and clients. (n.d.). GitHub. https://github.com/jlowin/fastmcp
All images are created by the author unless otherwise noted.