


Let's build Andrej Karpathy's BPETokenizer in Rust and use it from Python
Learn how to build a custom Rust library and generate Python Bindings. See how popular frameworks like Bytewax and Polars use the same workflow.

Abstract
In this article, we will build a Rust library for the popular Byte-Pair-Encoding Tokenizer (BPE) from Andrej Karpathy, used widely in LLMs (e.g. GPT4), and then generate Python bindings so we can use it from Python.
If you’ve heard/or worked with Polars (blazing fast DataFrame library) or Bytewax for stream processing - they use the same principles:
Using the same toolkit we’re going to use (Poetry, Maturin, PyO3, Rust)
Have the core functionality in Rust which is fast and resource-efficient, and the execution calls are done from Python.
As we’re going to see, in our case - we’ll benefit from Rust's speed (at least 3x on my tests) and Python’s flexibility and high-level abstractions.
I’ve recently started to look into Rust, for 2 main reasons:
1 - I don’t want my programming skills to “rust”, and become too confident and locked into Python, but rather pick and learn other languages too.
2 - At work, we have a library built in Python that does 100 000x calls to different Storage Layers (S3, Azure Blob, and GCS) and we can’t fully benefit from parallelizing remote file reads and transfers, so I have to adapt it in Rust and expose the high-level API to Python.
A warm welcome to the 52 new subscribers 🚀 who have joined NeuralBits!
This project is a successful result of what I’ve learned and applied.
Table of Contents:
1. What is Rust
2. How does Rust work
3. The BytePairEncoding Tokenizer
4. Rust implementation
5. Generating Python Bindings
6. Comparing Implementations
7. Conclusion
What is Rust
Rust is a general-purpose programming language, focusing on performance, type safety, and concurrency. It was started by Graydon Hoare at Mozilla Research in 2006 and got its first stable release in May 2015.
In 2022, Rust became the first language, other than C and Assembly to be supported in the development of the Linux kernel.
At the moment, Rust is one of the Top 10 most popular and in-demand languages for software engineers, with big companies like Amazon, Google, Meta, and Microsoft having a play in that since they’ve adopted it and rebuilt or enhanced some of their frameworks and services.
How does Rust work
Rust is popular for systems programming, supporting both functional and OOP paradigms. It is memory safe, meaning that all variable references point to valid memory, thus it doesn’t need a garbage collector like Java or Julia does.
To ensure memory safety and prevent data races, the “borrow checker” mechanism tracks the object lifetime of all references in a program during compilation.
To understand what powers it, we first need to take a look at the Compilation workflow. Rust is an LLVM-based language, meaning that the compiler (rustc) translates the high-level code (the one we write) to LLVM Intermediate Representation which is then analyzed, optimized, and compiled down to machine code targeting various backends (e.g x86, x64, ARM).

LLVM is at the core of multiple fast languages, such as Rust, Julia, Swift, LLGo, and the new Mojo language for AI development.
💡 If curious about Mojo, and want deeper dive into LLVM & MLIR, please see my recent article Mojo Language for AI Development.
As we’ve got the Rust overview covered, let’s get into what we’re going to build with Rust - The BPE Tokenizer.
The BytePairEncoding Tokenizer
Byte Pair Encoding (BPE) is a popular tokenization technique used in NLP, especially for training LLMs. Tokenization is the process of breaking down text into smaller units (tokens), which can range from one character up to a whole word.
BPE strikes a balance by splitting text into subword units, which allows it to handle rare or unseen words effectively. It starts by treating every character in a word as a separate token. Then, it iteratively merges the most frequent pairs of tokens until a fixed vocabulary size is reached.
Let’s follow a very basic example.
Supposing we have the following text = "Python and Rust", this is what a tokenizer does:
x = "Python and Rust"

from minbpe.bpe import BPETokenizer as PyBPETokenizer
tok = PyBPETokenizer()

print("Tokens: ", list(tok.encode(x)))
print("Vocabulary: ", tok.vocab)
for id in list(tok.encode(x)):
    val = tok.vocab.get(id)
    print(f"ID {c} -> Val {val} -> Text {val.decode('utf-8')}")
When we run it, we get this output:
>
> Tokens:  [80, 121, 116, 104, 111, 110, 32, 97, 110, 100, 32, 82, 117, 115, 116]
> Vocabulary:  {0: b'\x00', 1: b'\x01', 2: b'\x02', ... 255: b'\xff'}
ID 80 -> Val b'P' 	 -> P
ID 121 -> Val b'y' 	 -> y
ID 116 -> Val b't' 	 -> t
ID 104 -> Val b'h' 	 -> h
ID 111 -> Val b'o' 	 -> o
ID 110 -> Val b'n' 	 -> n
ID 32 -> Val b' ' 	 ->
ID 97 -> Val b'a' 	 -> a
ID 110 -> Val b'n' 	 -> n
ID 100 -> Val b'd' 	 -> d
ID 32 -> Val b' ' 	 ->
ID 82 -> Val b'R' 	 -> R
ID 117 -> Val b'u' 	 -> u
ID 115 -> Val b's' 	 -> s
ID 116 -> Val b't' 	 -> t
This tokenizer was not trained, and by default, it mapped ASCII characters from 0..255. In our case 0 = 0, 1=1, … 80 = P, 81 = Q, 82 = R, and on.
Now, if we train this tokenizer - we’ll get a different vocabulary. Training it on the text from Taylor Swift’s Wikipedia Page, with fixed vocabulary size=512 tokens, and applying it to the same example of text = "Python and Rust", we get:
Tokens:  [80, 121, 267, 279, 319, 82, 312, 116]
Vocabulary:  {... 309: b'Taylor ', 310: b'es', 311: b'Taylor Swif' ...}
ID 80 -> Val b'P' 	 -> P
ID 121 -> Val b'y' 	 -> y
ID 267 -> Val b'th' 	 -> th
ID 279 -> Val b'on ' 	 -> on
ID 319 -> Val b'and ' 	 -> and
ID 82 -> Val b'R' 	 -> R
ID 312 -> Val b'us' 	 -> us
ID 116 -> Val b't' 	 -> t
Since we’ve trained it with an entire page of text, and mentioned that the vocabulary should be only 512 tokens, this is where Byte-Pair comes into play, looping over token pairs and merging them (e.g “t”, “h” → “th” or “an”, “d” → “and”).
The quality of an LLM's outputs heavily depends on the tokenizer, as the model's final layer maps probabilities to the tokens defined by the tokenizer.
Rust Implementation
Next, let’s implement the BPETokenizer in Rust, by porting Andrej Karpathy’s implementation he did in pure Python (9k ⭐).
The full implementation can be found on Neural Bits Github, here we’ll walk through a few key details.
Since we’re going to build a library, first we have to create a new rust package .For that, we run:
cargo new <lib-name> --libCargo is Rust's build system and package manager
Which will generate a new folder structure for our library, that looks like this:
<lib-name>
|___Cargo.toml
|___Readme.md
|___src
    |___lib.rs
In Cargo.toml we’ll add details about the library, including dependencies and build mode, similar to what a pyproject.toml does for a Python package.
In lib.rs we should specify the macros for our Python bindings, basically what classes and functions we want to expose to Python. Next, we’ll have to create and organize the additional rust (.rs) scripts just as we like. In our implementation, they look like this:
<lib-name>
|___Cargo.toml
|___Readme.md
|___src
    |___lib.rs
    |___bpe.rs
    |___helpers.rs
The main implementation will be in bpe.rs, and in helpers.rs we’ll keep a public set of functions similar to what one would do in Python in a tools.py or utils.py script.
Next, let’s dive into the structure of bpe.rs. Here, we start by importing Packages, which in Rust are called Crates:
use pyo3::prelude::*;
use std::collections::BTreeMap;
use std::fs::File;
use std::io::{BufRead, BufReader, Write};
use crate::helpers::*;
Next, we’ll define the Class and Methods we’re going to implement. The structure is a little bit different to Python - but still easy to follow:
// This is the class definition
#[pyclass]
pub struct BPETokenizer {
    merges: BTreeMap<(i32, i32), i32>,
    pattern: String,
    special_tokens: BTreeMap<String, i32>,
    vocab: BTreeMap<i32, Vec<u8>>,
}

// This is the class implementation
#[pymethods]
impl BPETokenizer {
    #[new]
    pub fn new() -> Self {
        let merges = BTreeMap::<(i32, i32), i32>::new();
        let pattern = String::new();
        let special_tokens = BTreeMap::<String, i32>::new();
        let vocab = build_vocab(&merges, &special_tokens);

        BPETokenizer {
            merges,
            pattern,
            special_tokens,
            vocab,
        }
    }

    fn train(&mut self, text: &str, vocab_size: usize, vb: bool) {}

    pub fn decode(&self, ids: Vec<i32>) -> String {
        let mut text_bytes = Vec::with_capacity(ids.len() * 2);
        for &id in &ids {
            text_bytes.extend_from_slice(&self.vocab[&id]);
        }
        String::from_utf8_lossy(&text_bytes).into_owned()
    }

    pub fn encode(&self, text: &str, verbose: bool) -> Vec<i32> {};
}
Further, let’s note a few key details of this code block:
The #[pyclass], #[pymethods], and #[new] are called macros, and they specify to the rust compiler which definitions (classes and functions) we expose in Python. These are imposed by the PyO3 library we’ll cover in just a bit.
Notations such as BTreeMap::<(i32, i32), u32> which is a data structure, are strongly typed that specify the Struct/Class (BTreeMap) and its type in between < >. As an equivalent in Python, we could have Dict[Tuple[int, int], int].
We’ve specifically left the decode function implementation, to take a look at how variables work in Rust. Since Rust is memory-safe, we could use &(ref) to reference any variable without making a copy.
Next, let’s see the entry point of our library, in lib.rs:
use pyo3::prelude::*;

mod helpers;
mod bpe;

#[pymodule]
fn rust_llm(_py: Python, m: &PyModule) -> PyResult<()> {
    m.add_class::<bpe::BPETokenizer>()?;
    Ok(())
}
Here, we start by defining the crates (bpe.rs and helpers.rs) and then the
#[pymodule] macro will tell the compiler what will be exposed to our Python package. Our Python package will be called ‘rust_llm’ and it’ll expose the BPETokenizer class and all its methods.
A crate is the smallest amount of code that the Rust compiler considers at a time.
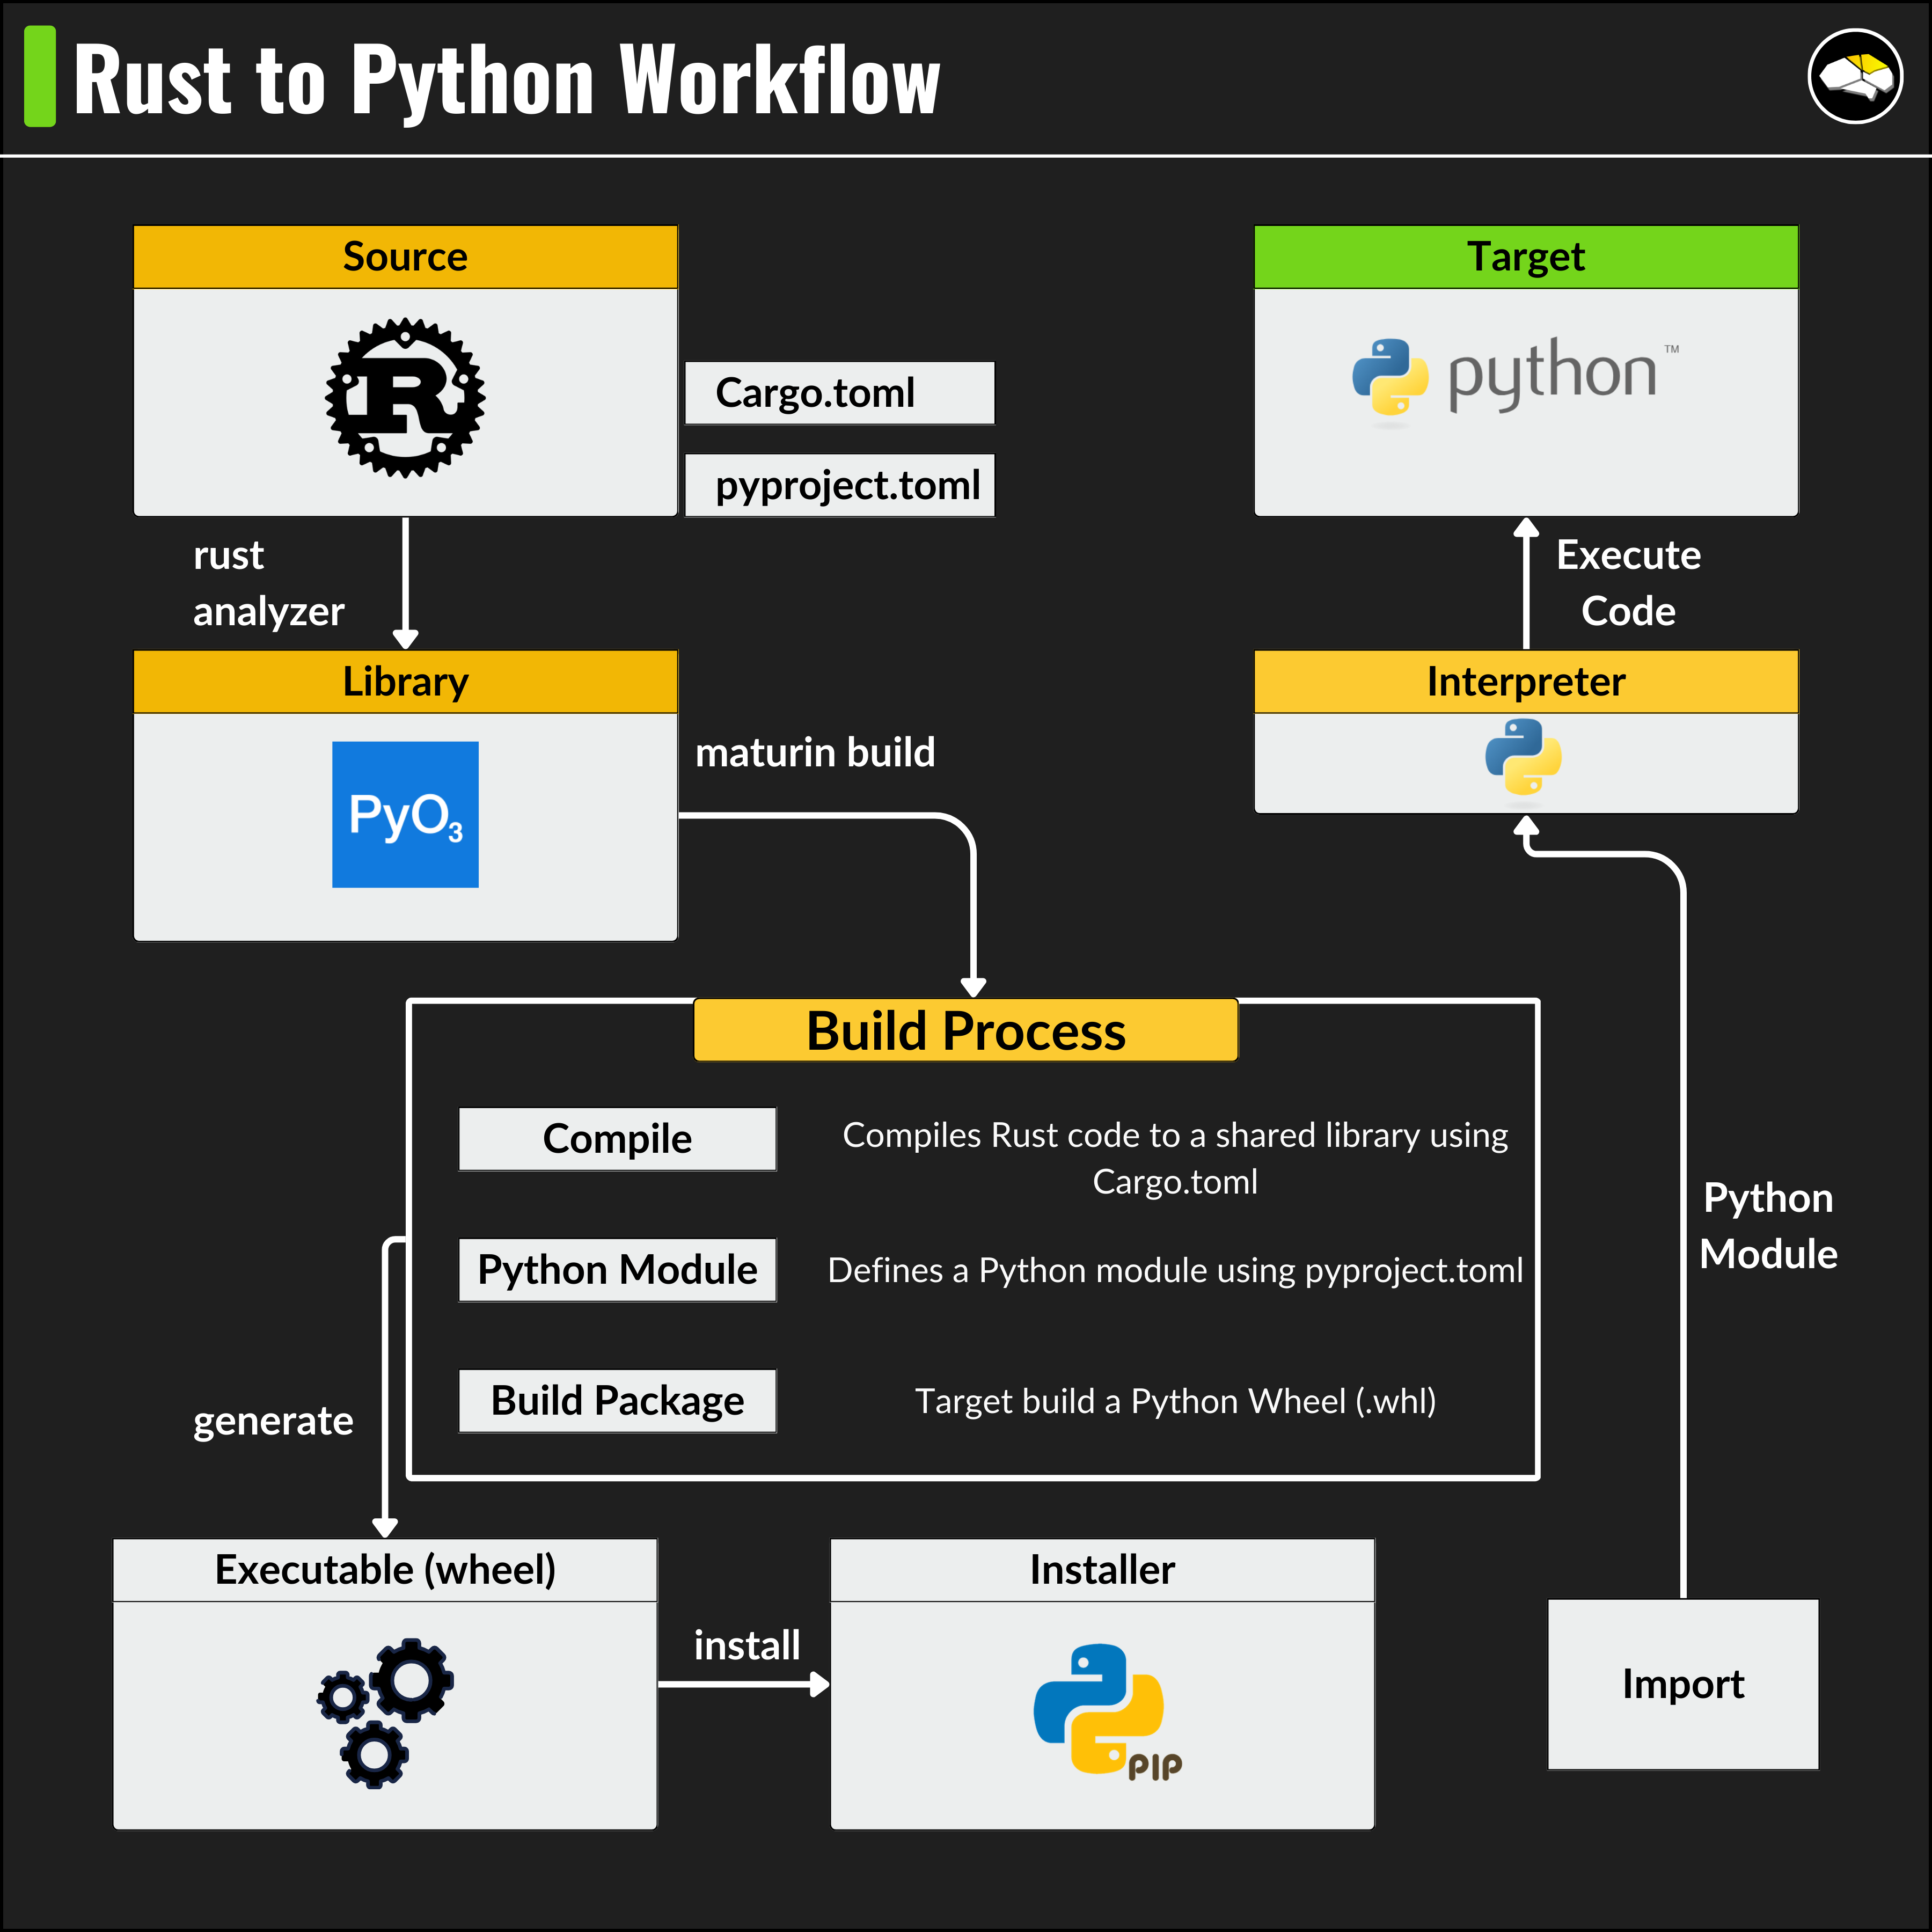
In the next section, let’s inspect the workflow and build our library as a Python Wheel file we can install using pip.
Generating Python Bindings
Once we have our Rust implementation, we’ll use these 2 libraries:
PyO3 - a Rust library that maps Rust code to conform to the API expected by CPython, making it compatible with the Python import used for loading C extensions.
Maturin - a build tool that simplifies the packaging and distribution of Python bindings created with Rust. It integrates with PyO3 to compile your Rust code and package it as a Python wheel.
Before compiling, let’s take a look at the Cargo.toml file which specifies the packages and build plan:
[package]
name = "rust_llm"
version = "0.1.0"
edition = "2021"

[lib]
name = "rust_llm"
crate-type = ["cdylib"]

[dependencies]
pyo3 = { version = "0.20.0", features = ["extension-module"] }
lazy_static = "1.4.0"
base64 = "0.22.1"
unicode_categories = "0.1"
Similar to pyproject.toml, we specify that our library is a cdylib.
Libraries could be `dylib` for the ones shared across Rust implementations, and `cdylib` destined to be used outside of Rust (e.g CPython)
Next, we’ll use maturin to build our library. Build workflows could have 2 modes:
develop - compiles your Rust code into a Python module allowing you to test and run it directly without needing to create a final package. This doesn’t apply LLVM optimizations, and it turned out to be slower vs Python, from my tests.
release - compiled with optimizations enabled. It will generate a Python wheel that is smaller, faster, and ready to be distributed or deployed.
To trigger the actual build, run the `make build_rel` command from the Makefile attached to the repository. This will generate a .whl file in <library>/targets/wheels.
rust-llm/target
├── release
│   ├── build
│   ├── deps
│   ├── examples
│   ├── incremental
│   ├── librust_llm.d
│   ├── librust_llm.dylib
│   └── maturin
└── wheels
    └── rust_llm-0.1.0-cp39-cp39-macosx_11_0_arm64.whl
Here’s an overview of how the build workflow looks like:
Comparing Implementations
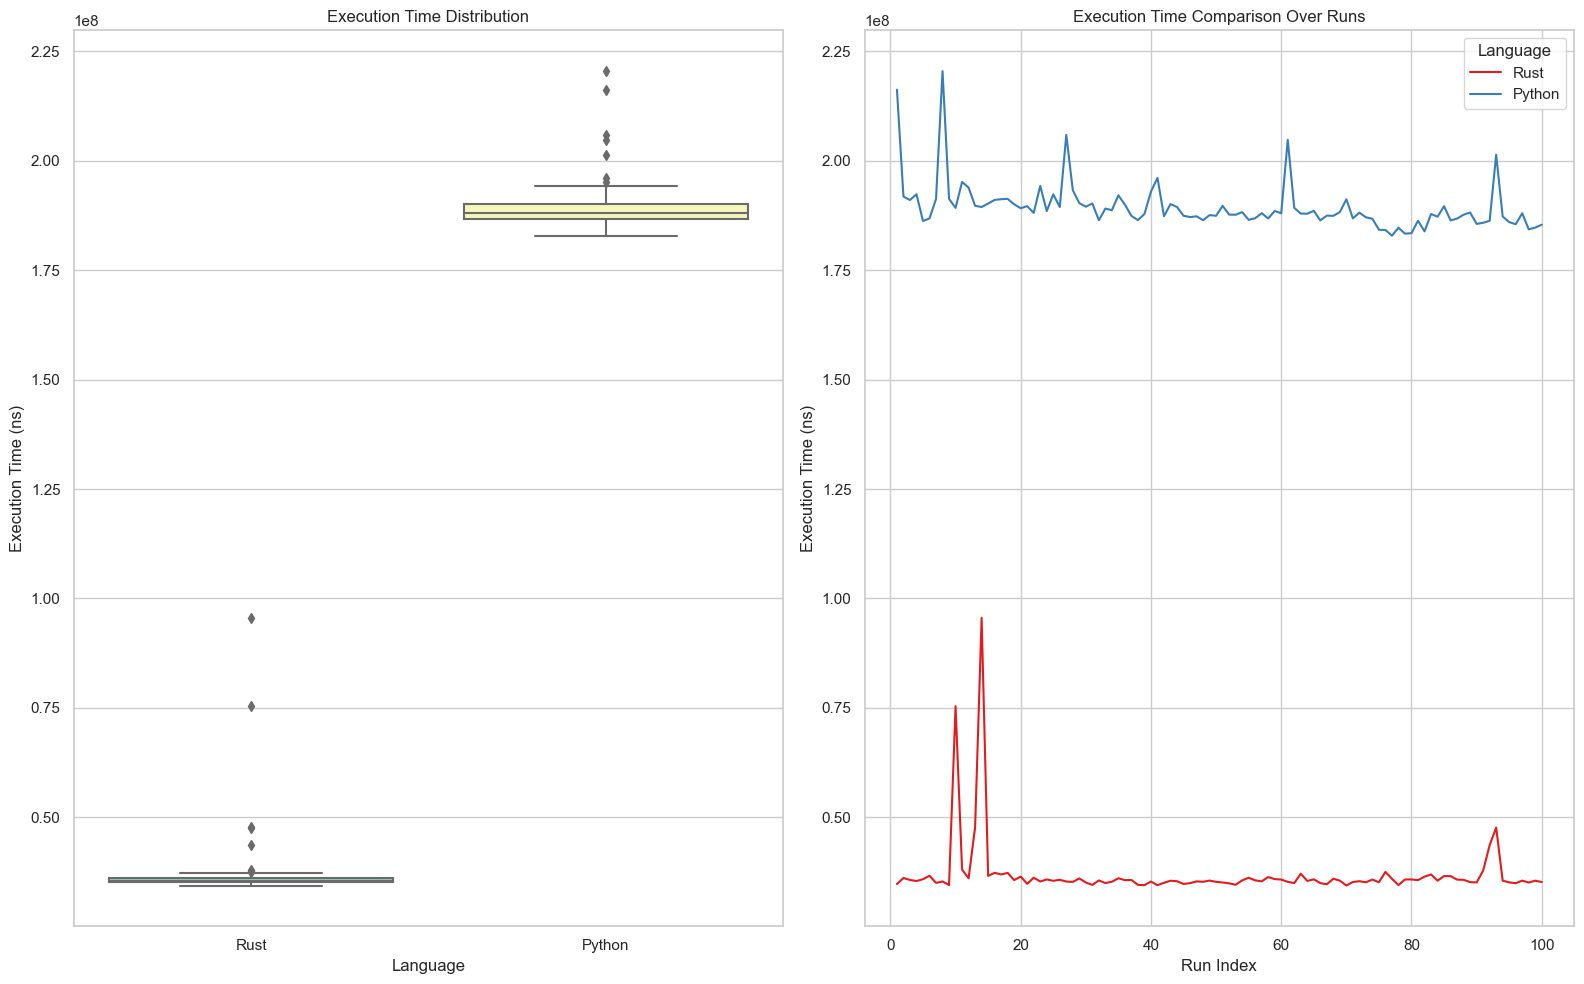
At the root of the project folder, we have a Jupyter Notebook (playground.ipynb) with a few utilities to test our implementations.
Given this text="We've just built a RUST library for Python!”, let’s see how both implementations encode it to IDs and decode it back:
Testing BPE Tokenizer
--------------------Python--------------------
[Python] Tokens IDs: [87, 101, 39, 118, 101, 32, 106, 117, 115, 116, 32, 98, 117, 105, 108, 116, 32, 97, 32, 82, 85, 83, 84, 32, 108, 105, 98, 114, 97, 114, 121, 32, 102, 111, 114, 32, 80, 121, 116, 104, 111, 110, 33]
[  Python  ] Decoded tokens: We've just built a RUST library for Python!
Python BPE took 108000 ns
--------------------RUST--------------------
[RUST] Tokens IDs: [87, 101, 39, 118, 101, 32, 106, 117, 115, 116, 32, 98, 117, 105, 108, 116, 32, 97, 32, 82, 85, 83, 84, 32, 108, 105, 98, 114, 97, 114, 121, 32, 102, 111, 114, 32, 80, 121, 116, 104, 111, 110, 33]
[  RUST  ] Decoded tokens: We've just built a RUST library for Python!
Rust BPE took 81000 ns
We can notice that the values are the same, only that rust is 1.33x faster on this single call.
When training our tokenizer on Taylor Swift’s Wikipedia Page which equals to 185767 tokens with a vocab_size=512, RUST is close to 4.6x faster.
Total Tokens: 185767
[Python] Trained vocab size: 512
[Python] Time: 6.1626 sec
[Python] Saved: Python_model
[RUST] Trained vocab size: 512
[RUST] Time: 1.322929 sec
[RUST] Saved: RUST_model
By profiling Rust vs Python on 1000 runs of encoding the same Wikipedia page, we get the following results.
The full code for this project can be found on NeuralBits Github
Conclusion
And that’s it!
In this article, we’ve taken Andrej Karpathy’s BytePairEncoding Tokenizer which he built in pure Python, and ported it to Rust.
Further, we’ve wrapped the Rust crates using PyO3 macros to expose methods and classes to Python and then built our Rust library as a Python Wheel. This workflow of Rust and Python Bindings is also found in popular and fast frameworks like Bytewax Stream Processing and Polars.
This project will help you understand how to build a custom Rust library for your Python project, and also provide a concrete example of a performance improvement to a ~4x factor.
If you’ve found this article useful, please give it a like and leave your impressions in the comments. 😊
Stay tuned for the next in-depth, hands-on article, happy learning!
See you next week!
Great hands on tutorial, thank you 😊
LLVM at core of Golang? Care to elaborate? The go compiler is written in Go, previous one was inherited from Plan9…