

Intro to Video Streaming for AI Computer Vision Applications
Build a server-client video streaming application using FastAPI Websockets and ReactJS.

Abstract
In this article, we’ll focus on the Engineering of Computer Vision applications, and cover the main components within each project that works with Video.
We’ll cover common libraries to work with Image and Video and discuss 3 different streaming protocols that involve server-client communication using FastAPI and ReactJS for video streaming.
We’ll focus on showcasing the WebSockets use case and cover key details on HTTP and WebRTC protocols, adding code support for each one of them that can be found on the Neural Bits Computer Vision Hub.
A warm welcome to the 39 new subscribers 🚀 who have joined NeuralBits!
Table of Contents
1. What is Video Processing
2. Libraries for Video/Image Processing
3. Video Streaming Backend using FastAPI Websockets
4. Video Streaming Dashboard in React
5. Other video streaming protocols
6. Conclusion
What is Video Processing
In computer vision, video processing involves analyzing, interpreting, and transforming video data to extract key information.
Computer vision models can process each frame in sequence, identify patterns, detect changes over time, and make predictions, enabling applications such as video surveillance, autonomous driving, and video content analysis.
The majority of CV systems have to run in real-time to yield true value, as many use cases focus on CCTV, action surveillance, or quality validation in manufacturing factories.
To understand how to build efficient Computer Vision systems, let’s first walk through the key components of the Video format.
Key Components of the Video Format
Codec
A codec is a hardware- or software-based process that compresses (encodes) and decompresses (decodes) large amounts of video and audio data. They are essential for reducing video/audio file sizes and streams, as one RAW video file might take up a very large space.
Let’s take an example and verify the raw size for a 60-second 1920x1080 30 FPS video file:
Pixels /frame = 1920 * 1080 = 2,073,600 pixels
Bits   /frame = 2,073,600 pixels * 24 bits = 49,766,400 bits/frame
Bits   /second = 49,766,400 bits * 30 frames = 1,492,992,000 bits/s
Bytes  /second = 1,492,992,000 / 8 = 186,624,000 bytes (or ~186 MB)
Total Size  = 186 MB * 60 = 11,197,440,000 bytes (or ~11.2 GB)
Here are the most popular codecs used for video compressing:
H.264 (AVC): Highly efficient, balances quality with relatively low file sizes. Compatible with almost all video players and streaming services.
H.265 (HEVC): Better data compression at the same level of video quality as H.264.
VP9: Developed by Google, used primarily for streaming high-definition video on platforms like YouTube.
2. Bitrate
Refers to the amount of data processed in a given amount of time, typically measured in bits per second (bps). In video, bitrate is crucial as it directly affects the quality and size of the video:
High Bitrate: More data per second, leading to higher video quality but larger file sizes.
Low Bitrate : Reduces file size leads to poorer video quality, manifesting as blurriness or blockiness in the video.
3. Resolution
Indicates the number of pixels in each dimension that can be displayed. We’re all familiar with HD (1280x720), FHD (1920x1080), and 4K (3840x2160) which are the resolutions widely used everywhere.
4. Frame Rate
Describes how many individual images are shown each second.
5. Container Formats
Containers such as MP4, and AVI encapsulate video, audio, and metadata. They manage how data is stored and interchanged without affecting the quality.
When your media player streams a video, it processes blocks of data from within a container.
Due to the way a video container is structured — it makes it simple to convert from one video format to another video format. Here’s the process:
SOURCE — the video in format A.
DEMUX — the component that splits the video stream from the audio stream.
DECODER — decompresses both streams (from low format to RAW format)
ENCODER — re-compresses the RAW streams using new Video and Audio codecs.
MUX — re-links and synchronizes the video stream with the audio stream.
TARGET — dumps the new data stream (video + audio) into a new container.

Next, let’s cover a few common libraries used to work with Video and Image data in Python.
Libraries for Video/Image Processing
When working on Computer Vision projects, image processing and manipulation are mandatory.
Starting with data preparation, labeling, QA, augmentations, and model training, to pre-processing/post-processing steps required after a model is deployed in production.
Here’s a list of libraries and tools a Computer Vision Engineer has to know/work with:
OpenCV
By far the most used library to work with Audio/Video and Image. It is found at the core of each Computer Vision project, both in C++ and Python due to its wide, complex, and optimized feature set.

Albumentations
Fast and efficient library widely used within dataset augmentation when working on Computer Vision tasks. The majority of augmentations are implemented as GPU kernels.
In Computer Vision, an augmentation is a transformation applied to an Image in order to extend the features set a model can see and learn without the need for additional samples.
As a practical example, think of training a CV model to work well under different light conditions. In this case, you could augment the images in the dataset by altering the brightness, contrast, and sharpness of the same image which will extend the features a model can see and learn from.

Torchvision - also used extensively for augmentations and Image processing, but being closely related to PyTorch, it includes DataLoaders and Dataset parsers out of the box for the majority of Computer Vision use cases (Image Classification, Segmentation or Object Detection).
Commonly, when building Computer Vision systems, the insights extracted by the AI components are collected and displayed either in a dashboard, stored, or viewed in real-time (e.g. CCTV with Thread Detection in real-time).
Let’s focus on the latter and see how we can read and stream video via WebSockets using FastAPI as the backend processor and React JS as our frontend.
Video Streaming Backend using FastAPI Websockets
Find the code on the Neural Bits Computer Vision Hub
When real-time streaming is required in production use cases, Computer Vision Engineers often have to develop specific video processing workflows that are optimized for low-compute especially if the deployment use case also includes vision models like Object Detectors or Segmentation and is intended to run on Edge.
In a large majority of Computer Vision projects, the processing is done at the Edge, either on servers that have access to RTSP Cameras or on devices that dump frames locally or stream them through Ethernet.
For instance, to tackle the problem of detecting the manufactured pieces that would fail the quality test from inside a Factory line, one could train and deploy stacks that use live video feed and Segmentation models to identify key areas at risk.

Websockets provide an efficient way of data transfer because they allow for lower latency, and real-time interaction due to their stateful workflow. On websockets, once the handshake between sender and receiver is complete - the video frames are streamed as long as the connection is in Open state.
Let’s see the FastAPI WebSocket endpoint to stream our video:
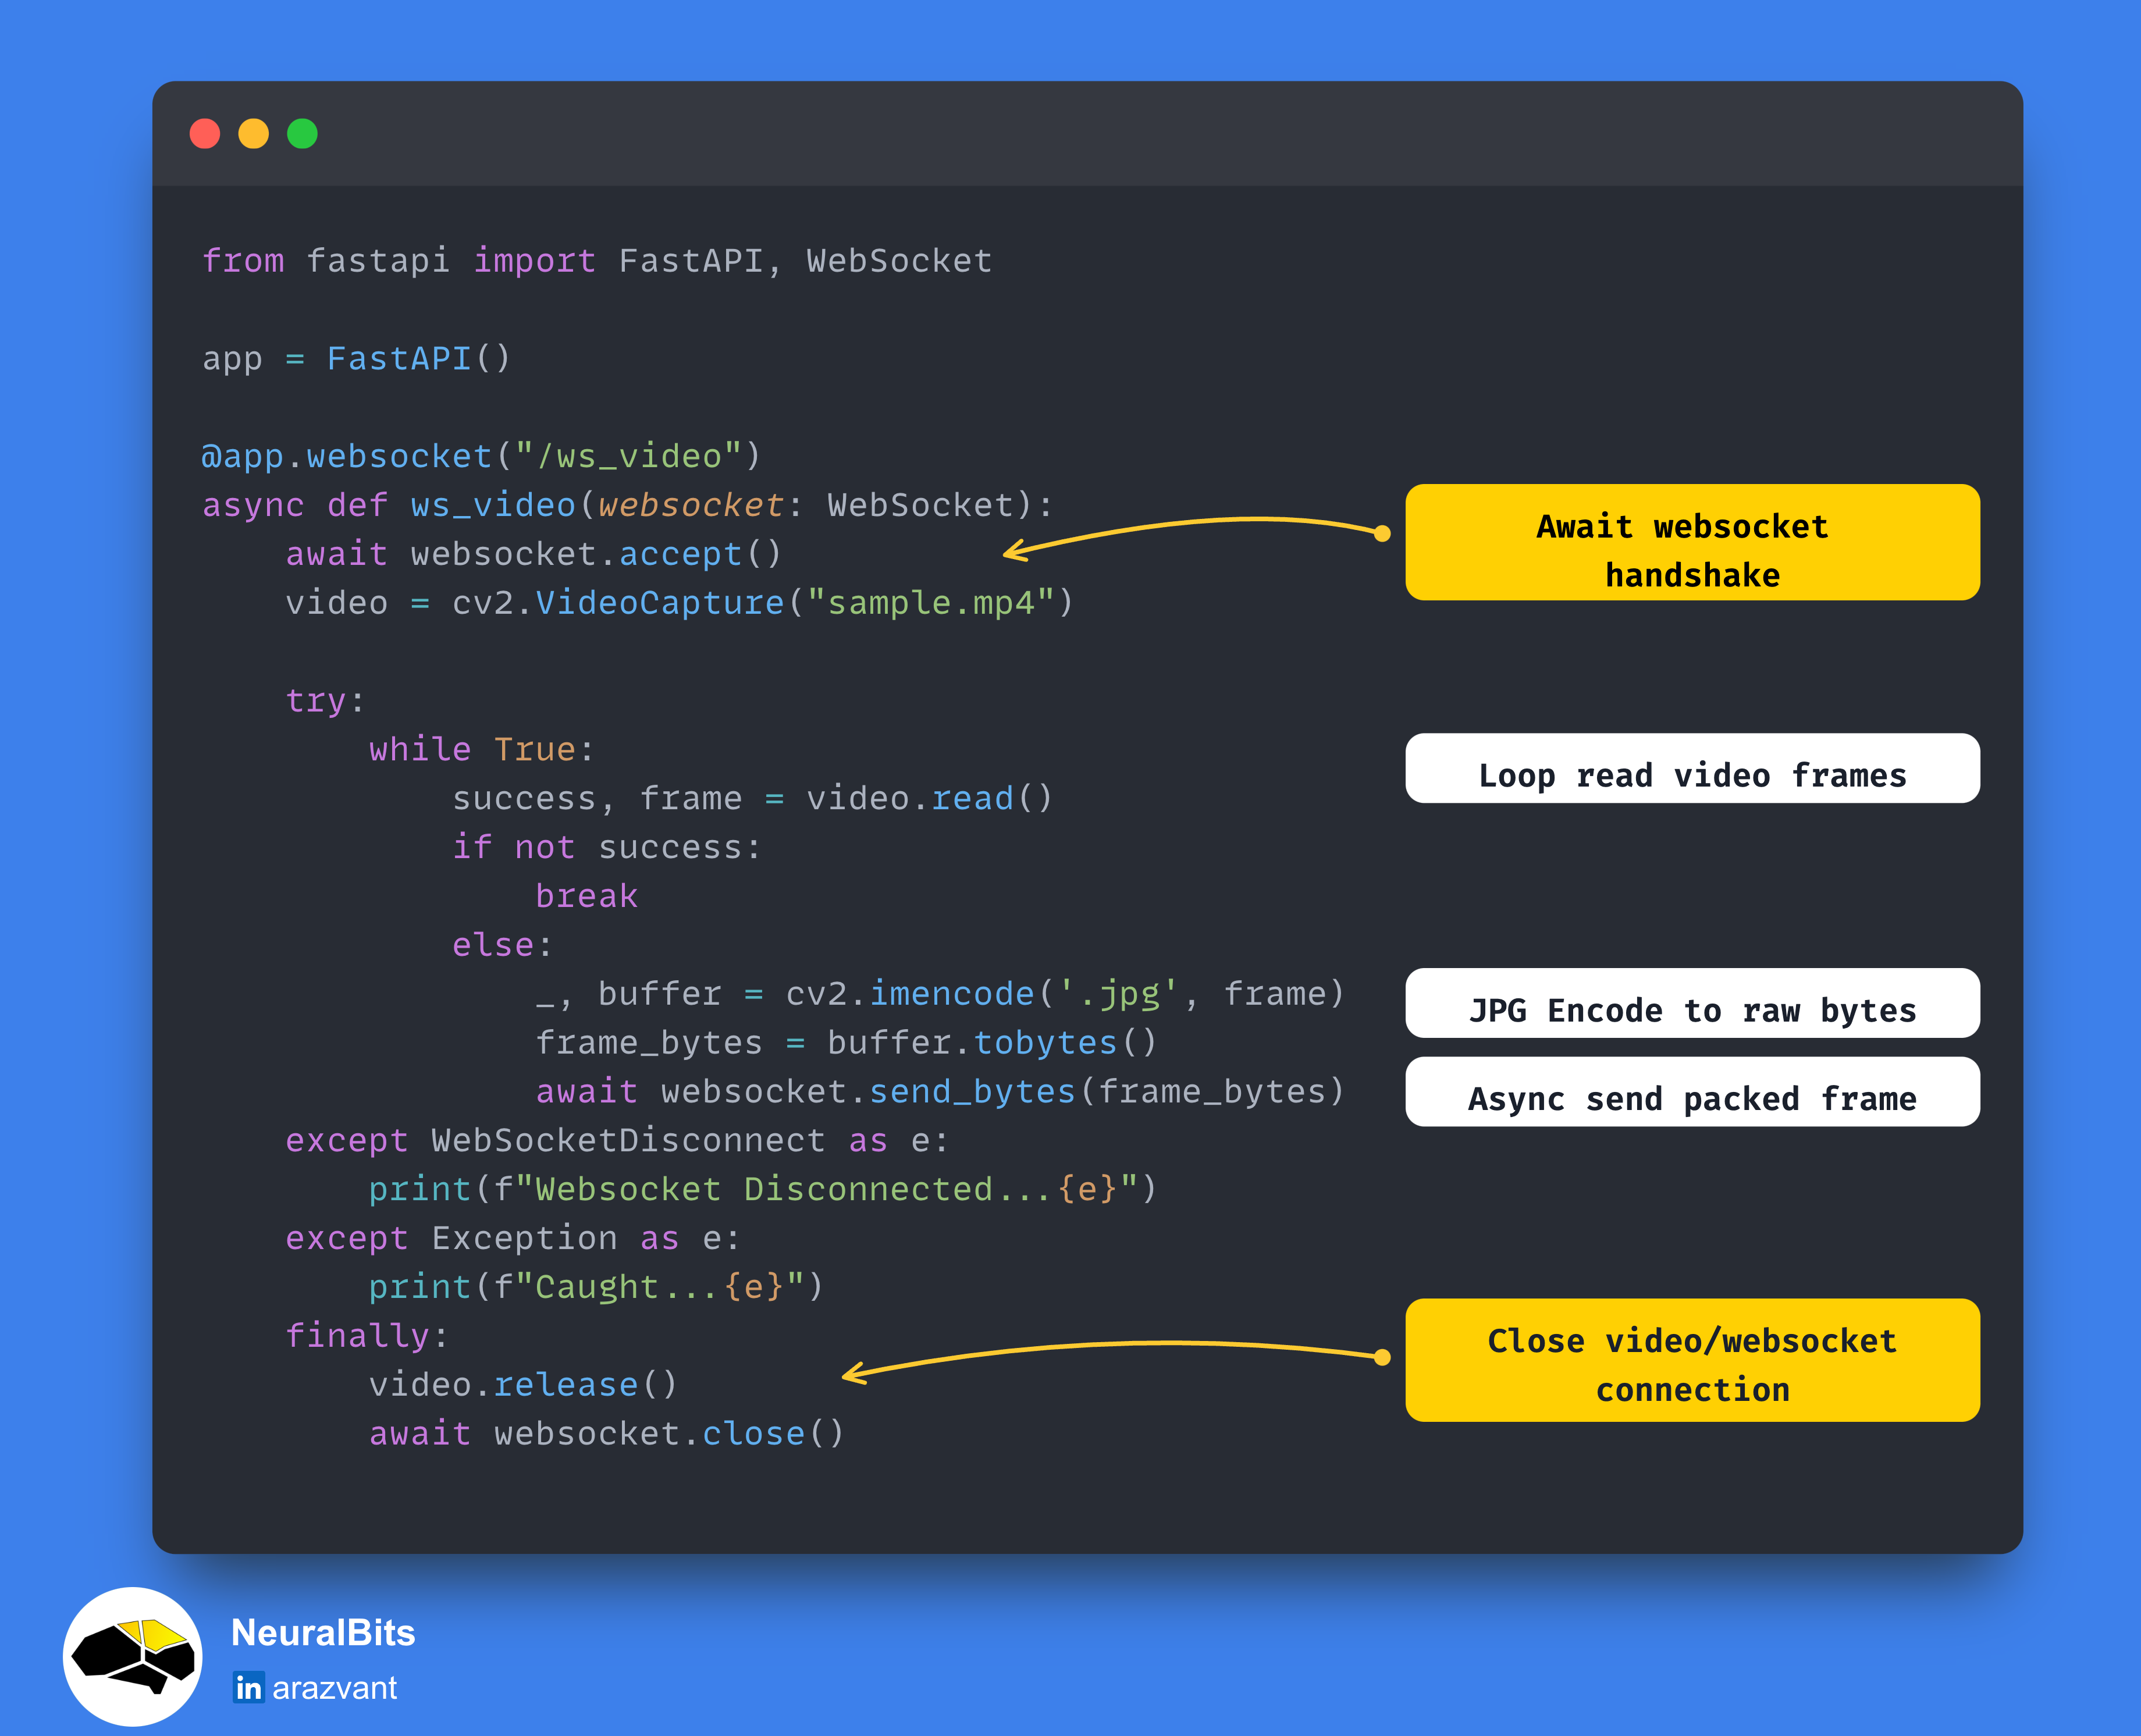
Here, we define a new WebSocket endpoint “/ws_video” and after the connection is accepted via “await websocket.accept()” we start streaming frames inside a while True loop.
Each frame is sent as a byte stream using await “websocket.send_bytes()” which will get captured in our React frontend, unpacked, and transformed into an Image component for rendering.
Finally, we close the video container and the socket connection, using “await websocket.close()”.
Video Streaming Dashboard in React
Below is the React JS implementation for our Frontend:

Here, we’re using the “useState” and “useEffect” hooks to capture the WebSocket stream and link it to our VidemImage component which is a <img> tag.
Within “useEffect” we specify the new WebSocket connection, and using the “.onmessage()” event loop we capture the byte stream, unpack and render it to our UI.

Other video streaming protocols
Two other protocols we can use to stream Videos that we’re going to cover are HTTP and WebRTC, with the latter being the more complex but recommended one for low latency (e.g. used Video Conference tools like Teams/Zoom, etc).
Streaming via HTTP
This is a quick and practical approach, making it the most straightforward one to validate the concept of streaming a video to a Web Application.
For small use cases, this might work but once the application scales and has to support many devices or workflow streams, the latency, overhead added by HTTP headers, and bandwidth start to impose challenges.
In FastAPI, we would have:
app = FastAPI()

def generate_frames():
    video = cv2.VideoCapture("sample.mp4")
    while True:
        success, frame = video.read()
        if not success:
            break
        else:
            _, buffer = cv2.imencode('.jpg', frame)
            frame = buffer.tobytes()
            yield (b'--frame\r\n'
                   b'Content-Type: image/jpeg\r\n\r\n'
                   + frame + b'\r\n')

    video.release()

@app.get("/http_video")
def video():
    return StreamingResponse(
        generate_frames(),
        media_type="multipart/x-mixed-replace; boundary=frame")
Where we are yielding the Image contents as base64 + headers which will be captured and displayed directly into the UI, using:
<img src="http://127.0.0.1:8000/http_video"/>Streaming via WebRTC
WebRTC (Web Real-Time Communication) is a technology standard that enables real-time communication over P2P (peer-to-peer) connections without the need for complex server-side implementations.
To understand WebRTC, here are its main components:
Data channels: Enables the arbitrary exchange of data between different peers, be it browser-to-browser or API-to-client.
Encryption: All communication, audio, and video are encrypted ensuring secure communications.
SDP (session-description-protocol): During the WebRTC handshake, both peers exchange SDP offers and answers. In short, SDP describes the media capabilities of the peers, such that they can gather information about the session. The SDP offer describes the type of media the peer is requesting, and the SDP answer confirms that the offer was received and like-wise, exchanges its media configuration.
Signaling: The method through which the offer-response communication is achieved (Sockets, REST API). In our use case, we’re using a POST endpoint to open the channel.
All three use cases, HTTP, WebSockets, and WebRTC are implemented and explained on the NeuralBits GitHub Organization.
Jump to the code for this article on the Computer Vision Hub
Conclusion
In this article, we covered the structure of a video format and the key components one must grasp to understand how video works.
We’ve also iterated over a few widely-known libraries that make it easy to start up and work with video/image data. We ended up with the walkthrough over 3 video streaming methods, HTTP, Sockets, and WebRTC, and have showcased the implementation and results for the WebSockets protocol.
In the next articles, we’ll add an ML component - a Yolov7 object detector and stream Video + Detected Objects directly to our UI.
Stay tuned!