


Adopt these two Industry Standards in AI/ML Development
Learn about DevContainers, Dynamic Configs in Python and bonus walkthrough on LLM Model structure from HuggingFace.

Topics for today:
Use DevContainers in your Projects
Organize your Configuration Files
Understand LLM Model Files
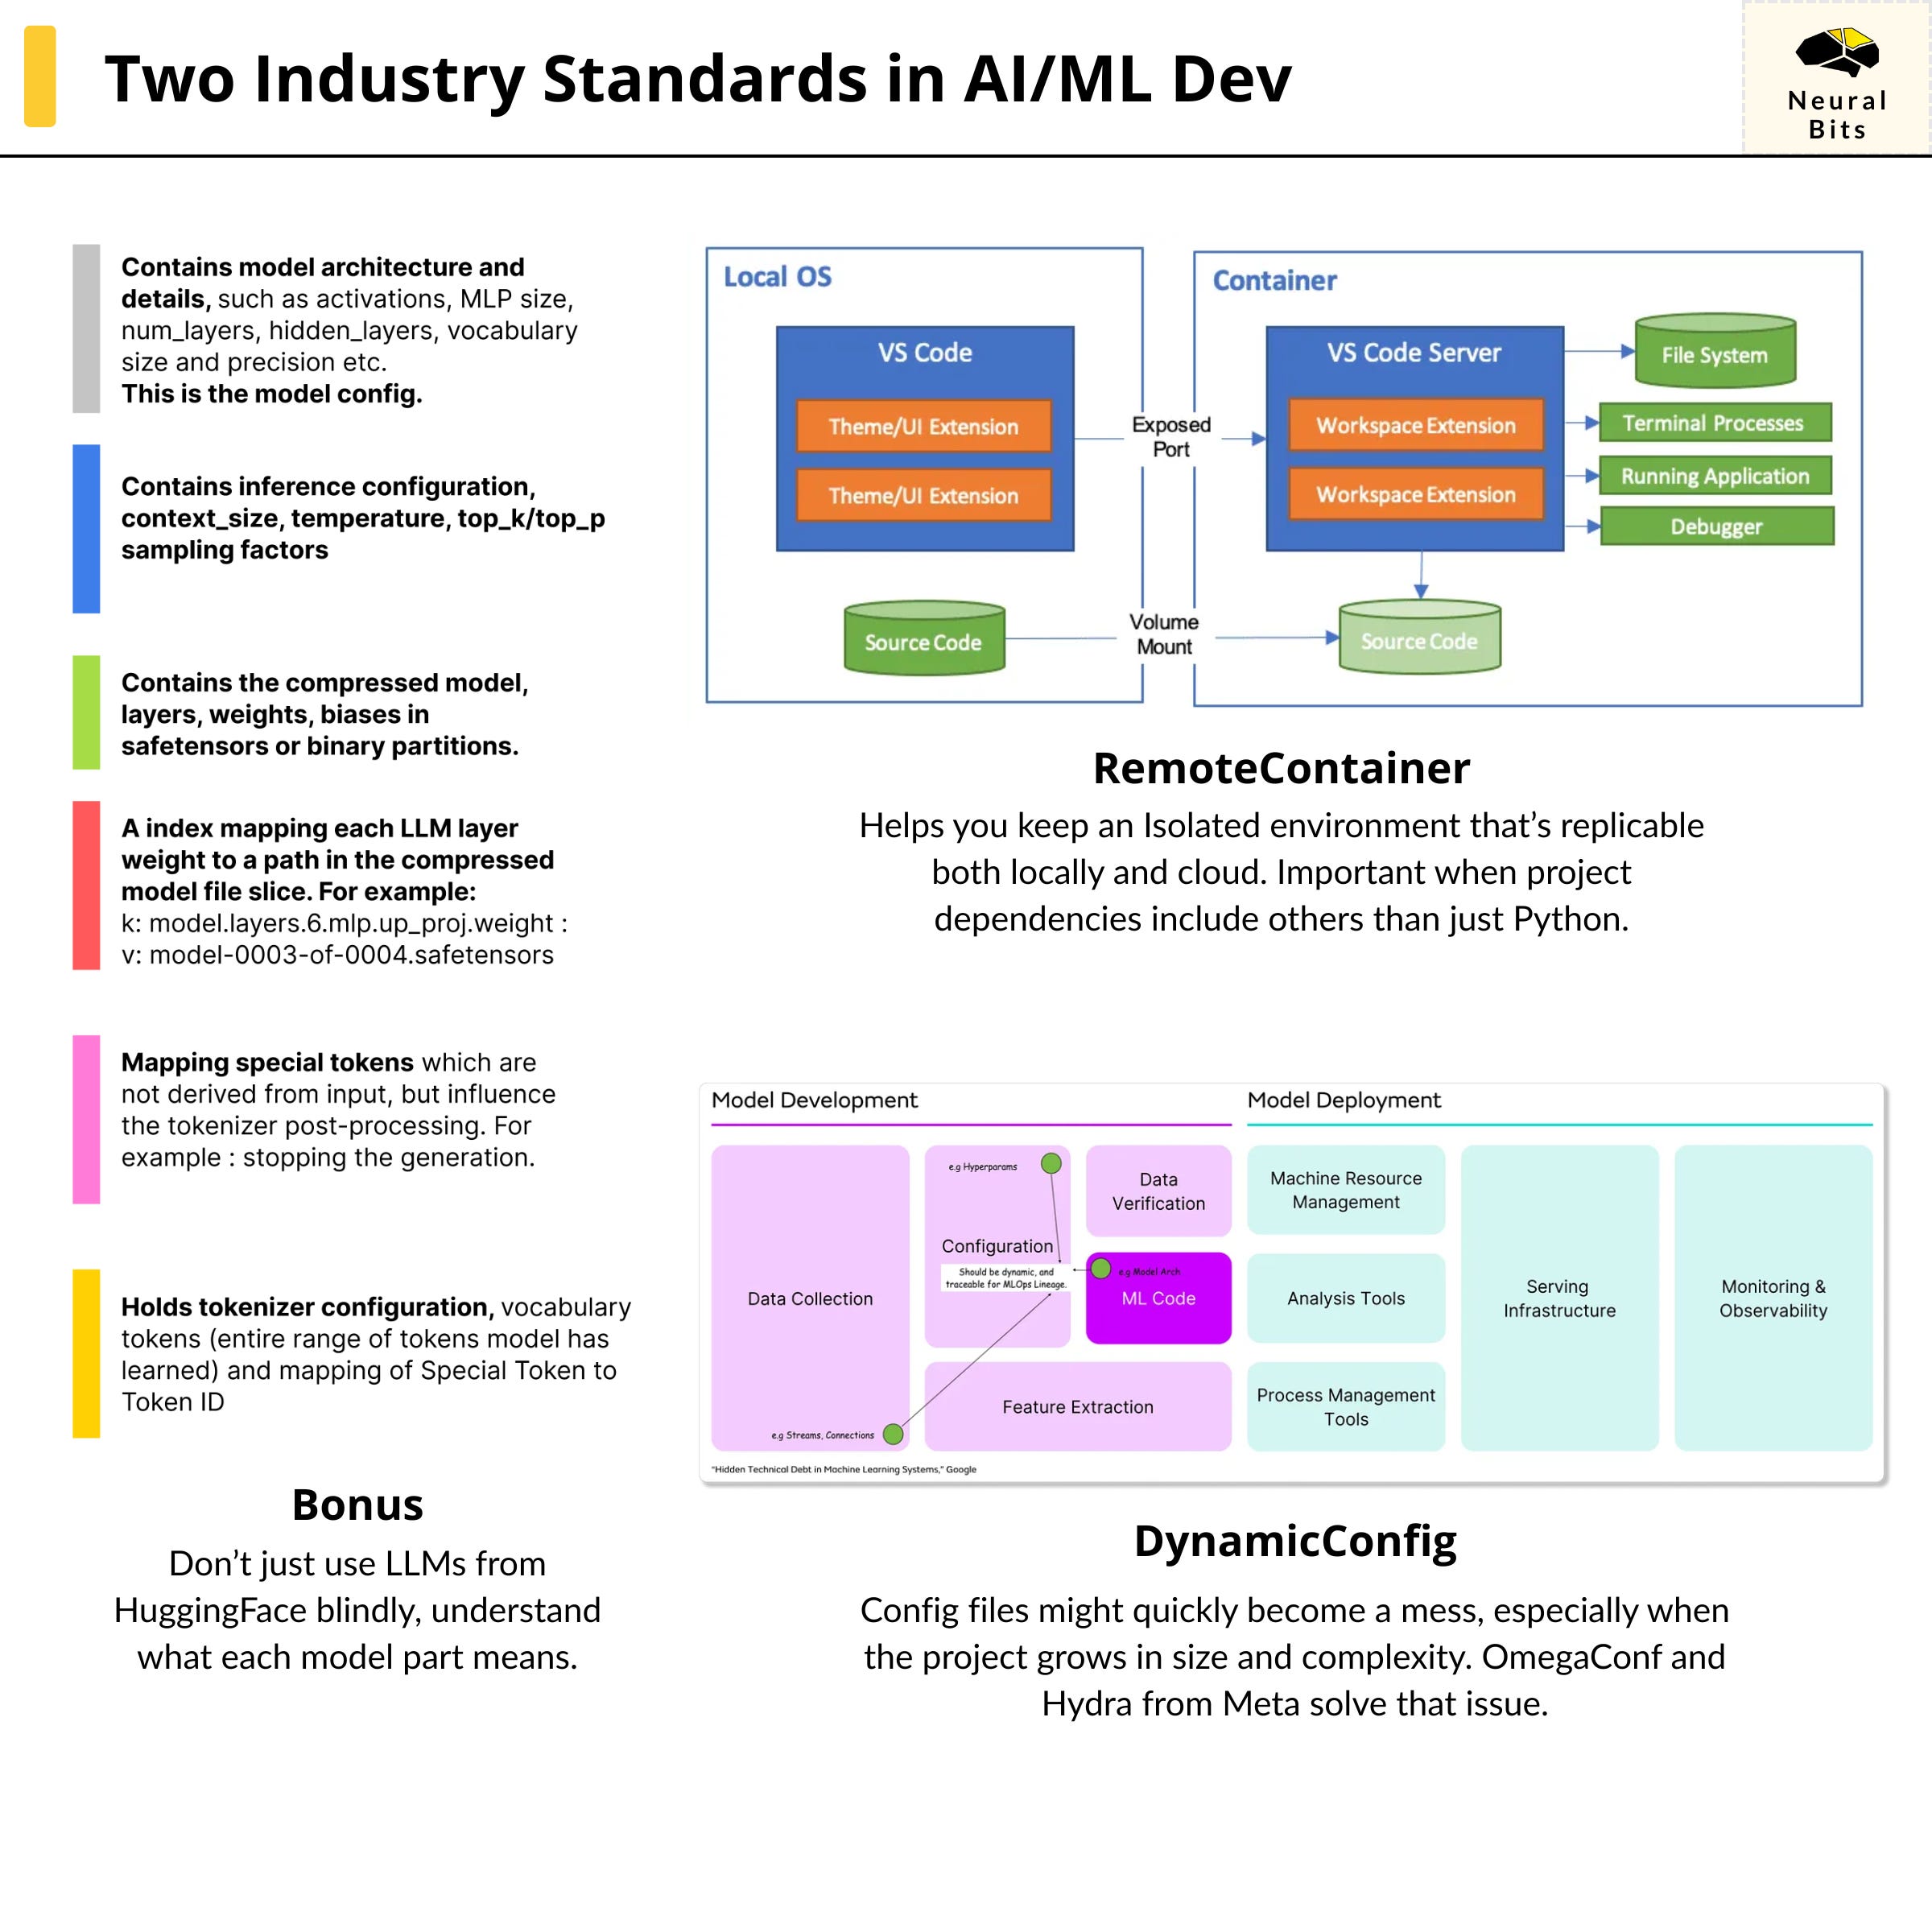
Using DevContainers
Containerized environments are the industry standard for production deployments.
When starting in this field, as a junior developer, I learned that containers apply only to deployment phases, where every service has to be isolated and run in a reproducible environment, where it has to interact with other services.
What devcontainers give you is this beautiful consistency.
During development, although using uv and having a pyproject.toml was a solid step towards environment replication, DevContainers allowed me to have not only that but move past the Python ecosystem while also enabling specifying container resources, specific shared storage mounts, all while developing both locally and in Cloud Environments.

Further, let’s see how you can enhance your development cycle by using DevContainers.
This approach implies creating a .devcontainer folder at the root of your project. Depending on the complexity of your project, you could have nested or single configurations inside this folder. Here’s the process:
At the root of your project, add a .devcontainer folder
Follow this structure
# For single project configuration
./
|-- .devcontainer/
|   |--devcontainer.json

# For multiple project configurations
./
|-- .devcontainer/
|   |-- [DevEnv1]/
|   |   |-- devcontainer.json
|   |-- [DevEnv2]/
|   |   |-- devcontainer.json
Preparing the Dockerfiles
# Example Dockerfiles
./
|-- .devcontainer/
|   |-- [DevEnv1]/
|   |   |-- devcontainer.json
|   |   |-- Dockerfile.dev
Adding post-build scripts
# Example with post-build scripts
./
|-- .devcontainer/
|   |-- [DevEnv1]/
|   |   |-- devcontainer.json
|   |   |-- Dockerfile.dev
|   |-- scripts/
|   |   |-- install_extra_deps.sh
Adding the JSON configuration
{
    "name": "[Dev] - Environment",
    "build": {
        "dockerfile": "Dockerfile.dev",
        "context": "../..",
        "args": {
            "LOG_LEVEL": "DEBUG",
        }
    },
    "runArgs": [
        "--gpus",
        "all"
    ],
    "customizations": {
        "vscode": {
            "settings": {
                "editor.formatOnSave": true,
                "[makefile]": {
                    "editor.insertSpaces": false
                }
            },
            "extensions": [
                "ms-python.python",
                "ms-python.ruff",
                "charliermarsh.ruff"
            ]
        },
        "remoteUser": "root"
    },
"workspaceFolder": "/workspace",
"workspaceMount":"source=${localWorkspaceFolder}/src,target=/workspace,type=bind,consistency=cached"
}
We’re done with configuration, let’s see what happens after we use this DevContainer. In VSCode or Cursor, use CTRL + SHIFT + P (Linux) or CMD + SHIFT + P (Mac) and select |> Dev Container : Reopen in Container|.
To quickly unpack what happens:
The IDE reads our
.devcontainer.jsonconfigurationIt builds the Dockerfile.dev image using the specified build arguments
It adds the IDE customizations, as we’ve specified we want Python, Pylance, and Ruff to be available and installed in our container.
It mounts the current codebase folder to our container
And that’s it, now we can develop in a standardised and isolated environment that can be used for either local development, cross teams, or cloud environments.
For an in-depth tutorial on OmegaConf and Hydra, please see this article!
2. Organizing Configuration Files
In a large majority of AI projects I’ve worked on, I’ve used the YAML file format for configs, and I’m sure it’s a common choice for many other AI/ML Engineers. From Github, Gitlab pipelines, to Kubeflow, to ZenML, AzureML, and many others - YAML standard is there.
Configuration management is a key step of effective MLOps, enabling reproducibility and traceability throughout the machine learning lifecycle. As models evolve through multiple iterations, we need to preserve the connections between data, data transformations, model configurations, model versions, and multiple other components to establish a clear lineage and not have multiple files scattered all over the codebase.
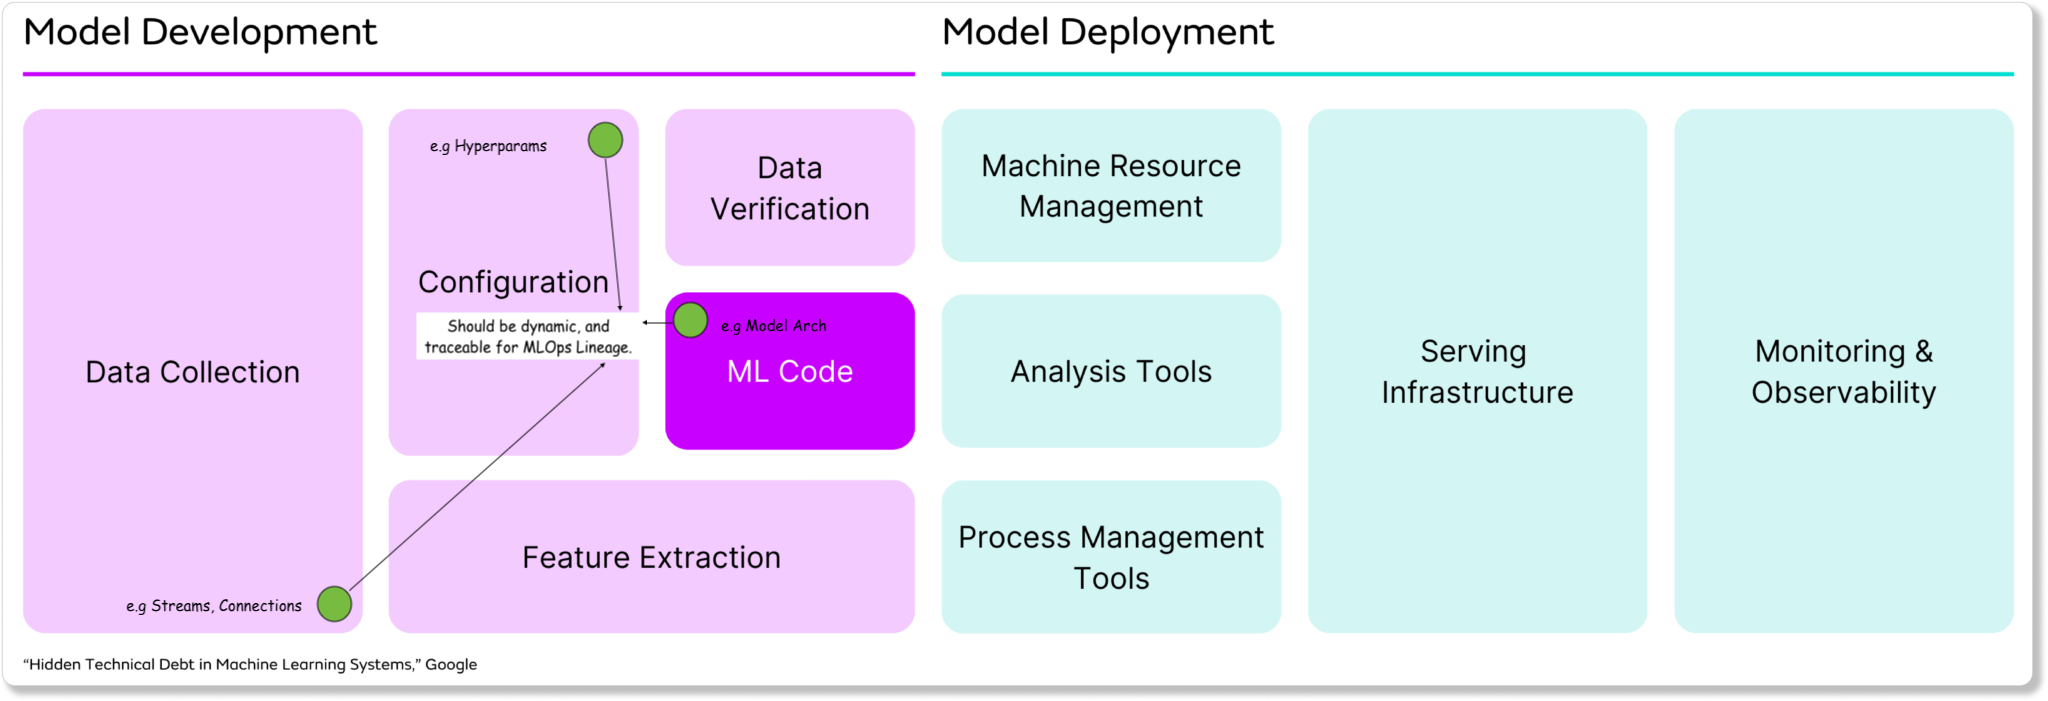
With these points in mind, I’ve found the two libraries from Meta to help solve many of these pain points: OmegaConf and Hydra.
OmegaConf is a hierarchical configuration system designed specifically for complex applications like AI/ML pipelines. :
It allows merging multiple configuration files at runtime.
It allows variable interpolation at runtime, where you can modify a config value using point-notation (i.e config.group.value) when starting the project and passing the config.
Type Safety via either enforced dataclasses or pydantic BaseModel.
Using OmegaConf will suffice in many use-cases where config files are basic and we could allow having a grouped configuration in the same file or even have a few config files each targeting a module.
However, if our project grows in size and complexity, a better solution that builds on top of OmegaConf is Hydra, which allows us to manage multiple configs in a structured manner.
Hydra is a full-featured framework for configuration management in complex applications, also created by Meta. Hydra’s powerful points are:
Management of config groups from a single file.
CLI overrides
Multirun support, which is key, as it allows developers to test multiple configurations in a single project run.
Automatic directory management, as it enforces a dir structure for our configs, and we can define a single entry point for a nested configuration.
Let’s see an example!
Here we have Hydra reading from a config.yaml file that is located in our conf folder. In that config.yaml file, we specify a defaults key, which encapsulates other nested configs, as we can see in the following example:
# config.yaml
defaults:
  - dataset: dataset.yaml
  - model: model.yaml
  - evaluation: evaluation.yaml
We’ve got dataset, model, and evaluation, each with its config values. Using Hydra and loading this config will allow us to access any value using point notation, for example:
cfg.model.name
cfg.evaluation.metrics
cfg.dataset.version
...
For an in-depth tutorial on OmegaConf and Hydra, please see this article!
3. Understanding LLM Model Files
The previous two topics were development-oriented, describing industry standards in configuration management and standardised development environments. In this section, we’ll describe the structure of an LLM Model, a template that each model on HuggingFace follows.
Taking Llama-3-8B as an example, here’s what we find under the “Files” tab on HuggingFace.

Whenever we download a model or serve it directly, we get a collection of different files, configuration, and checkpoint parts - here’s the explanation for each of them:
Model Configuration - contains details about the model architecture, layers, activations, sizes, precision, and more. That’s what we see in the grey tab.
Model Weights - models are uploaded in shards for resilient and faster downloads. We see those in the green tab.
Layer Mapping - as the model is uploaded in shards, we need a layer mapping specifying how to reconstruct the entire model, specifying which layer has which weights set from which model shard. That’s what we see in the Red tab.
Tokenizer Config - each LLM comes with its own trained tokenizer, having different sets of special tokens and mappings that the models have learned. We see this in the Purple and Yellow tabs.
Generation Config - this config contains details on inference setup, specifying temperature, token IDs, the context length, sampling and more. We can see this under the Blue tab.
For an in-depth walkthrough on each section, please see this article!
Important
I’m working on a complex, end-to-end AI System that I’ll publish soon, walking you through every possible step out there of designing, building, testing, and deploying a real AI System - not just playgrounds or half-projects.