
A complete tutorial on LitServe/LitApi
Hands-on implementation of a Zero-Shot VLM on LitApi.

In this article, you’ll learn about:
LitServe API for serving AI models
VLMs and the OpenVocabulary Object Detection
Customizing LitServe deployment
Deploying Owl-ViT using LitApi
In this article, we will deploy a VLM (Vision Language Model) for the Open-Vocabulary Object Detection Task using LitServe and LitApi, a new AI Model Serving engine from the creators of PyTorch Lightning.
LitApi is fairly new, thus there are few advanced tutorials on the topic. We’ll aim to explain each component involved so you can replicate and adapt it to specific use cases, as with LitServe we can deploy any Deep Learning model, be it CNN-based or transformers-based, LLMs, or VLM models from HuggingFace.
Finally, we’ll provide code, diagrams, and additional notes and perks that LitServe offers in addition to default FastAPI deployments and other model-serving solutions.
1. What is LitServe?
LitServe is a flexible FastAPI-based serving engine for AI models. Features like batching, streaming, and GPU autoscaling eliminate the need to rebuild a FastAPI server per model.
LitAPI defines the core steps of serving a model: one-time setup, decoding requests, running predictions, and encoding responses.
LitServer handles the infrastructure side of serving models: scaling requests, batching inputs, streaming responses, and managing GPU resources.
FastAPI is a great framework for implementing RESTful APIs. However, it wasn’t specifically designed to handle the complex requirements of serving machine learning models. We could wrap our model inference logic with FastAPI, but scaling and optimizing doesn’t come out of the box, and a higher load will add bottlenecks.

2. What is an Open Vocabulary VLM?
When we use the terms Open Vocabulary or Zero Shot, we refer to the model’s ability to perform a task that it wasn’t specifically fine-tuned for.
In traditional Object Detection using (CNNs), models were trained using supervised learning, where we would have prepared a diverse dataset and annotated each object using a bounding box rectangle, which is costly and time-consuming.
That process made models “atomic” to the configuration and dataset used for training, as every time we would like a new object class to be detected, we would re-train/finetune the model with the new configuration.
In Zero-Shot Learning, models learn each category whether they are “seen” (annotated) or “unseen” through semantic embedding. Visual Language Models (VLMs) pre-trained on large-scale image-text pairs do very well on computer vision tasks such as segmentation, detection, video understanding, scene understanding, etc.
VLMs are composed of transformer-based text encoder and vision-transformer-based image encoder. The text encoder works on text tokens, whereas the image encoder treats patches of images (i.e. squares of NxN pixels) as tokens.
Further, the visual tokens are projected into the text-embedding space and processed as joint-embeddings on top of which the VLM processor applies custom regression and detection network heads.
For a visual representation, see the following image:
3. What we’re deploying?
The model we’re going to deploy is google/owlvit-base-patch32, capable of doing zero-shot, text-conditioned object detection.
The model uses a CLIP backbone with a ViT-B/32 Transformer architecture as an image encoder and uses a masked self-attention Transformer as a text encoder. These encoders are trained to maximize the similarity of (image, text) pairs via a contrastive loss.
The CLIP backbone is trained from scratch and fine-tuned together with the box and class prediction heads with an object detection objective.
4. Implementation
We’re going to start with the prerequisites, sorting out the dependencies required while using astral/uv as the Python package manager.
4.1 Prerequisites
Install and init uv
pip install uv
uv init --name zero-shot-od
Installing and pinning a Python version
uv python install 3.11
uv python pin 3.11
Adding dependencies
uv add transformers litserve pydantic torch python-multipart loguru
4.2 Unpacking the Structure
The model setup is the simplest part, since we’re customizing the server we will:
Optimize the model using torch.compile allowing for multiple execution backends
Define Pydantic Models for the request input and output schemas.
First, I’ll go over each module and explain it in detail, and at the end, I’ll provide the complete code, for simplicity.
Model Optimization Code
import torch
from enum import Enum

class ModelOptimizerBackend(str, Enum):
    """Torch Compile Optimizer Backends"""

    TC_ONNX = "onnxrt"
    TC_INDUCTOR = "inductor"
    TC_CUDA_GRAPHS = "cudagraphs"
    TORCH = "torch"

    @classmethod
    def as_list(cls) -> List[str]:
        return [model_optimizer.value for model_optimizer in cls]

def _apply_model_opts(model, optimizer_backend: str):
    """Just-in-time (JIT) compilling the torch model"""

    match ModelOptimizerBackend(optimizer_backend):
        case ModelOptimizerBackend.TC_ONNX:
            model = torch.compile(model=model, backend="onnxrt")
        case ModelOptimizerBackend.TC_INDUCTOR:
            model = torch.compile(model=model, backend="inductor")
        case ModelOptimizerBackend.TORCH:
            model = model
        case ModelOptimizerBackend.TC_CUDA_GRAPHS:
            model = torch.compile(model=model, backend="cudagraphs")
Defining Pydantic Models for Output Schema
The result of an object-detection task is composed of a numpy array that holds the:
class_id: int = identifier for the predicted class or label name
score: float = value representing the confidence of the model that the detected object is assigned to the predicted class_id
box: np.array[int] = bounding box coordinates, a rectangle of x1y1 (top-left), x2y2 (bottom-right) coordinates
By default, LitApi can’t serialize this type as it’s composed of multiple sub-types (int, float) and most importantly np.array(int) which is not serializable and we need to convert it to a list[int]. Here’s the implementation for that:
from typing import Annotated, List, Union
from pydantic import BaseModel, ConfigDict, PlainSerializer

def nd_array_serializer(array: np.ndarray) -> List[Union[int, float]]:
    return array.tolist()


NumpyAnnotatedType = Annotated[
    np.ndarray,
    PlainSerializer(nd_array_serializer, return_type=List),
]


class ObjectDetectionResults(BaseModel):
    boxes: NumpyAnnotatedType
    scores: NumpyAnnotatedType
    labels: List[str]

    model_config = ConfigDict(arbitrary_types_allowed=True)

    def __dict__(self):
        return {
            "boxes": self.boxes,
            "scores": self.scores,
            "labels": self.labels,
        }
4.3 Server Implementation
The LitApi definition is an ABC (Abstract Base Class) that we need to extend and implement the functionality. The key methods are:
setup - we’ll load our model here, this is called only once, when the server starts.
decode_request - logic to unpack a request coming to the server, called once for every incoming request.
predict - handling model inference, once per request.
batch - custom logic for batching requests, this acts dynamic based on either a max_batch_size, or a batch_timeout threshold.
unbatch - custom logic for unpacking predictions, called once a batch-inference is completed, to unpack the responses.
encode_response - logic to package and return a response to the client, called every time a new output is returned.
Let’s go ahead and implement each method, in the order we’ve described them above.
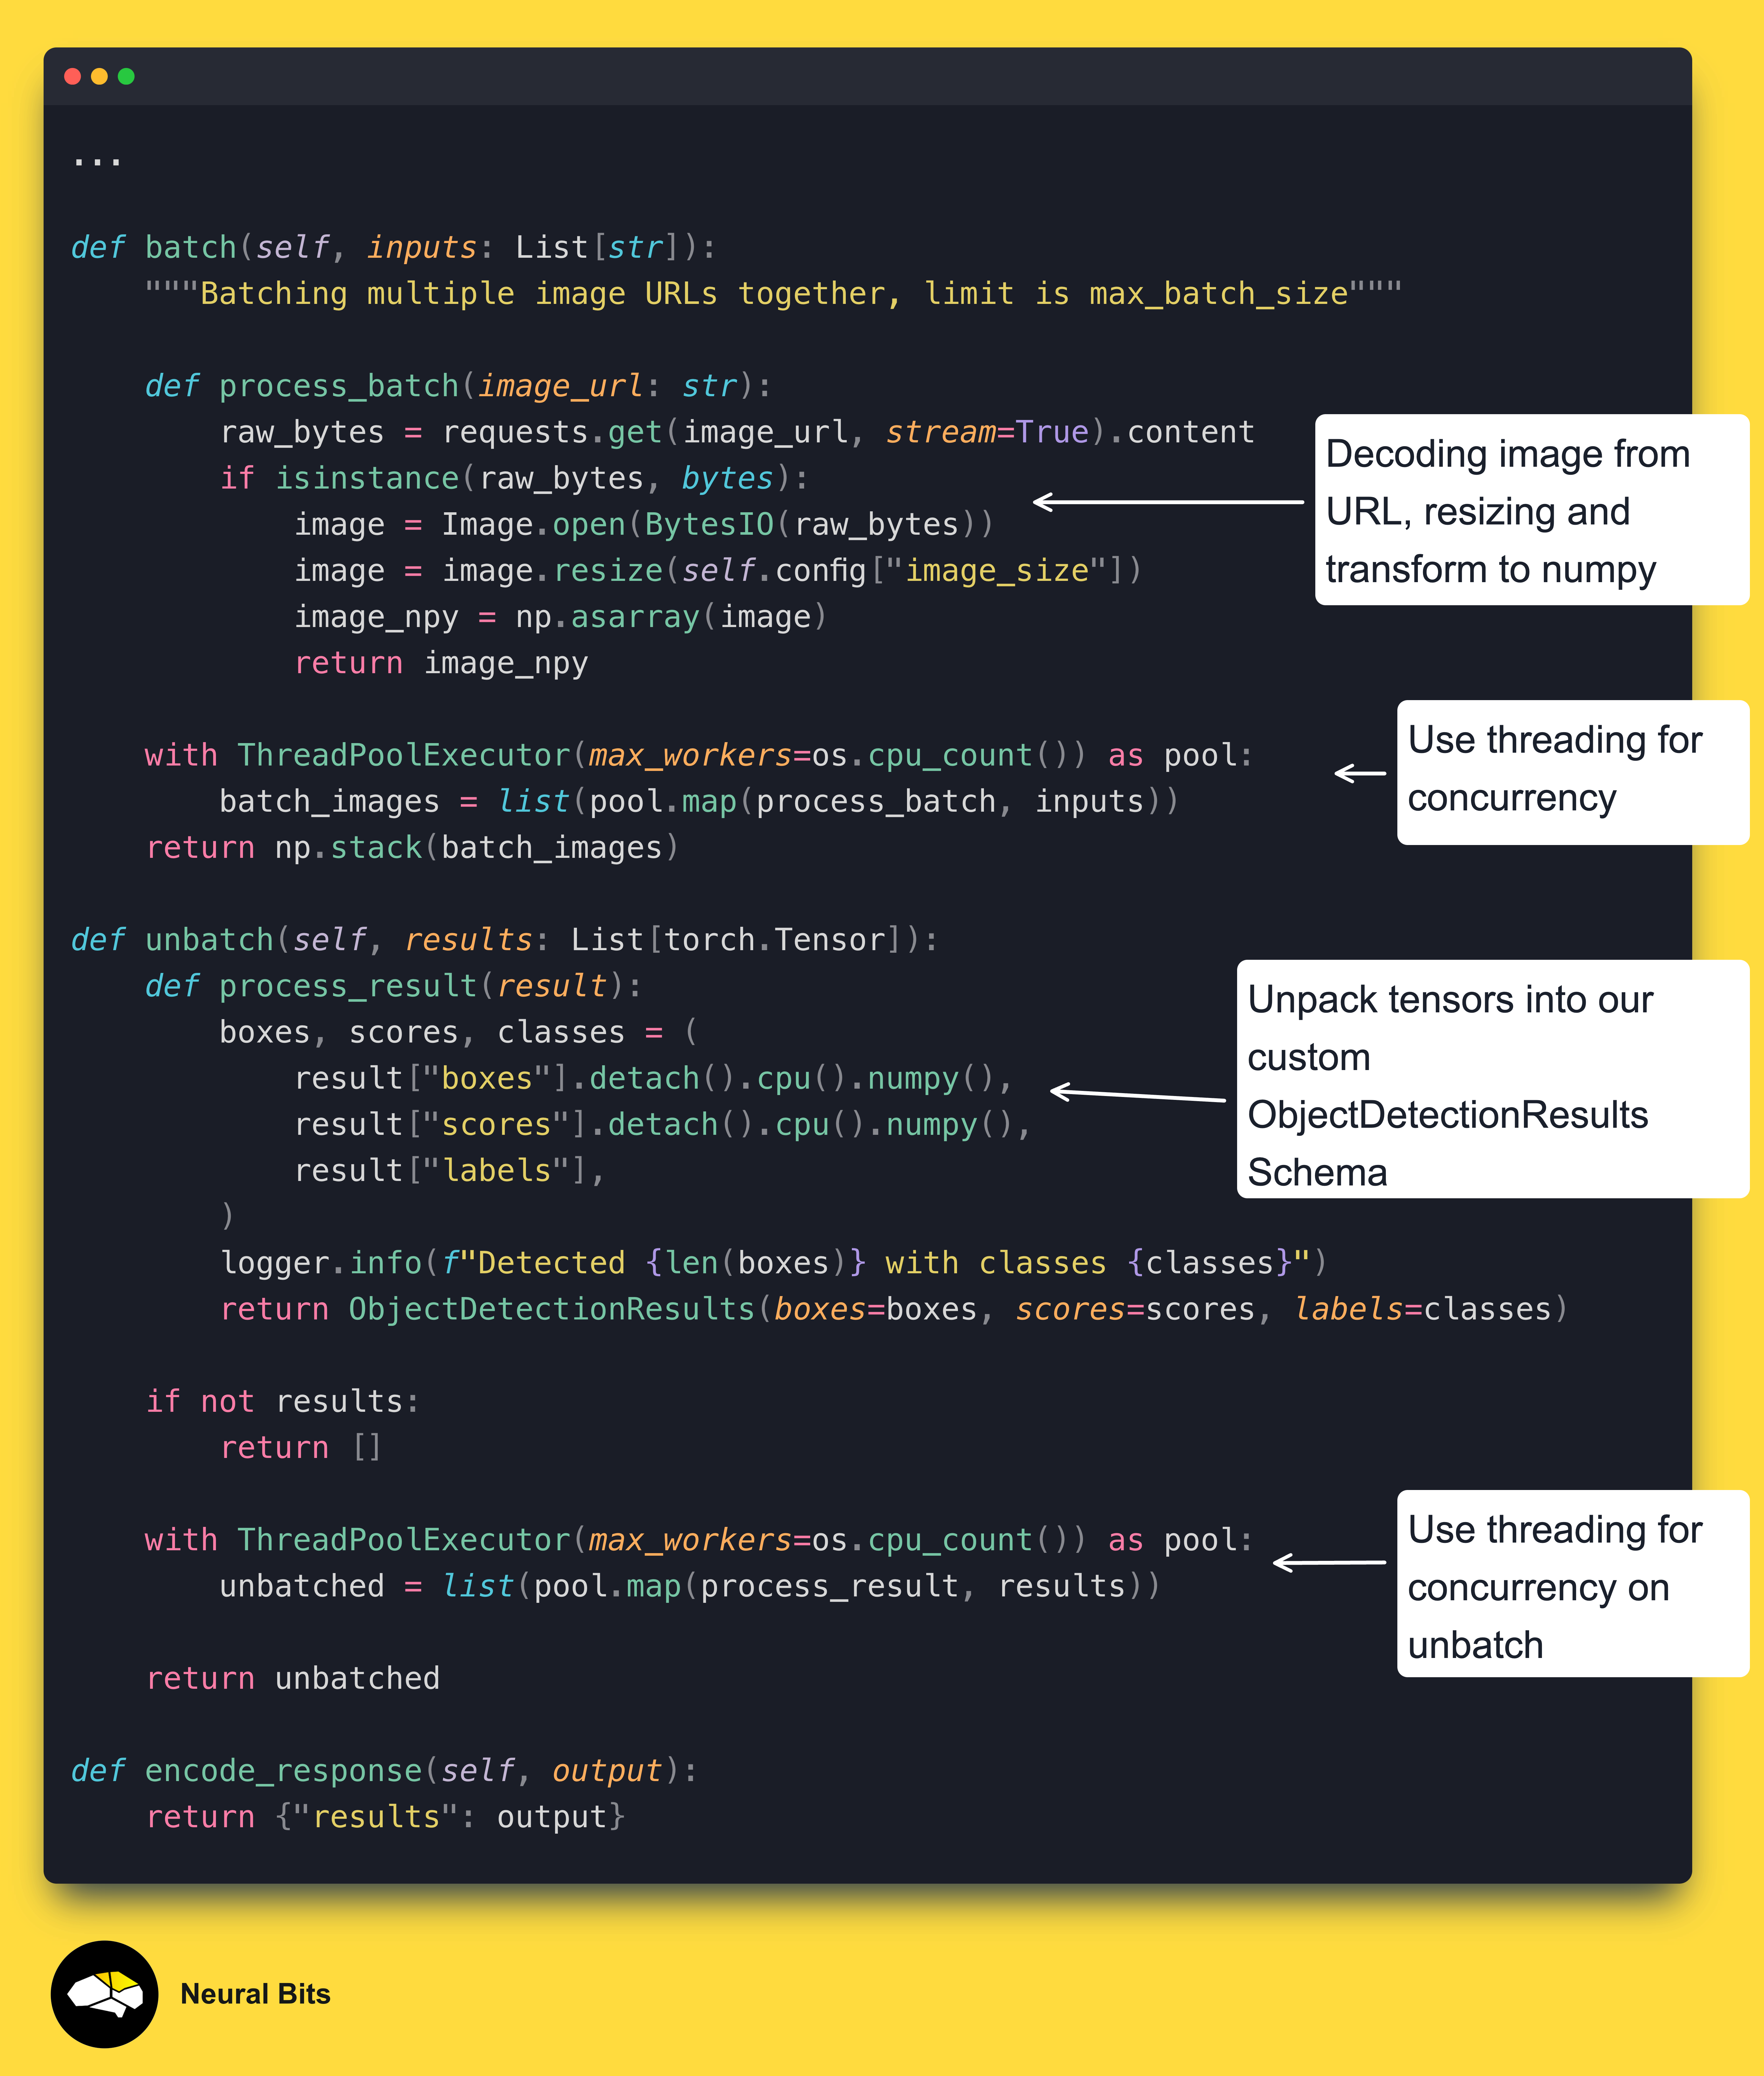
The `setup`, `decode_request` and `predict
The `batch`, `unbatch` and `decode_response`
4.4 Starting the Server
def deploy_ann_server() -> None:
    config = {
      "image_size": [1080, 1920],
      "max_batch_size": 2,
      "batching_timeout_sec" : 1,
      "device": "cuda",
      "optimizer": "torch",
      "ontology" : {
         "a bottle": "bottle",
         "glass bottle" : "bottle",
      }
    }
    srv_name = os.getenv("SERVER_NAME", "PreAnnotationServer")
    srv_port = os.getenv("SERVER_PORT", 8000)
    logger.info(f"Starting {srv_name} on port {srv_port}")

    api = OwlViTModelServer(config=config)
    server = ls.LitServer(api,
                          device=config["device"],
                          max_batch_size=config["max_batch_size"],
                          batch_timeout=config["batching_timeout_sec"])
    server.run(port=srv_port)


if __name__ == "__main__":
    deploy_ann_server()
Litserve is scalable on multiple GPUs, in our example we use a single-gpu-single-process deployment.
For multiple GPUs, you can start the server as:
server = ls.LitServer(api, num_workers=4, devices=[0, 1, 2, 3])In the application config, we’ve specified the new resize target we want for our images, standardizing them before passing through the model, and an ontology mapping.
In the context of prompts and zero-shot object detection, "ontology" refers to a structured representation that defines the relationships between concepts.
In our case, we map the raw prompts such as “a bottle” or “glass bottle” that we pass as inputs to the model to a single class_name = “bottle” which will be assigned to detected objects.
Once the server starts, the model will be downloaded from HuggingFace and cached for future runs. After the model is loaded, we’ll see a few logs and the “Application Started” message which means the server is ready for inference requests.
5. Testing the Deployment
We will use Postman to send inference requests to our server. Since we’ve specified the ontology in the config, we will use the following image for testing:

To send a request to the server, we could have used `curl` but I find Postman easier and user-friendlier to run. If you don’t have it installed, download here.
To configure Postman, select a new POST request, add the <server_url>/predict endpoint and on the request body, add “image_url” as the Key, which is the tag we use in the decode_request method of our server, and the actual image URL as the value.
For simplicity, here’s the image URL:
https://images.pexels.com/photos/1904262/pexels-photo-1904262.jpeg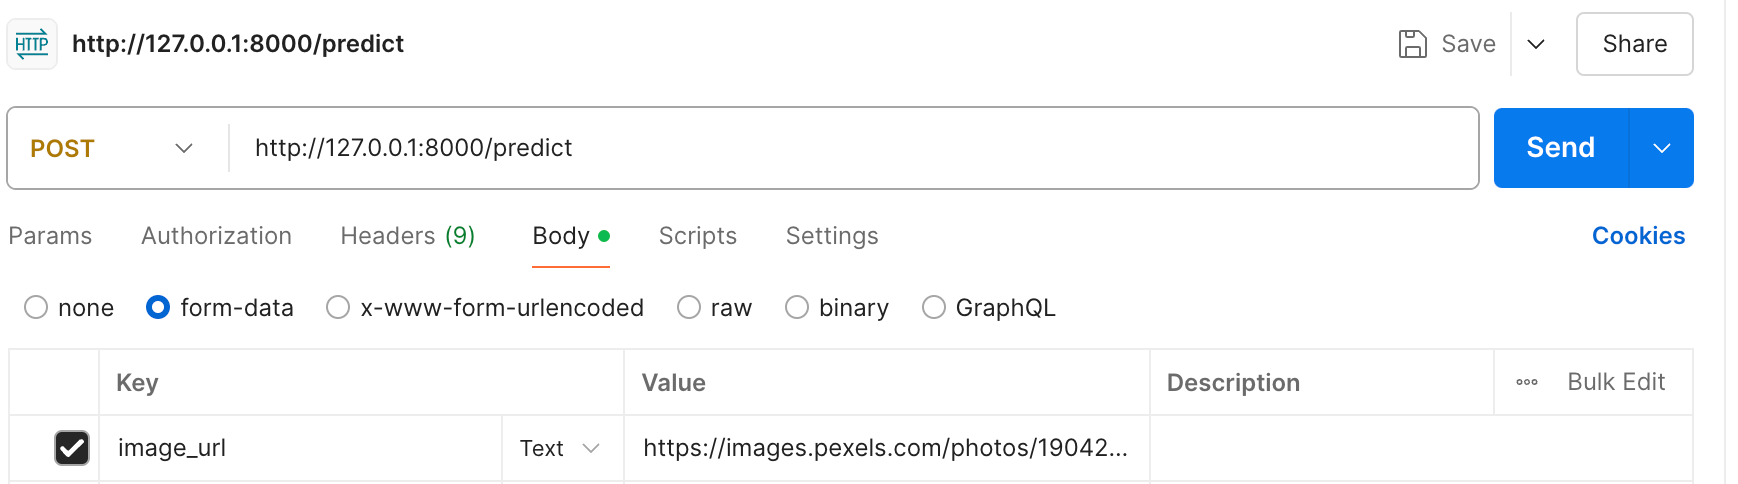
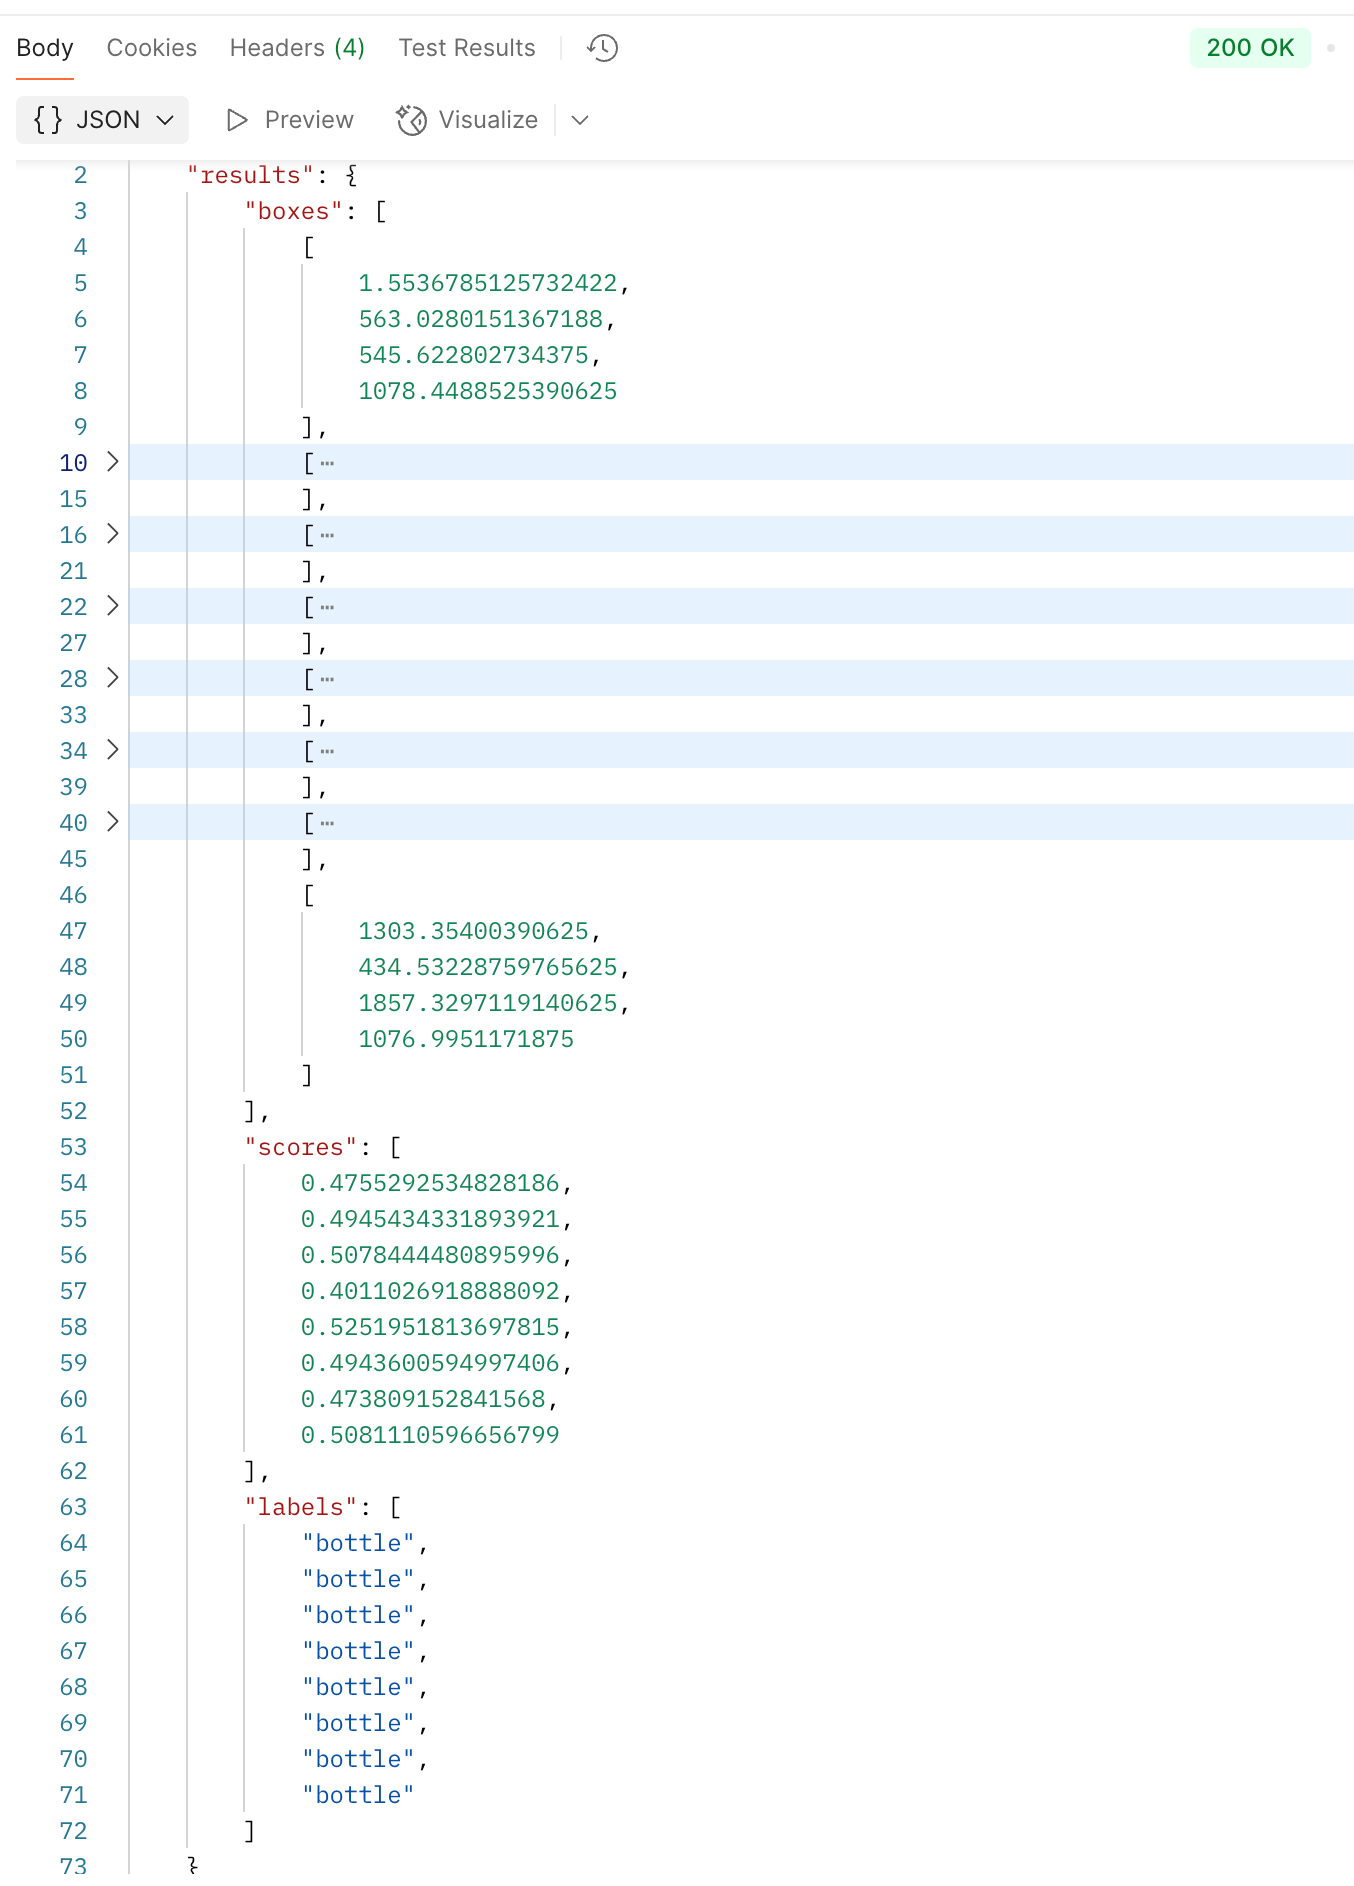
Next, when we send the request, we should get the response as JSON, formatted as we’ve specified in our custom ObjectDetectionResults pydantic schema.
To extend this implementation, you could use any model from HuggingFace by changing the model_tag in setup() and modifying the predict() method accordingly.
Conclusion
In this article, we’ve extended LitApi from Litserve to deploy a Zero-Shot Object Detection model. The setup is customizable, as one could change this to any VLM model, and increase the throughput by customizing the batch/unbatch methods or scaling it to multiple workers / multiple GPUs.
References
Lightning AI. (2023). Lightning AI. https://lightning.ai/docs/litserve/features/batching
Lightning AI. (2023). Lightning AI. https://lightning.ai/docs/litserve/api-reference/litapi
OWL-ViT. (2017). Huggingface.co. https://huggingface.co/docs/transformers/en/model_doc/owlvit
charliermarsh. (2025). Astral Docs. Astral.sh. https://docs.astral.sh/uv/
this is amazing Alex!! I can't wait to try this man